10.01.15
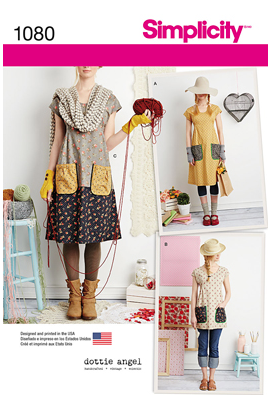
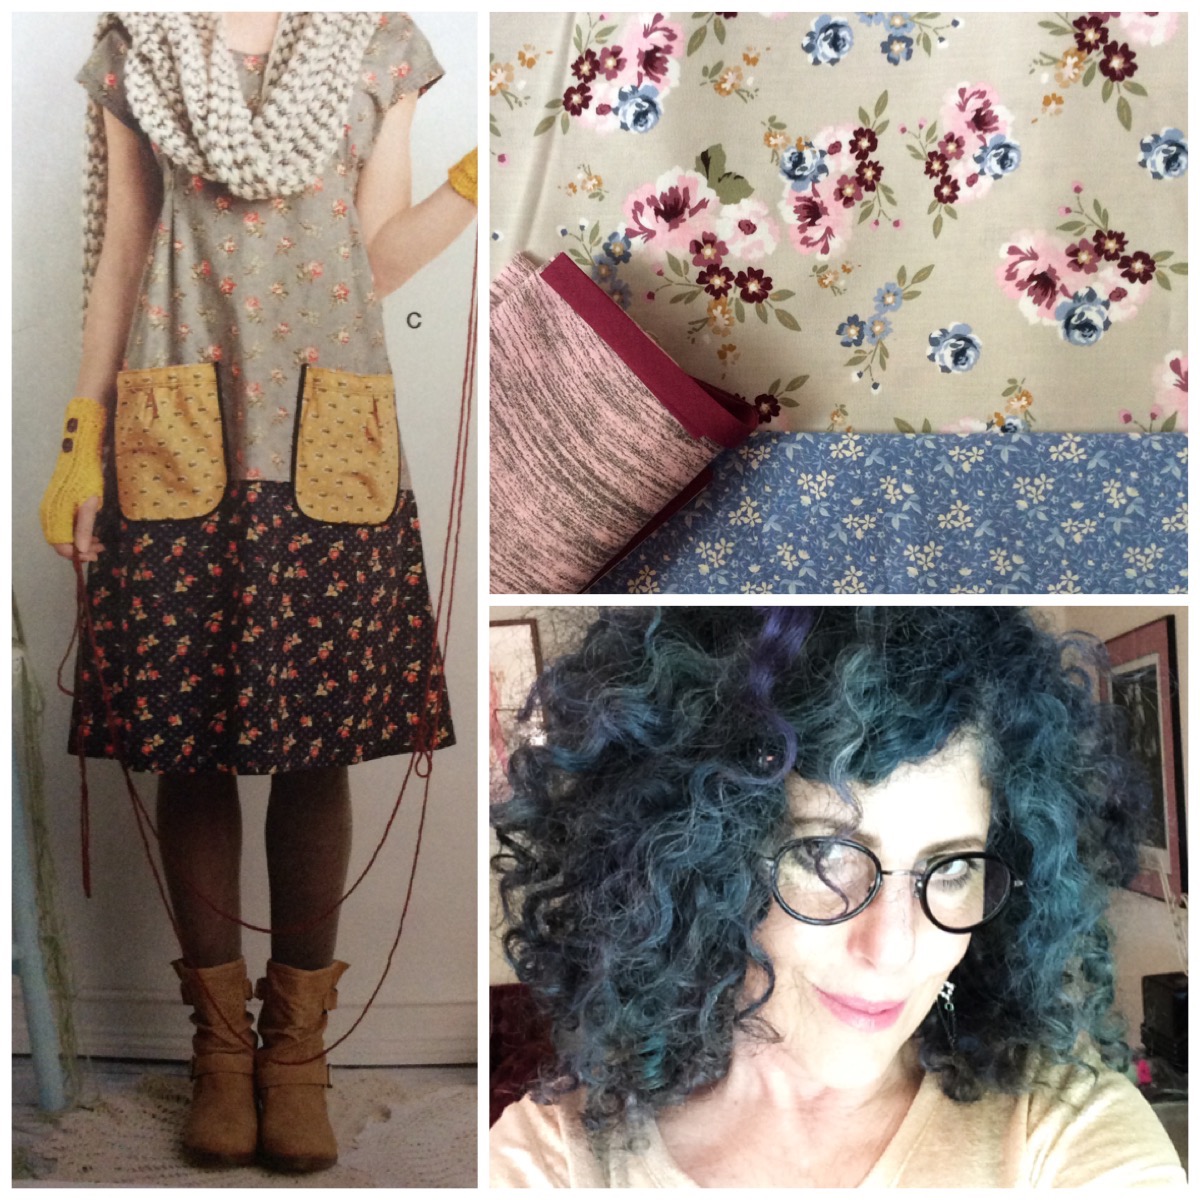
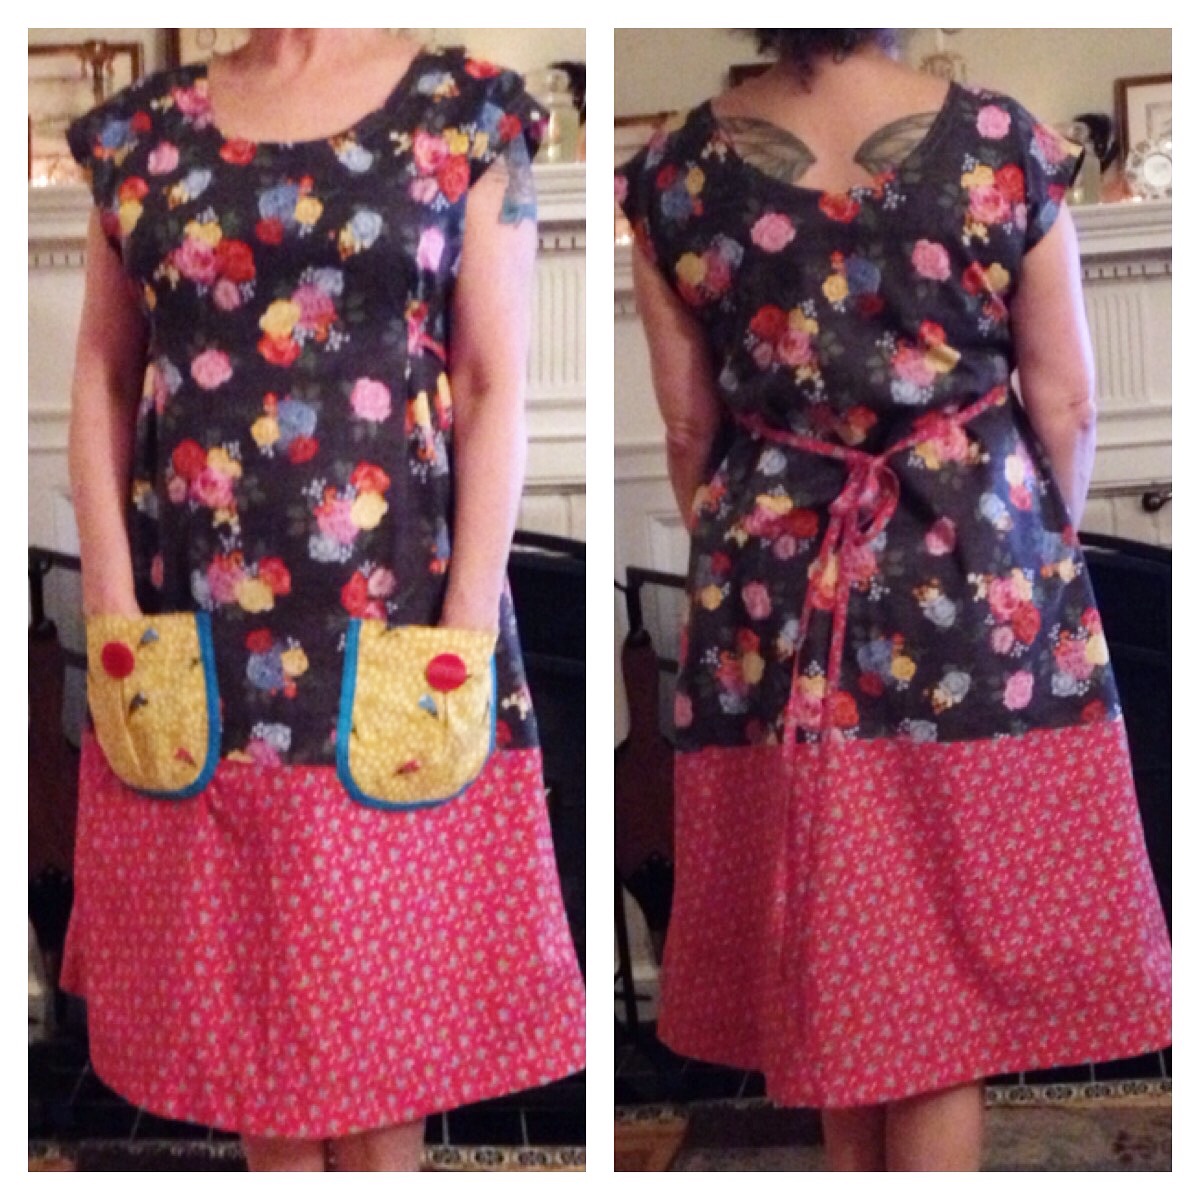
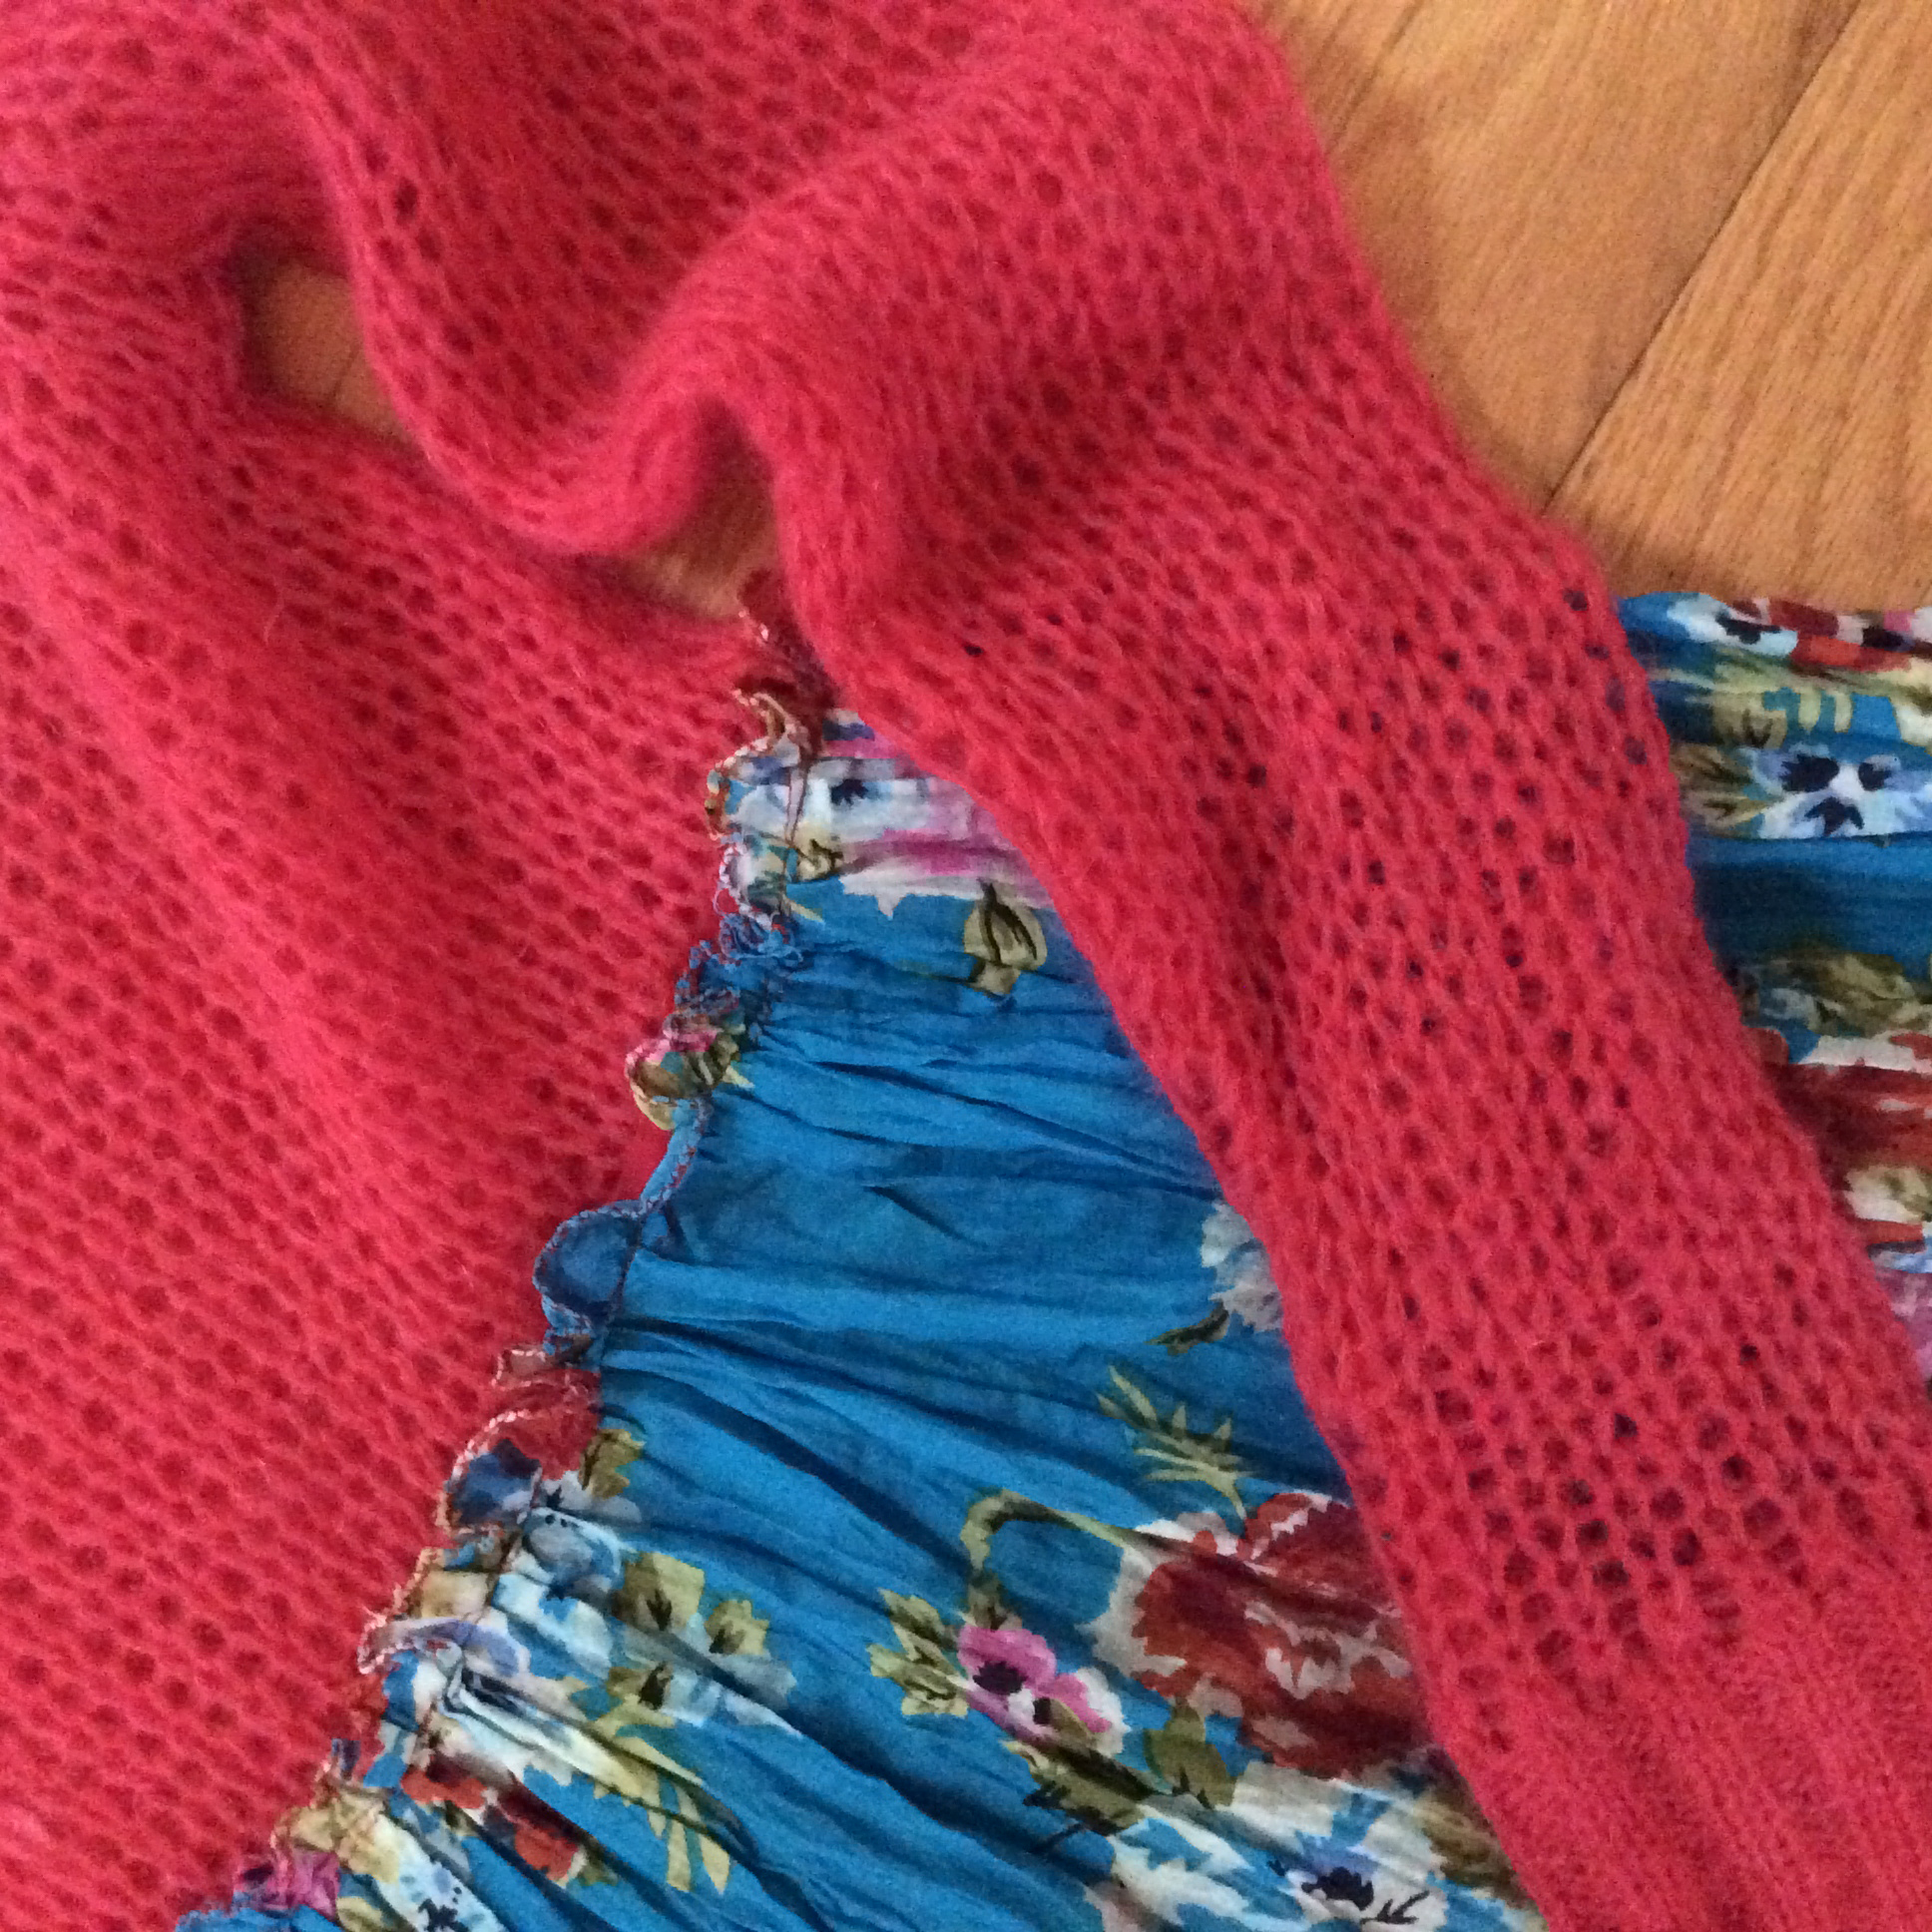
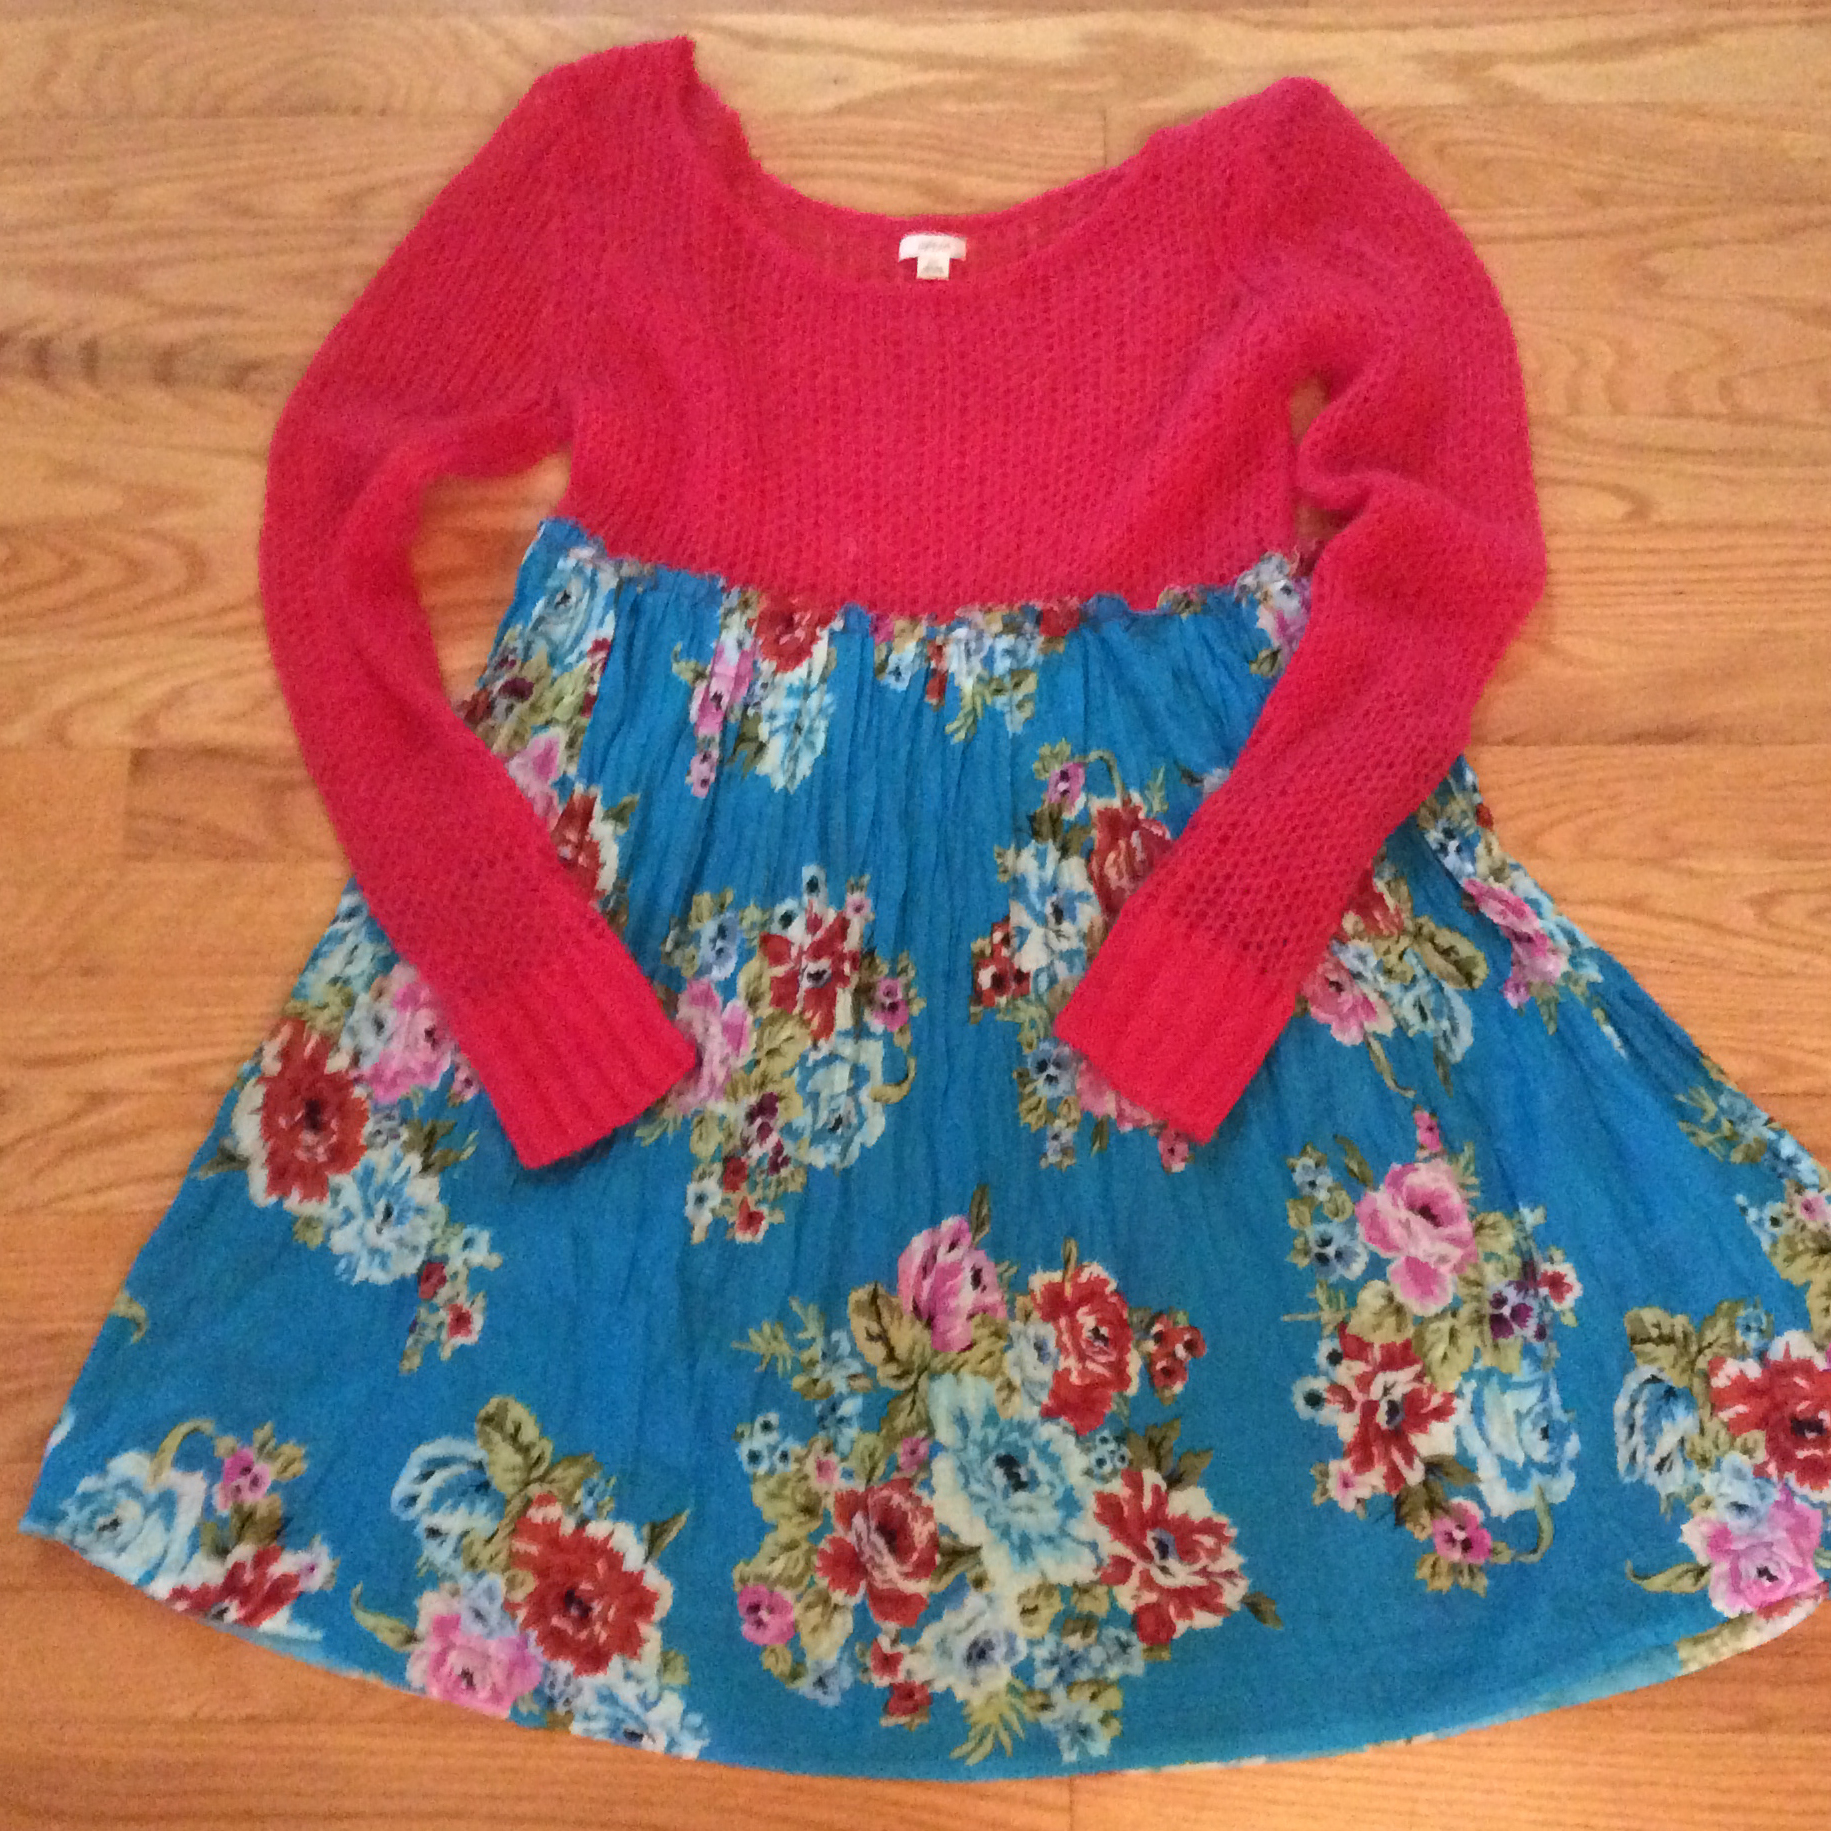
You read it here first: Simplicity Pattern 1080, The Dottie Angel Frock (DAF for short), released earlier in 2015, is fast becoming a cult classic in the world of crafts and sewing. This is a pattern that will live for decades, and will one day be out of print, collectible, and highly valued on the resale market. Trust me. In otherwords, run, do not walk to your local fabric emporium and grab at LEAST one copy. Note, you are going to fall in love with and want to make a wardrobe full of these frocks and for that reason you might want to pick up a second copy or trace your first. No local shops? Visit the Simplicity site. BTW, the pattern makes 3 versions… my posts will be about version C, the most complex and delicious in my opinion.
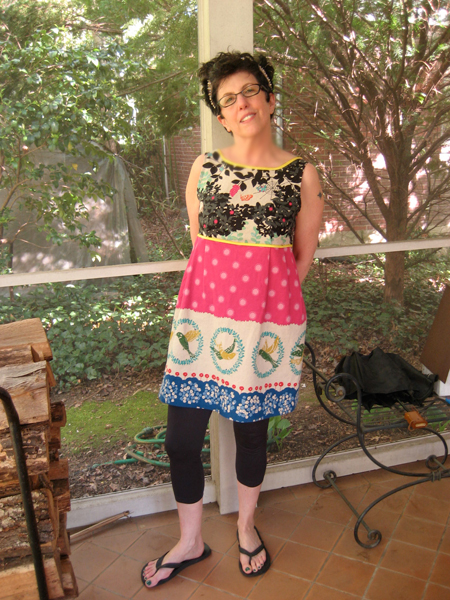
Let me get this out of the way: I am a NOVICE sewing person. Making this dress was my first attempt at a commercial pattern from any of the Big 4 (Simplicity, McCalls, Burda, Vogue). I have been “sewing” for many years, but in the most punk-rock ad-hoc way imaginable. I did not know how to lay out, mark, or cut a pattern, let alone read and follow the often-obtuse instructions. I thrift, reconstruct, make stuff up as I go along. Some things turn out wearable, and that has been due to the fact that I have a great sense of style and design and color and can fake my way through by playing to my strengths and ignoring my weaknesses (pretty much everything to do with actual sewing). Pictured below is a 4-piece dress I had a lot of fun with years ago, the Piece of Cake Dress. It is a super sweet indie pattern available here, and quite simple. I made at least 5 of them. Good practice sewing, but did not prepare me for a commercial pattern attempt. It did give me some bias binding experience, more on that later. And yes, that’s me with supah short hair.
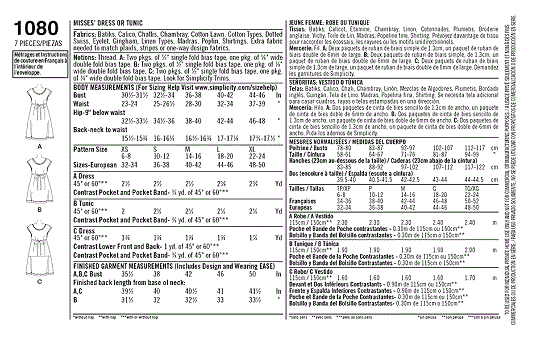
So, with its scant handful of pattern pieces (6 for version C), and finished results TO DIE FOR, this pattern finally inspired me to suck up all my fears and learn how to sew by the rules. I can’t be the only one. And, that’s why I’m here writing. If you want to read the musings of MUCH more experienced sewists about the DAF (and I recommend that you do even if for now you have no idea WTF they are talking about), just google and you’ll find those blog posts/pattern reviews. This is not a review. My review of this pattern is (pardonnez moi): fucking brilliant. Yes, there will be a few caveats, and this is about my experience getting through some complexities. But look at the pattern designer’s creations pictured below. I mean, just LOOK at those dresses! You know you want one. You will find out that you want 6. Or perhaps a baker’s dozen.
Briefest backstory. Dottie Angel is the crafty granny-chic alter-ego of blogger, Tif Fussell. She is, in a word, also brilliant. In a few more words, she is an adorable petite-looking powerhouse of creativity and technique… she thrifts and collects and curates… she sews, knits, embroiders, makes gorgeous photos, publishes books… she blogged for many years, is raising a bunch of kids, and seems to be the sort of dear lovely person you want as a best friend, mentor, sister. Yes, she’s all that. And she makes it look completely effortless. Which, of course, it–whatever it is–is not.
And that brings us back to this dress pattern (me and my little textile study for DAF #1, pictured above). Now, I have bought patterns before, opened up the folded moth’s-wing-thin tissues and instructions that appear written in a language I do not speak, and ended up in puddle of frustrated tears at the mere thought of getting started. Sewing from patterns is… a thing. So–and you may not like this–my recommendation to you: Learn how to use your machine a bit, then take a good basic class on working with patterns. I honestly don’t think you can learn the basics without SEEING them demonstrated (online courses are becoming big, I have my doubts, at least for me). I booked private sessions ($45 per hr, reasonable as these things go) with Jen Biehl at Bits of Thread Studio here in DC, working with her on two successive weekends for 1.5 hrs each time. Jen was kind, fun, great. We were focused. We worked hard. I was nervous and anxious. But after 3 hours (and some youtubing at home), I was able to carry on and complete my first DAF. Highly recommend Bits of Thread… lovely place.
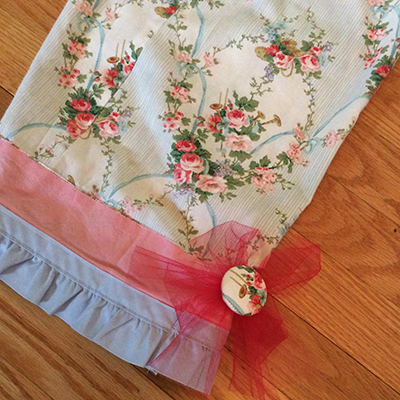
And while it wasn’t a complete tragedy (cute fabrics!), it turned out to be too big. I am 5’1″ (petite), a curvy 122 lbs, with a 38″ bust. My teacher Jen and I both thought size M looked right, but I was, as pictured below, swimming in the thing. When my boyfriend uttered the “m-word” (matronly… GASP!) I stopped short of hemming the dress, which was all that was left to do, settled myself down, and began anew. The story has a happy ending, I promise.
In retrospect, and to be fair to Tif and Simplicity, the pattern sizing CLEARLY shows that I should have made a size Small. So remember, go by the FINISHED bust measurement (bust is the only fitted spot on the garment, really), which for M is 42″. That is 4″ bigger than my bust… and it was just that… huge-mongous. It was big everywhere… through the middle and hips, hanging off my shoulders… droopy length. Not attractive. This is why making a muslin is advised with sewing from patterns, always. A muslin being a test-garment created from inexpensive fabric (could even be an old sheet), so that you don’t cut into more expensive textiles.
I decided to make a “wearable muslin” which of course turned out not to be so wearable, at least by me. And I think, for any new patterns I try, that I will make a muslin. While it’s true that you will pour some long hours into something you won’t wear, there’s an alleviation of pressure that I think offsets this. And I realized something important: YOU DON’T HAVE TO FINISH a muslin. In fact, there are probably steps in the pattern you can even skip on your way to figuring out if the fit is right. I would not, for example, bother stay-stitching the neckline of the DAF on a muslin. NOT necessary. I would not FINISH seams properly as French or bias-covered or even overlocked (don’t let those words scare you but maybe do look them up), I would only pay attention to seam ALLOWANCE.
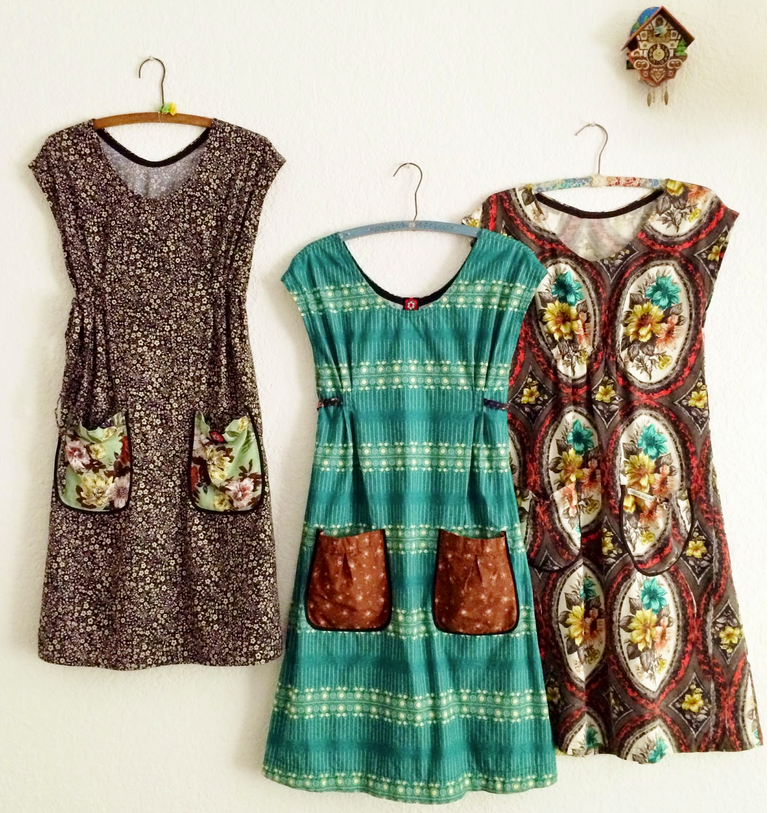
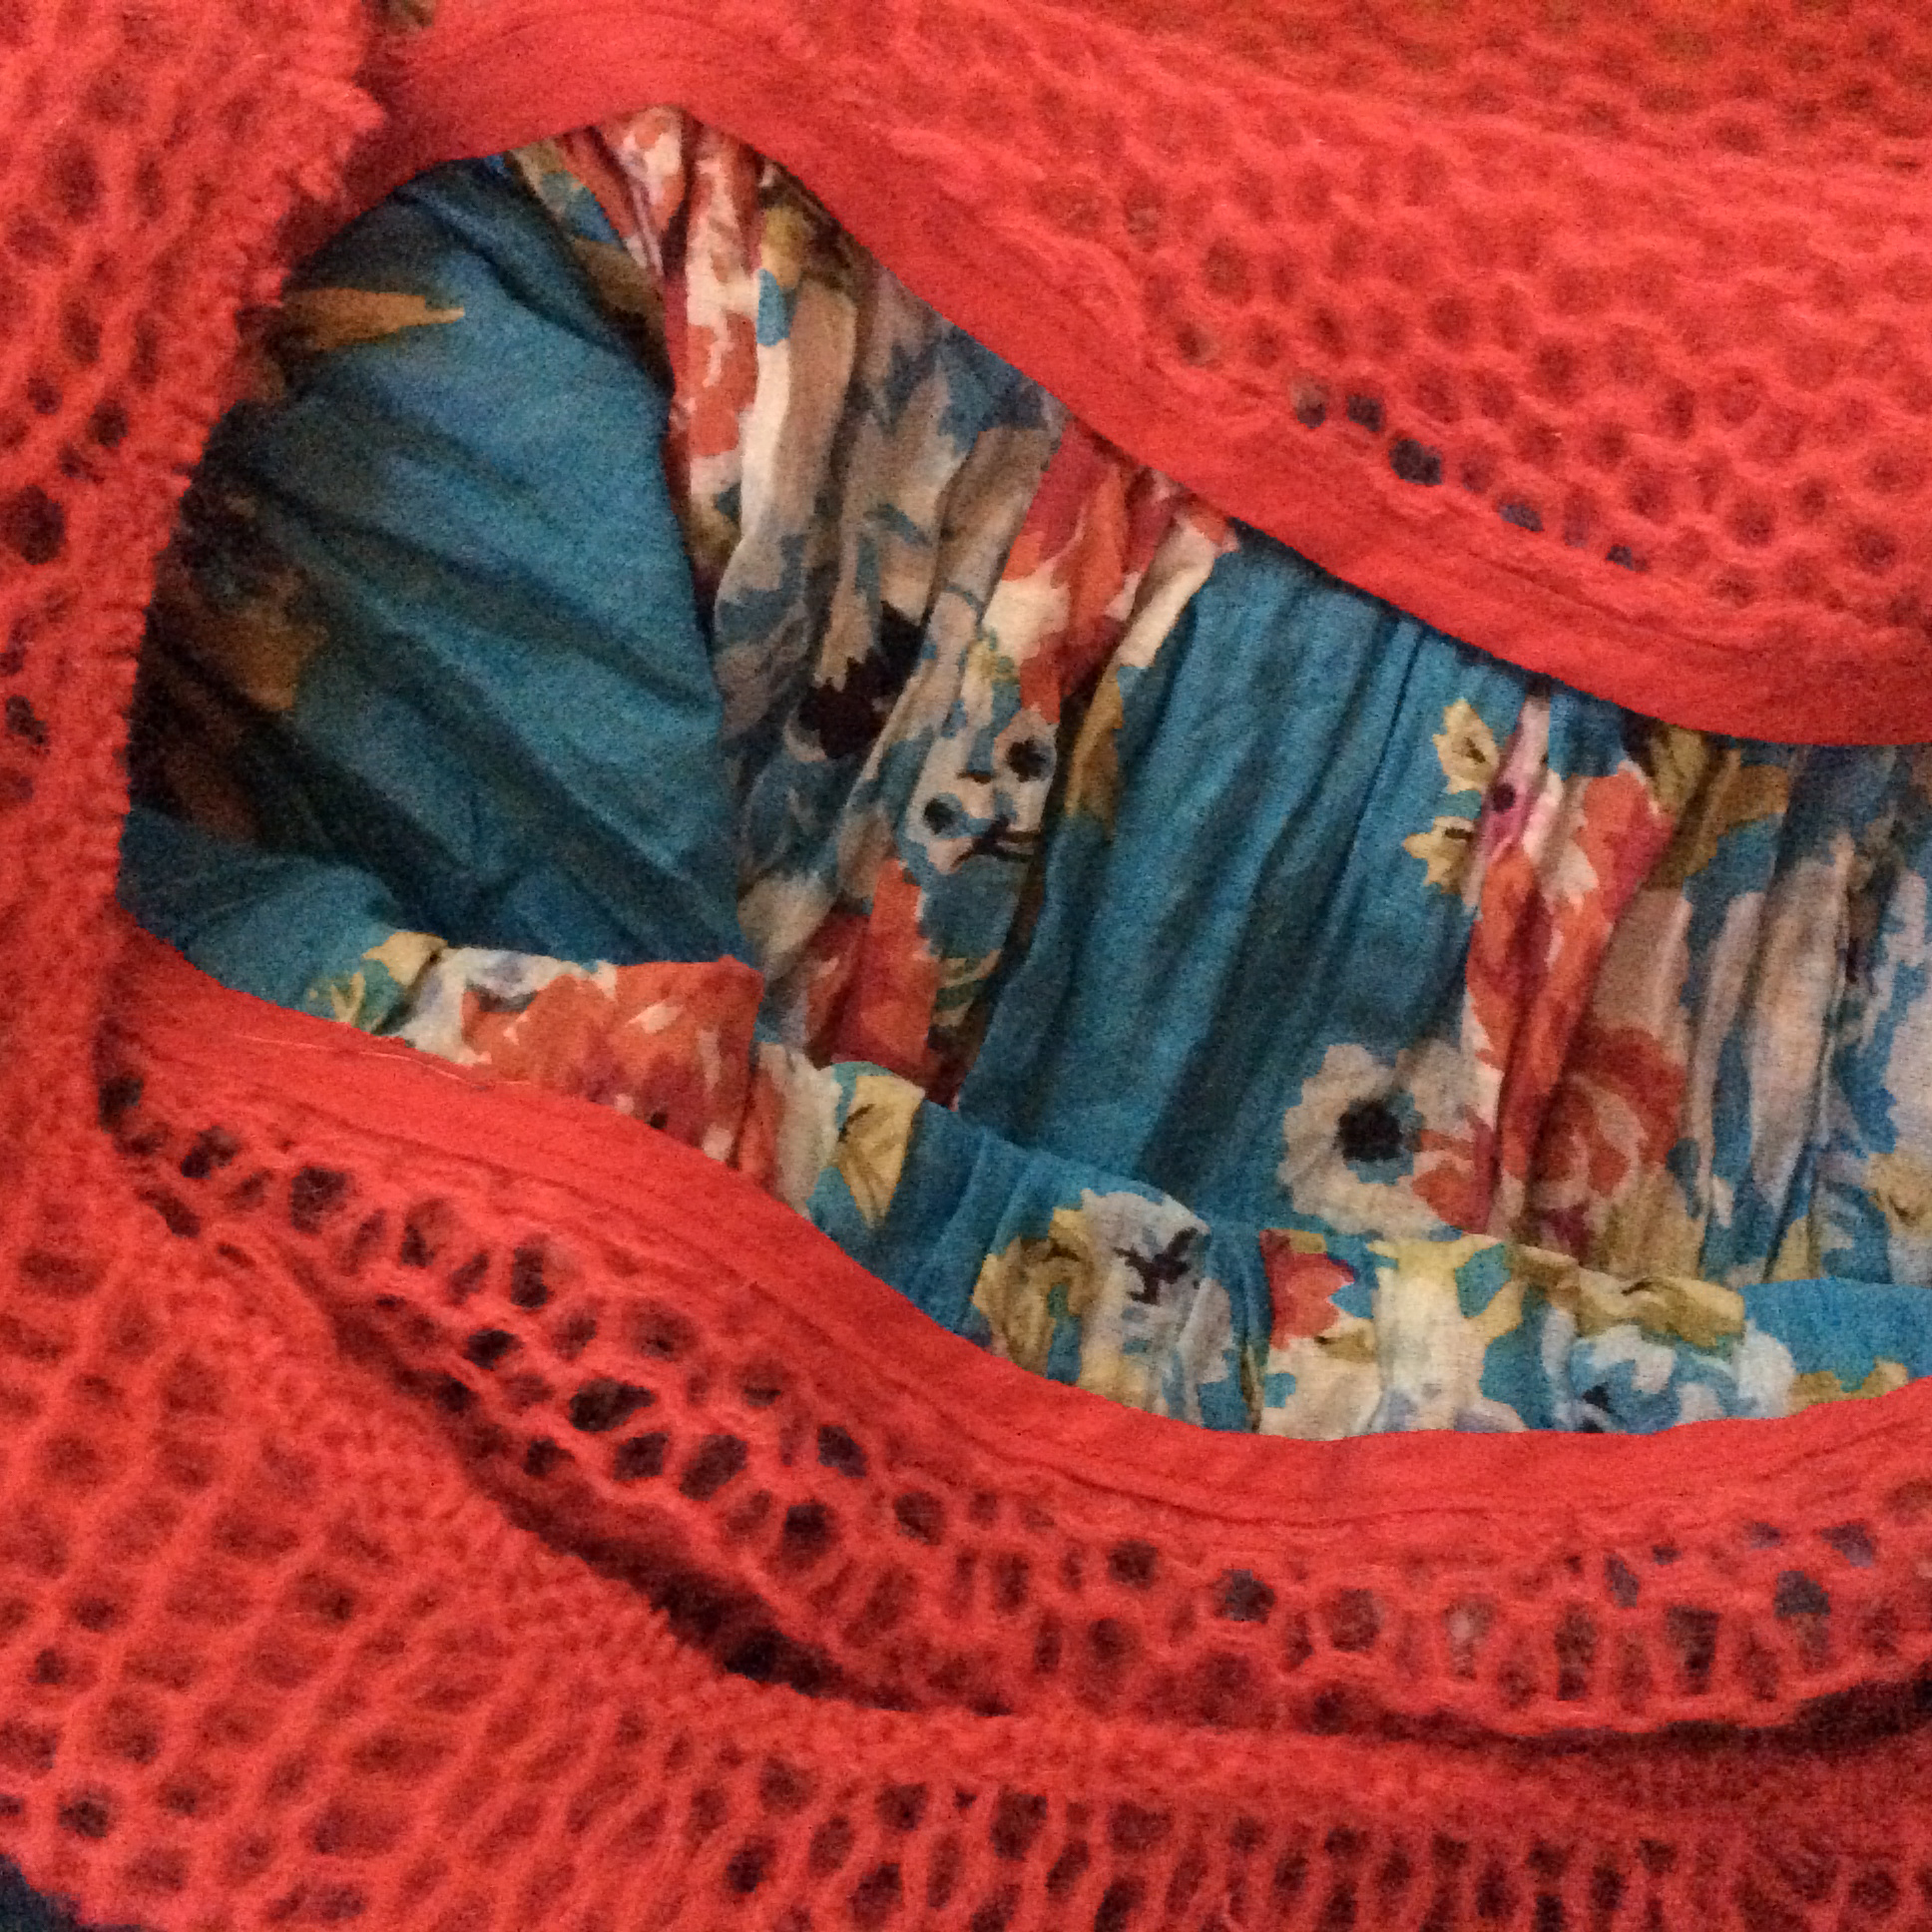
In other words, I might only do the steps necessary to determine fit, much of which I might be able to be complete in a few hours on a simple dress like DAF. Some fit issues will become apparent just by pinning, without even sewing. I was not experienced enough to make the judgement even though I pinned and tried on the garment like 50 times. Looking back, I could have recut the first dress down to a small had I stopped early enough, but I was really sort of unWILLING to admit it was too big. I thought I was too far in. As pictured below, I was choosing vintage buttons and dreaming about my vintage slip poking out the bottom. I was heavily invested so I pressed on. The good thing about this is that I got in a TON of practice before starting my second dress and because of that the second dress went faster, better, and I solved some key problems the second time around.
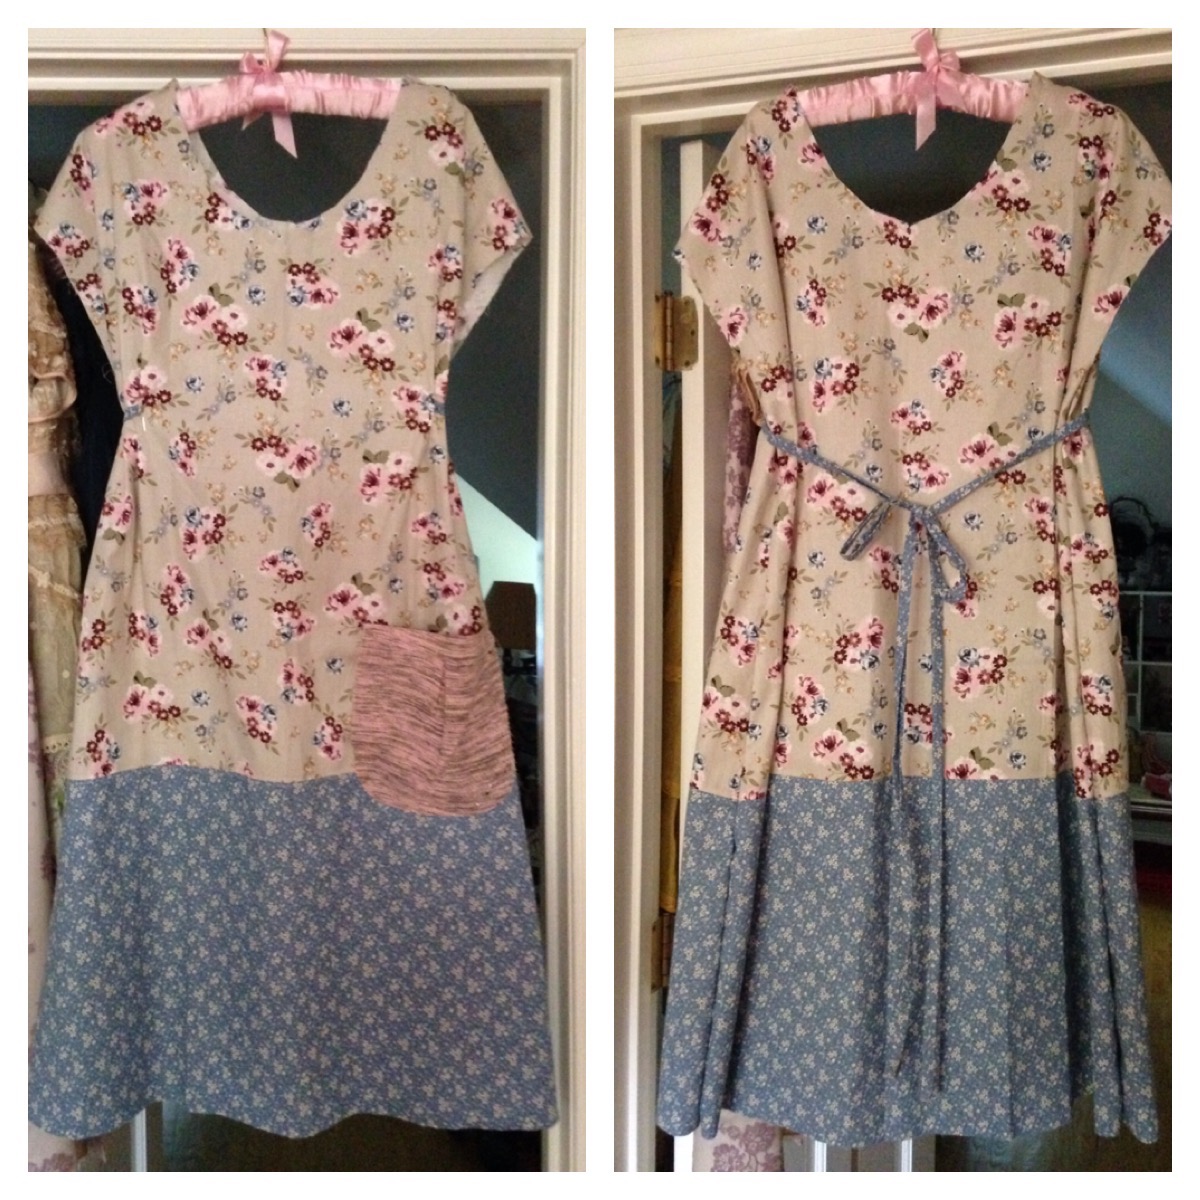
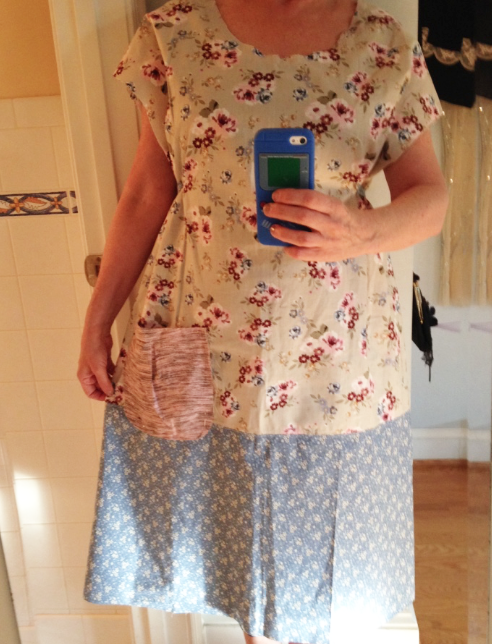
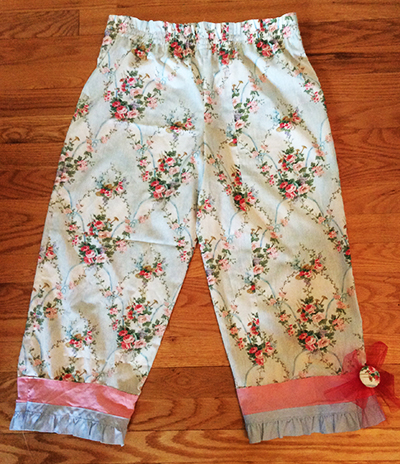
The upshot is that the size small, which I just completed on my DAF #2, is perfect for me with one tiny alteration to the pattern. I thought it might be too tight through the bust, but it is perfect. The only change I made was to lower the bust tucks and by only a quarter inch. Perfect. I will write more about this in the next post.
I wish I could help if you feel that the pattern requires more modification than something simple, but I am simply (haha) not there on my sewing journey. If you think you are really between sizes, go bigger first. Then consult someone experienced about how and where you might make changes so that you are not swimming in it. You can not wear a garment that is pulling across your bust or hiked up under your armpits. You might well be able to alter a garment down that is too big. Or give it to a friend.
Also, get out there on the internet and do some research. There are lots and lots of photos of women wearing their first (and some second) DAFs at this point in the life of this pattern, especially on Instagram #dottieangelfrock. Some of these dresses look (to me) to be too tight in the bust and that the bust tucks are too high (which people have been complaining about and I will address later). Also study the image on the cover of the pattern without judging yourself against it; she is a MODEL. I do not have the long, lean body type of this young woman (and neither, I bet do you), but look at how the garment DRAPES or falls. It is fitted because of the back tie and the front tucks, everything else is fairly soft. Drape is the important thing you are seeking to recreate with the DAF. This garment should have a somewhat loose, relaxed fit with a cute bustline and flattering high waist. Not too loose, but casual, comfortable, with room to move about. You should be able to pick apples in this dress, feed your toddler, go out to lunch with a girlfriend. And your significant other should not utter the word “matronly.” If made in the right size, this dress will be comfy on a hot humid summer day in swampy DC, or cozy with a bulky sweater and boots in the dead of winter months.
Let’s get back to size. I do not, as yet, fully understand pattern sizes. I do know this: The system apparently has not changed much over many decades (unlike clothing sizes). I can’t figure out what my pattern size is; I’m sure I will know more about this as I buy and make a few more patterns. Another thing for certain: Pattern sizes have nothing do with clothing sizes. I am generally a 6-8 in clothing, and I think my pattern size might be 12-14. So there you go. Simplicity has chosen to go with a simplified xs-xl sizing for the DAF. Let me say this again ladies: Pick your size by the FINISHED bust size. Hopefully it will work out and/or get you close to a good fit.
Last bit of advice for this first post about sizing. Do NOT get hung up on size! If Simplicity calls you an XL, and you think you are a M… try not to take it personally! Because it’s not personal! Look, I am everything from a size 4 to a size 10 in clothing. I am NOT exaggerating. I am an XL at H&M and I’m a petite size 4 at Ann Taylor Loft. This is a fact of marketing, not a judgement about your body. And I’m going to get real bold and say this: I believe that Simplicity Pattern 1080, a truly brilliant gem, can look fantastically lovely and flattering on a WIDE variety of body sizes and types… from darling sweet scrawny chickens to big beautiful brawny babes. Love yourself, and make a dress that fits and compliments your shape no matter what size anyone is calling it. The DAF, I think, really can work for almost everyone. You might need to make two to find out, but as you will see in my next posts… there is SO MUCH really fun stuff to learn by making this dress, you will only improve a myriad of techniques, and each dress will likely surpass the last in many ways.
I’m on instagram now with lots more pix there, though you’ll have to put up with myriad kitty photos.
Subject: Blog, Craft | 979 Comments »
03.30.15
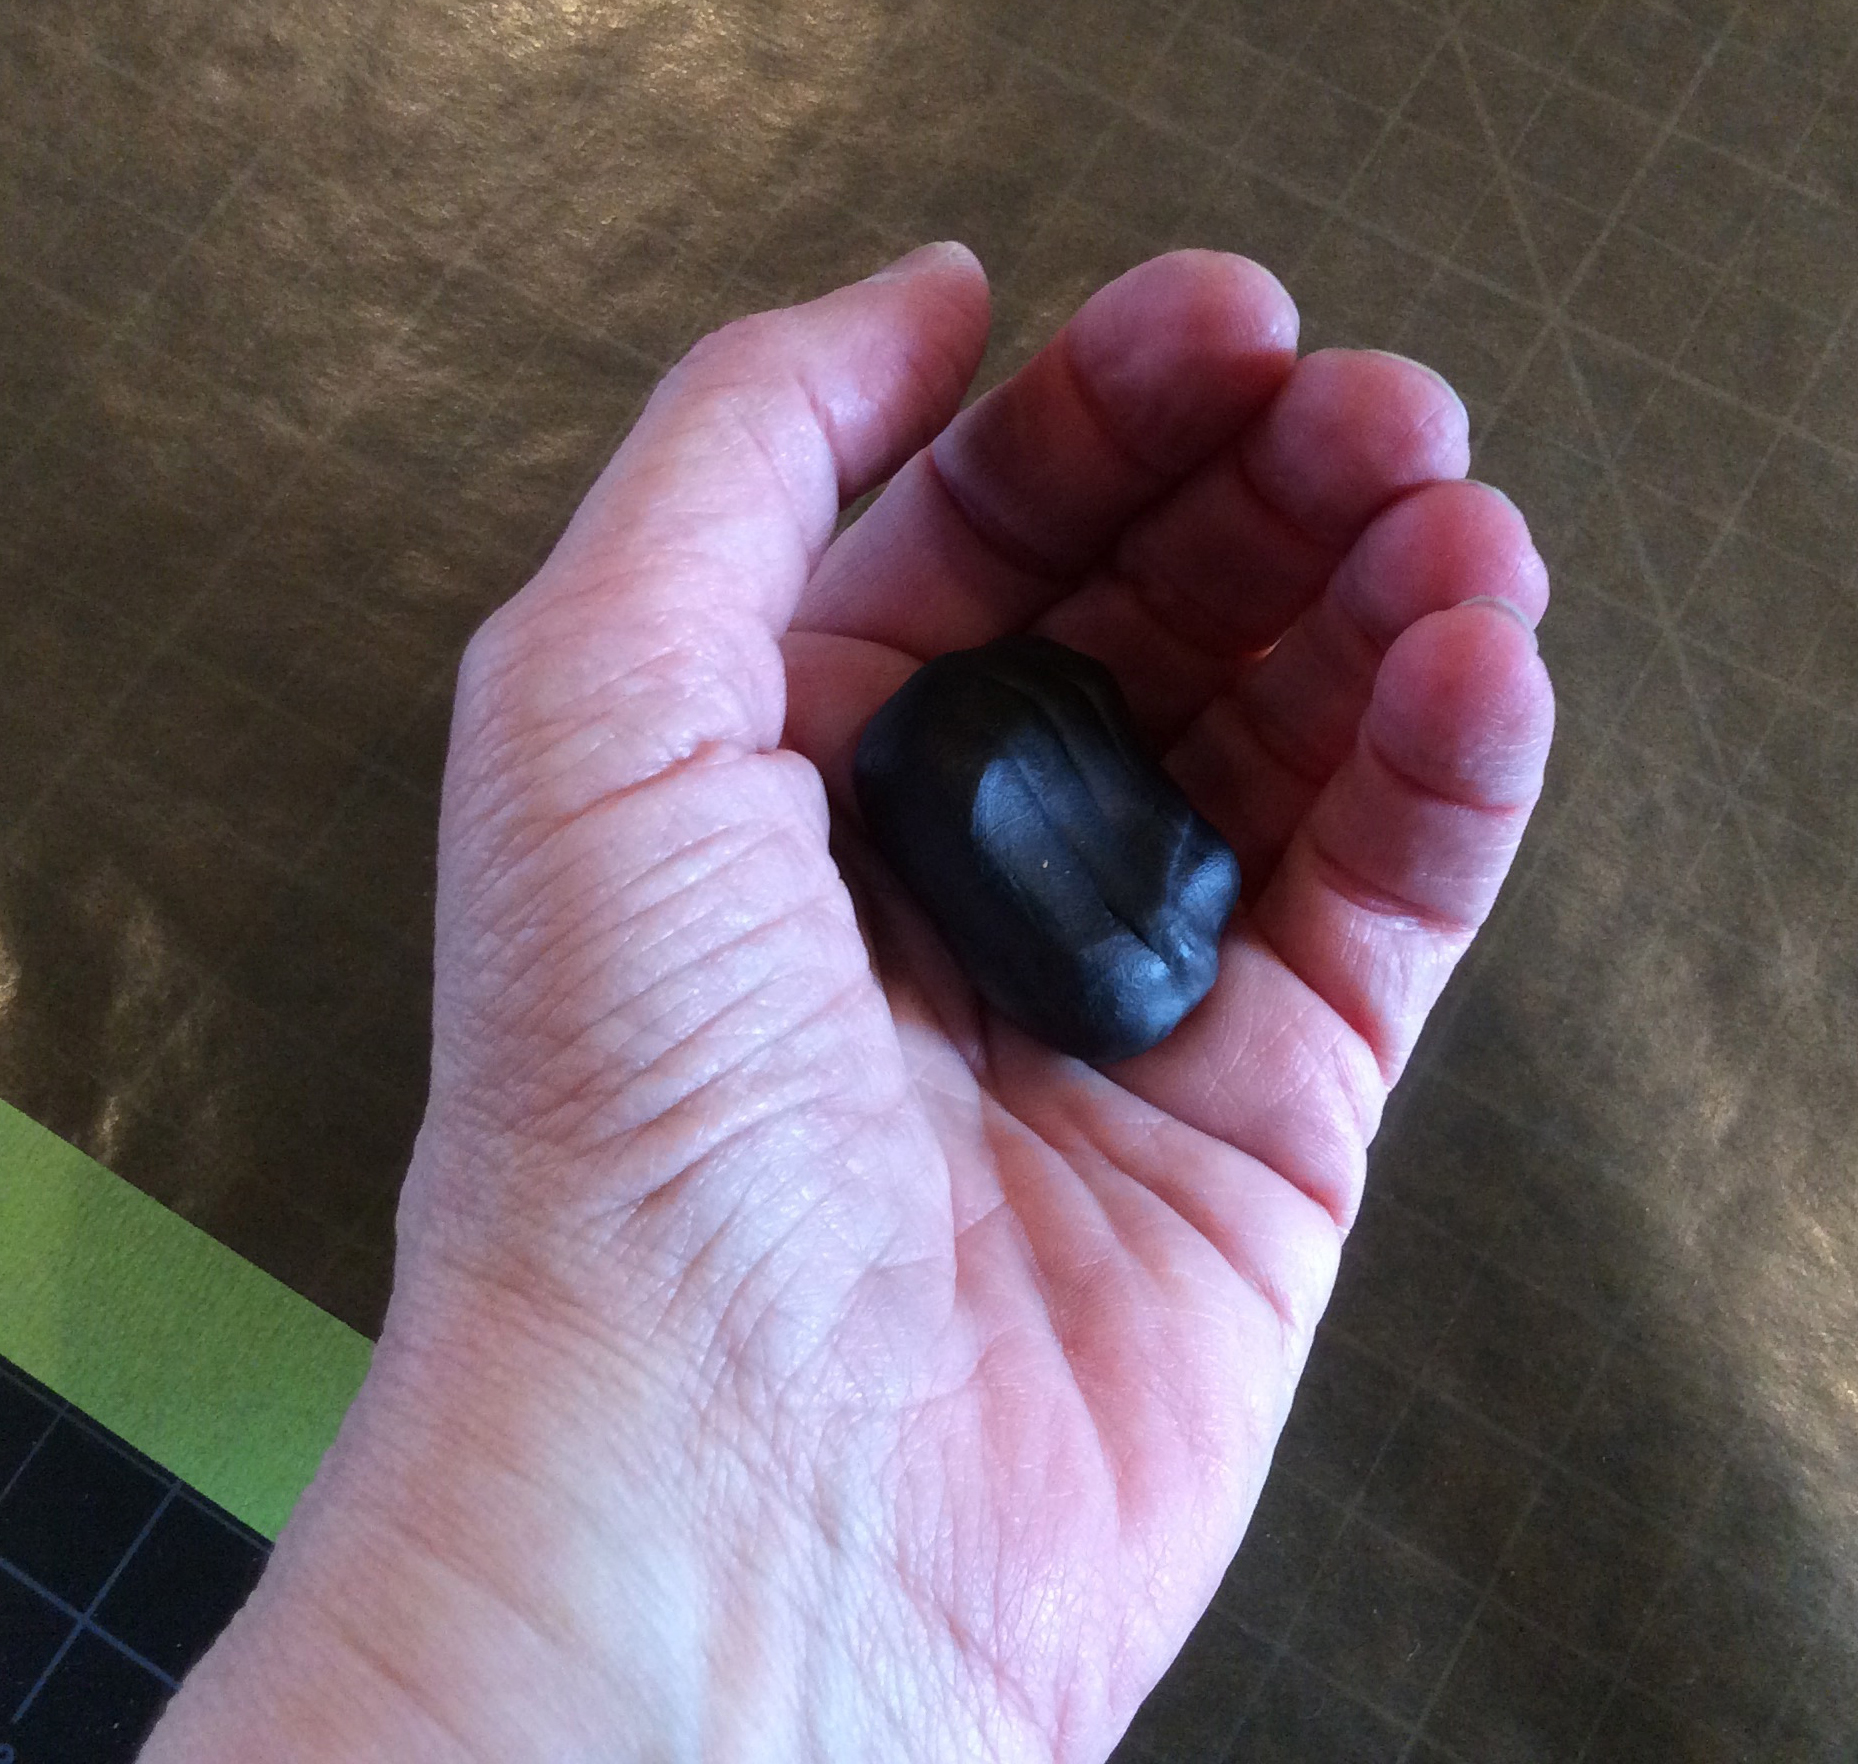
Really immersing myself in working with clay again; learning so much from scouring the internet, but also by fearless experimentation. A recent lesson: One of the addictions of clay is an undeniable therapeutic benefit to holding something squishy in one’s hands, something that softens with one’s own body heat, something that starts out as an ugly lump and becomes anything and everything!
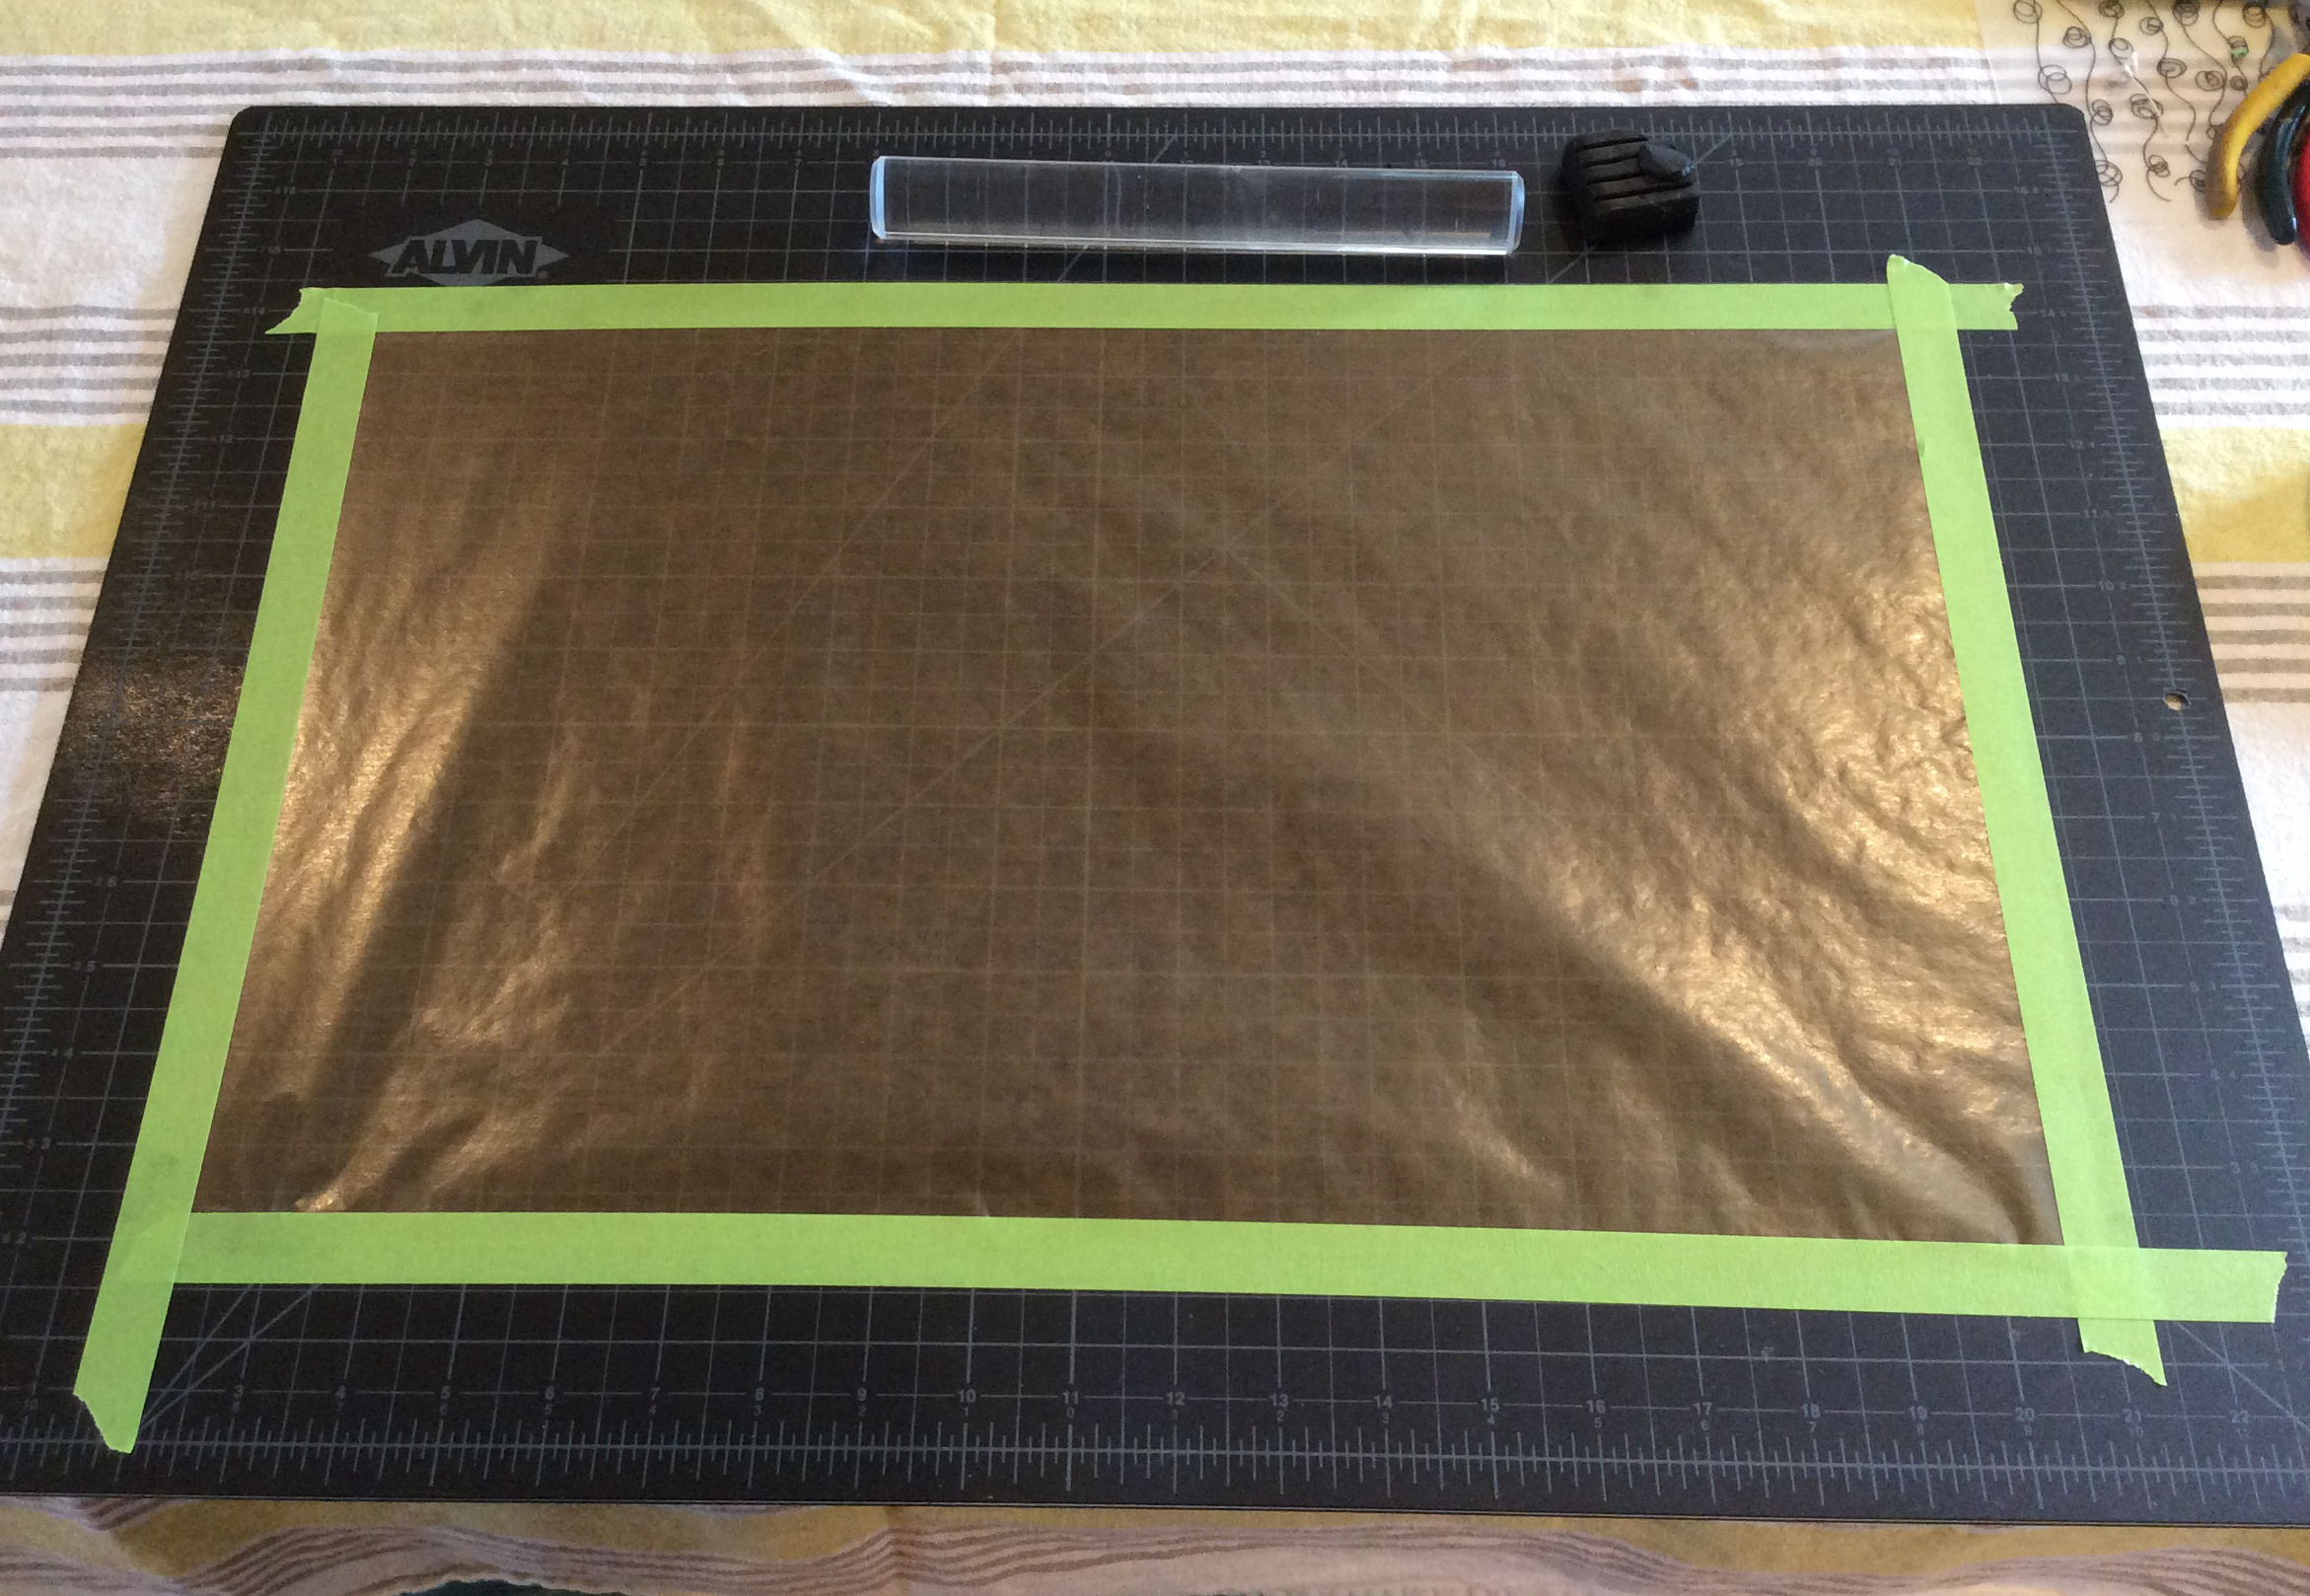
Less exciting things to learn include making due with available supplies such as taping a piece of wax paper to the cutting board I primarily use for sewing. This makes an excellent clay rolling surface, won’t break (like the piece of glass I shattered prior to this discovery) and can be tossed out and resurfaced when it gets too dirty. Simple, but effective.
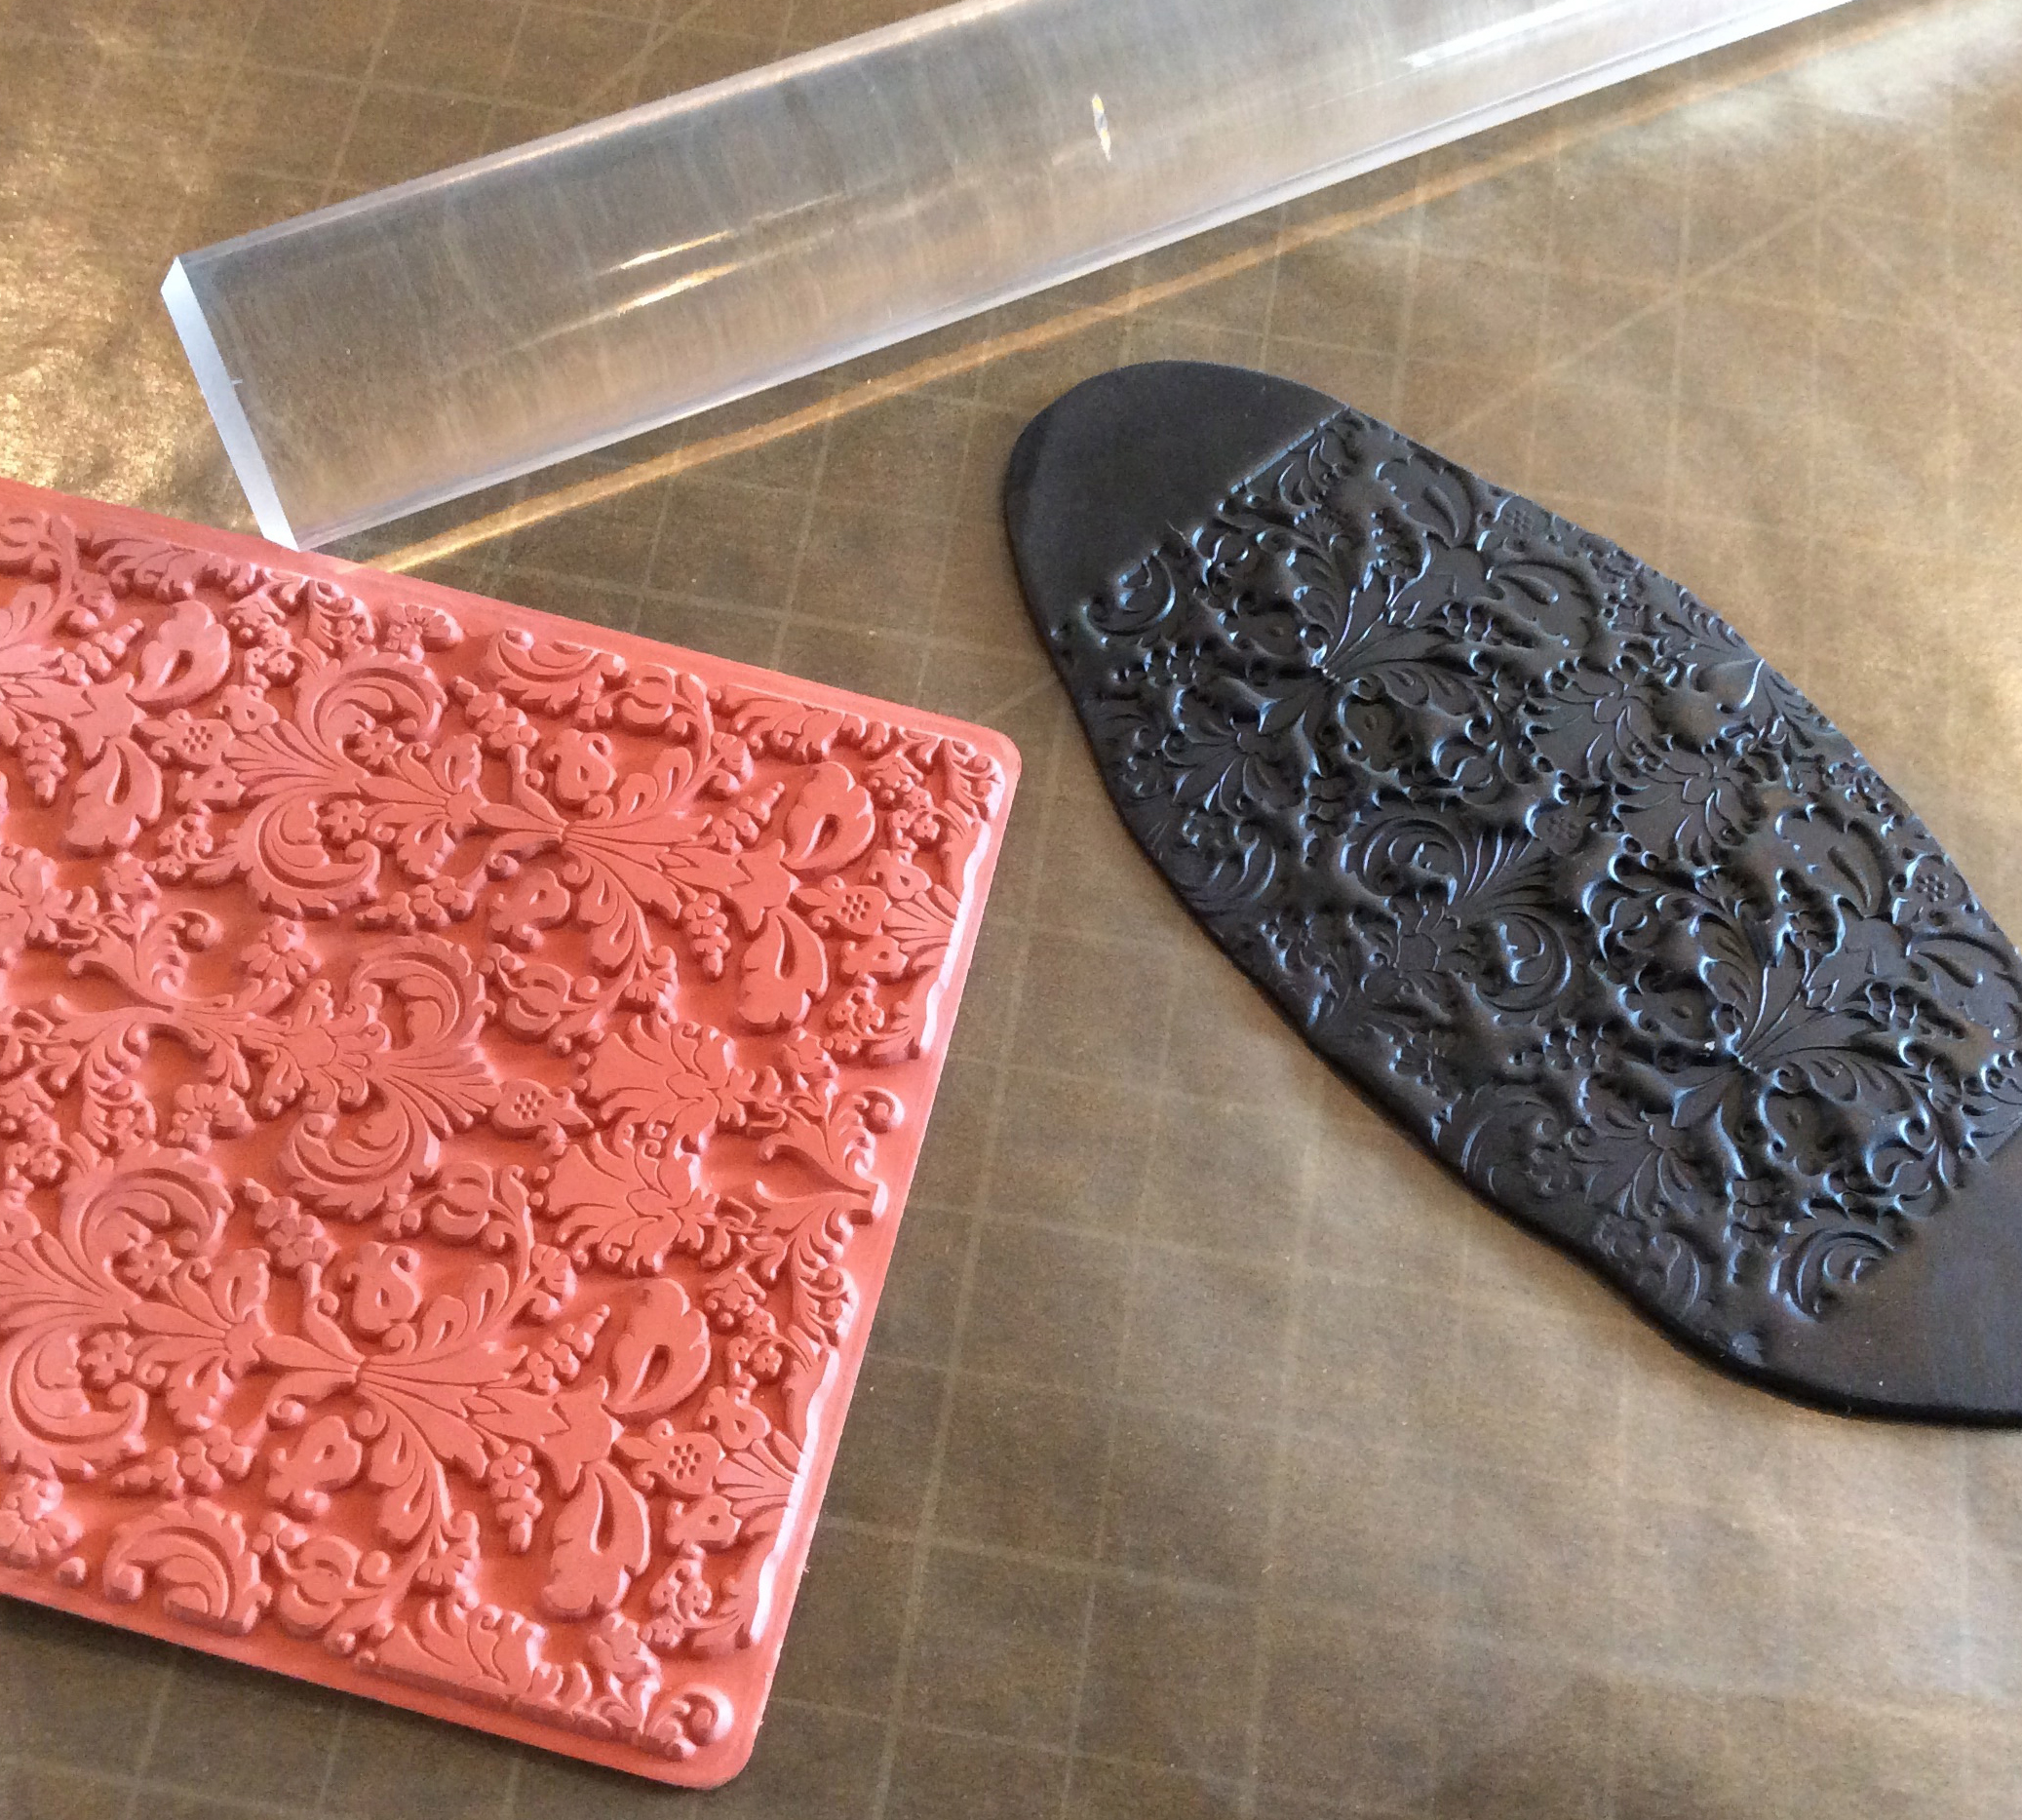
Patterning a rolled, flat piece of clay is intuitive… just press your texturing surface into the softened clay; in this case a rubber stamp. Duh.
Applying this type of texture to a formed surface is a little tricky, requiring one to slice a thin piece of texture off and then apply to the vessel, or just start with a super thin piece to begin with so that it can be added without changing the overall shape of the piece. Above is a tiny vessel, unbaked, with texture applied in this way.
And here it is painted. I’m not 100% happy with the paint and decided that application with one’s finger will provide a better effect, leaving the indented parts of the texture paint-free. You can see a bit of a wing here, that piece was applied in the manner described above.
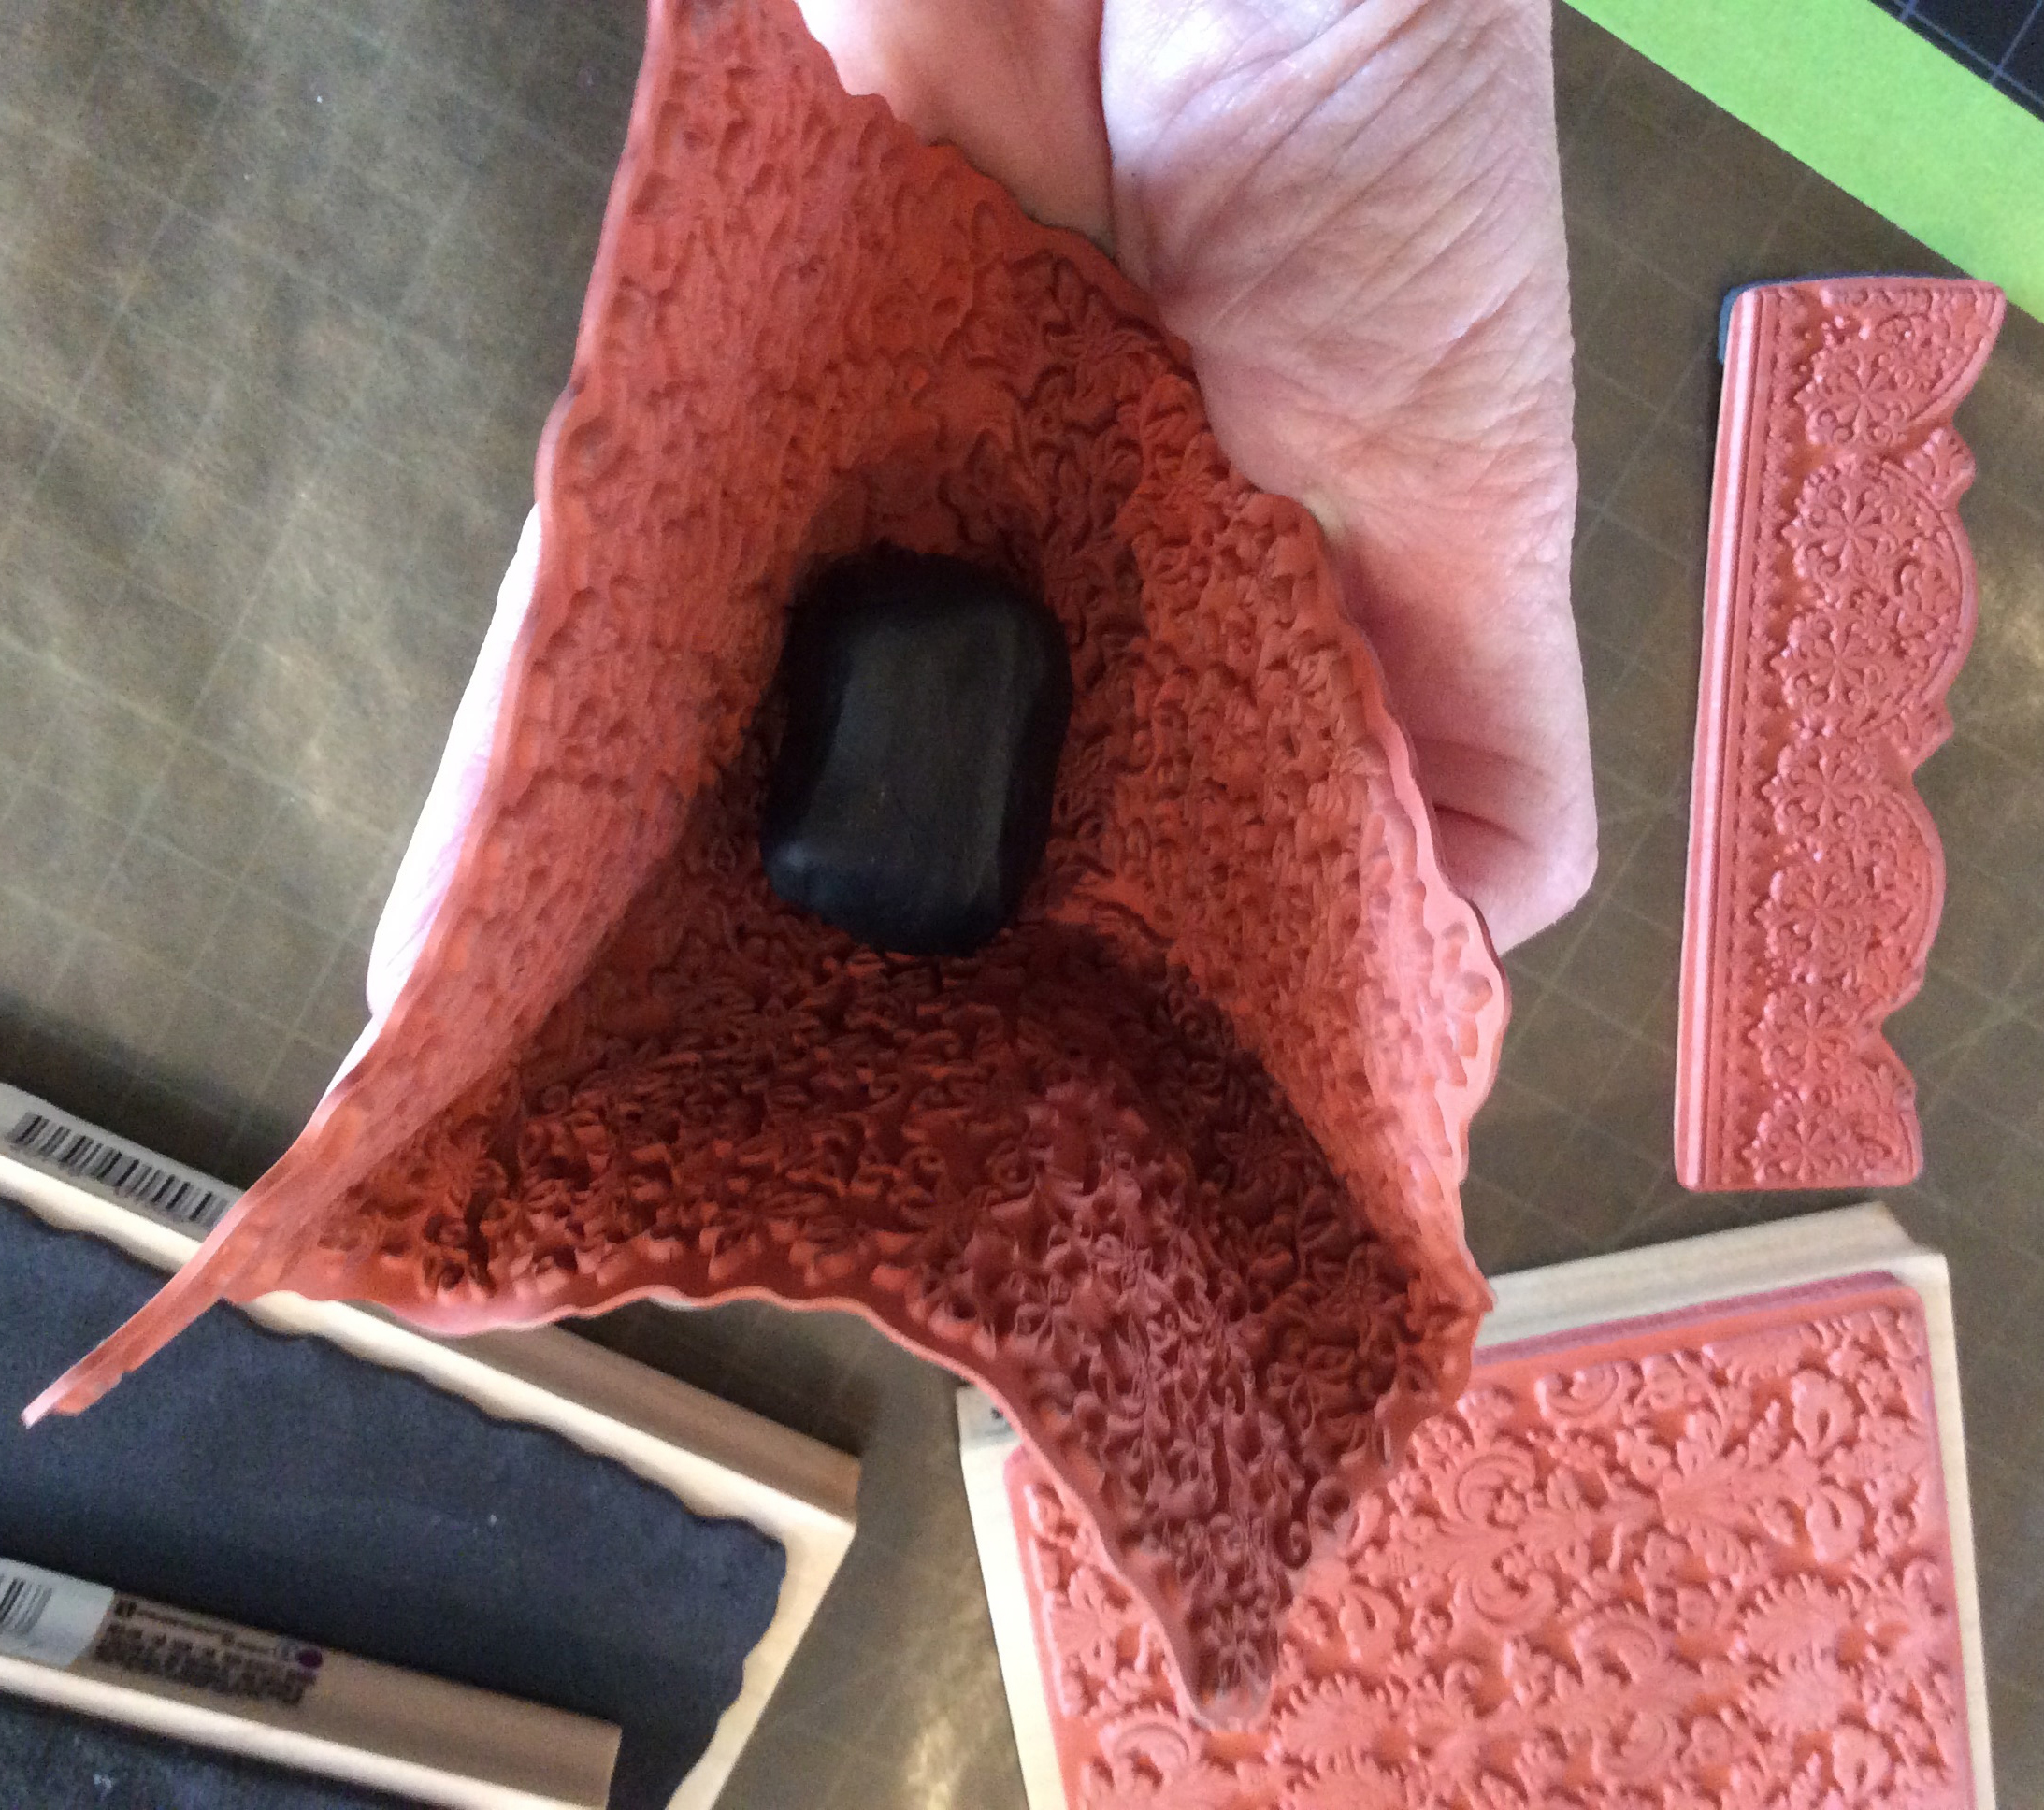
Less obvious, how to texture clay objects that are NOT flat. Here you can see that I pulled the rubber stamp off of its wood block and can now roll the ball of clay in the rubber, applying texture to all sides rather than just one. Once you’ve pulled the rubber stamp off the block, you can then texturize flat clay by rolling over it with your rolling pin.
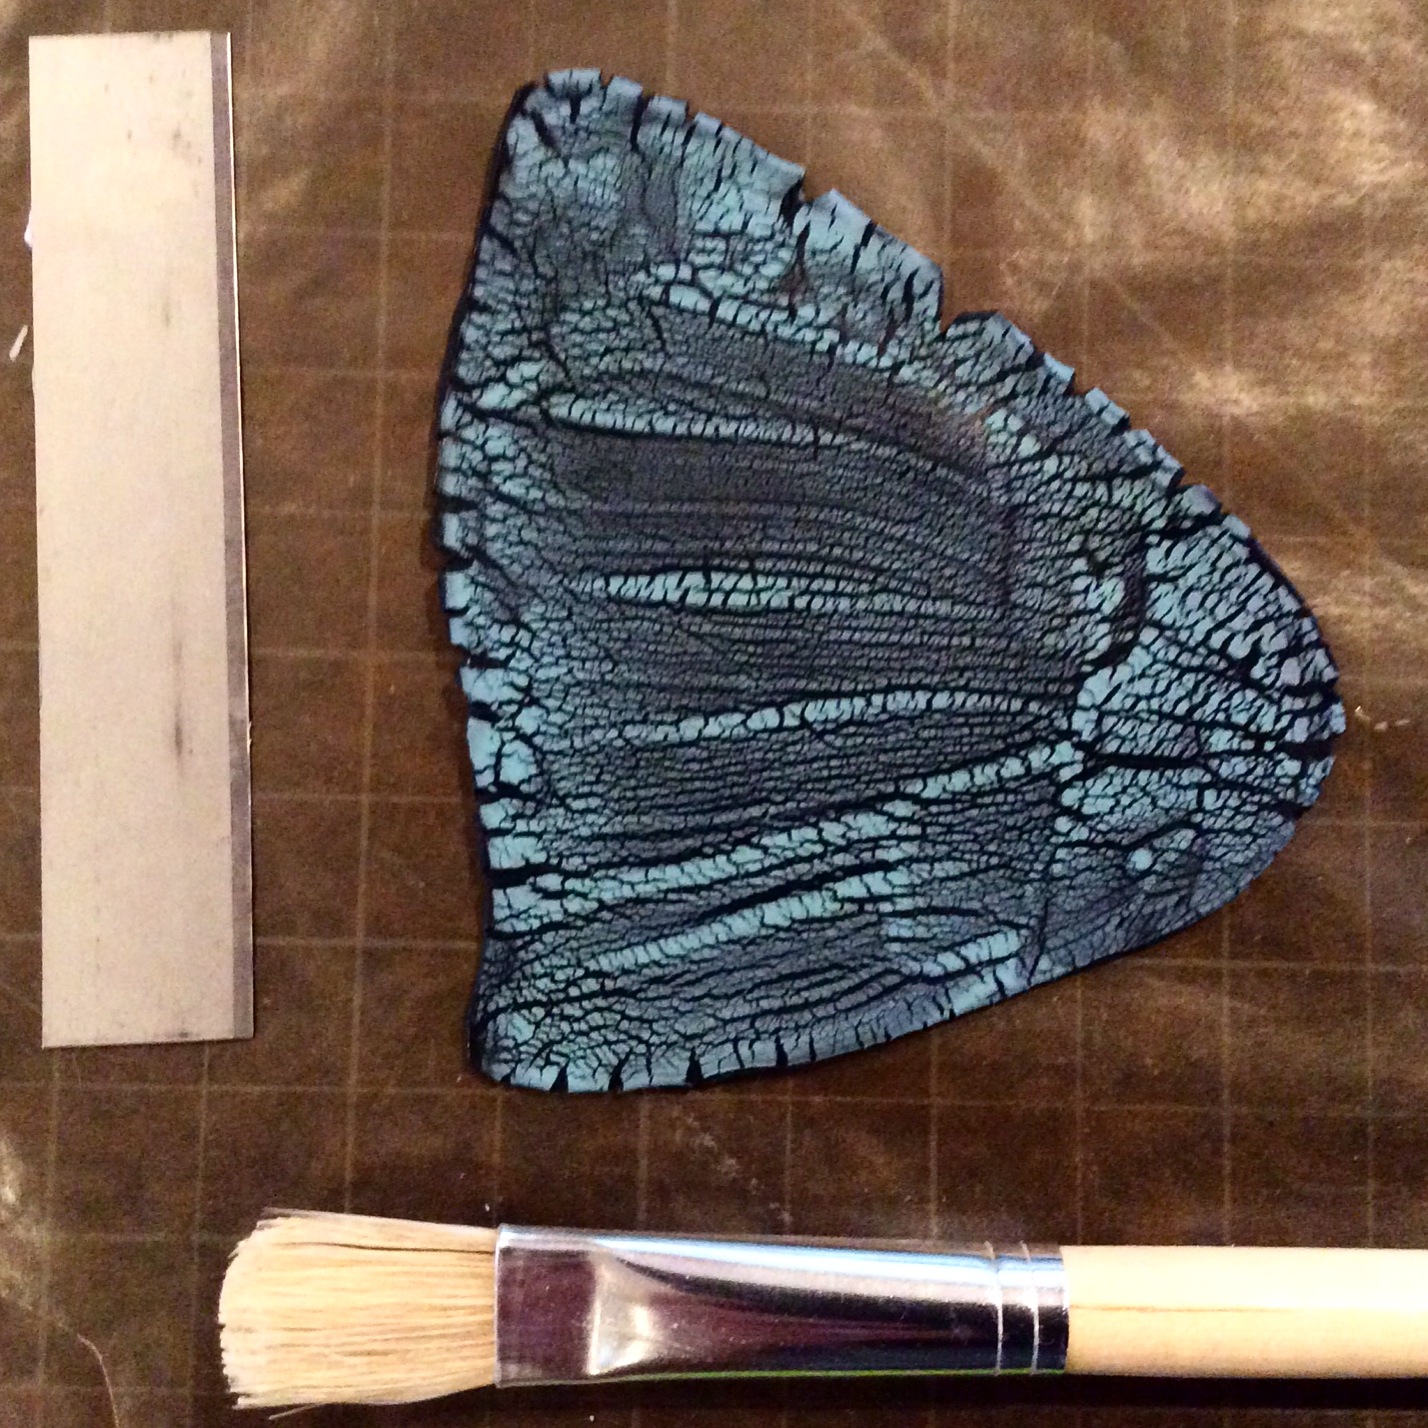
This is another surface treatment I learned called crackling or cracking. In fairness to the developer of the tutorial, I can’t legally share the info with you, but you can buy the tute here. What you are seeing above is a finished surface test that accidentally turned out to be this AMAZING butterfly wing. Complete accident! I didn’t see this until the crackle had finished happening. I don’t know what to do with this and will probably bake it as is and then try to think of something in which to incorporate it. It’s really just so gorgeous.
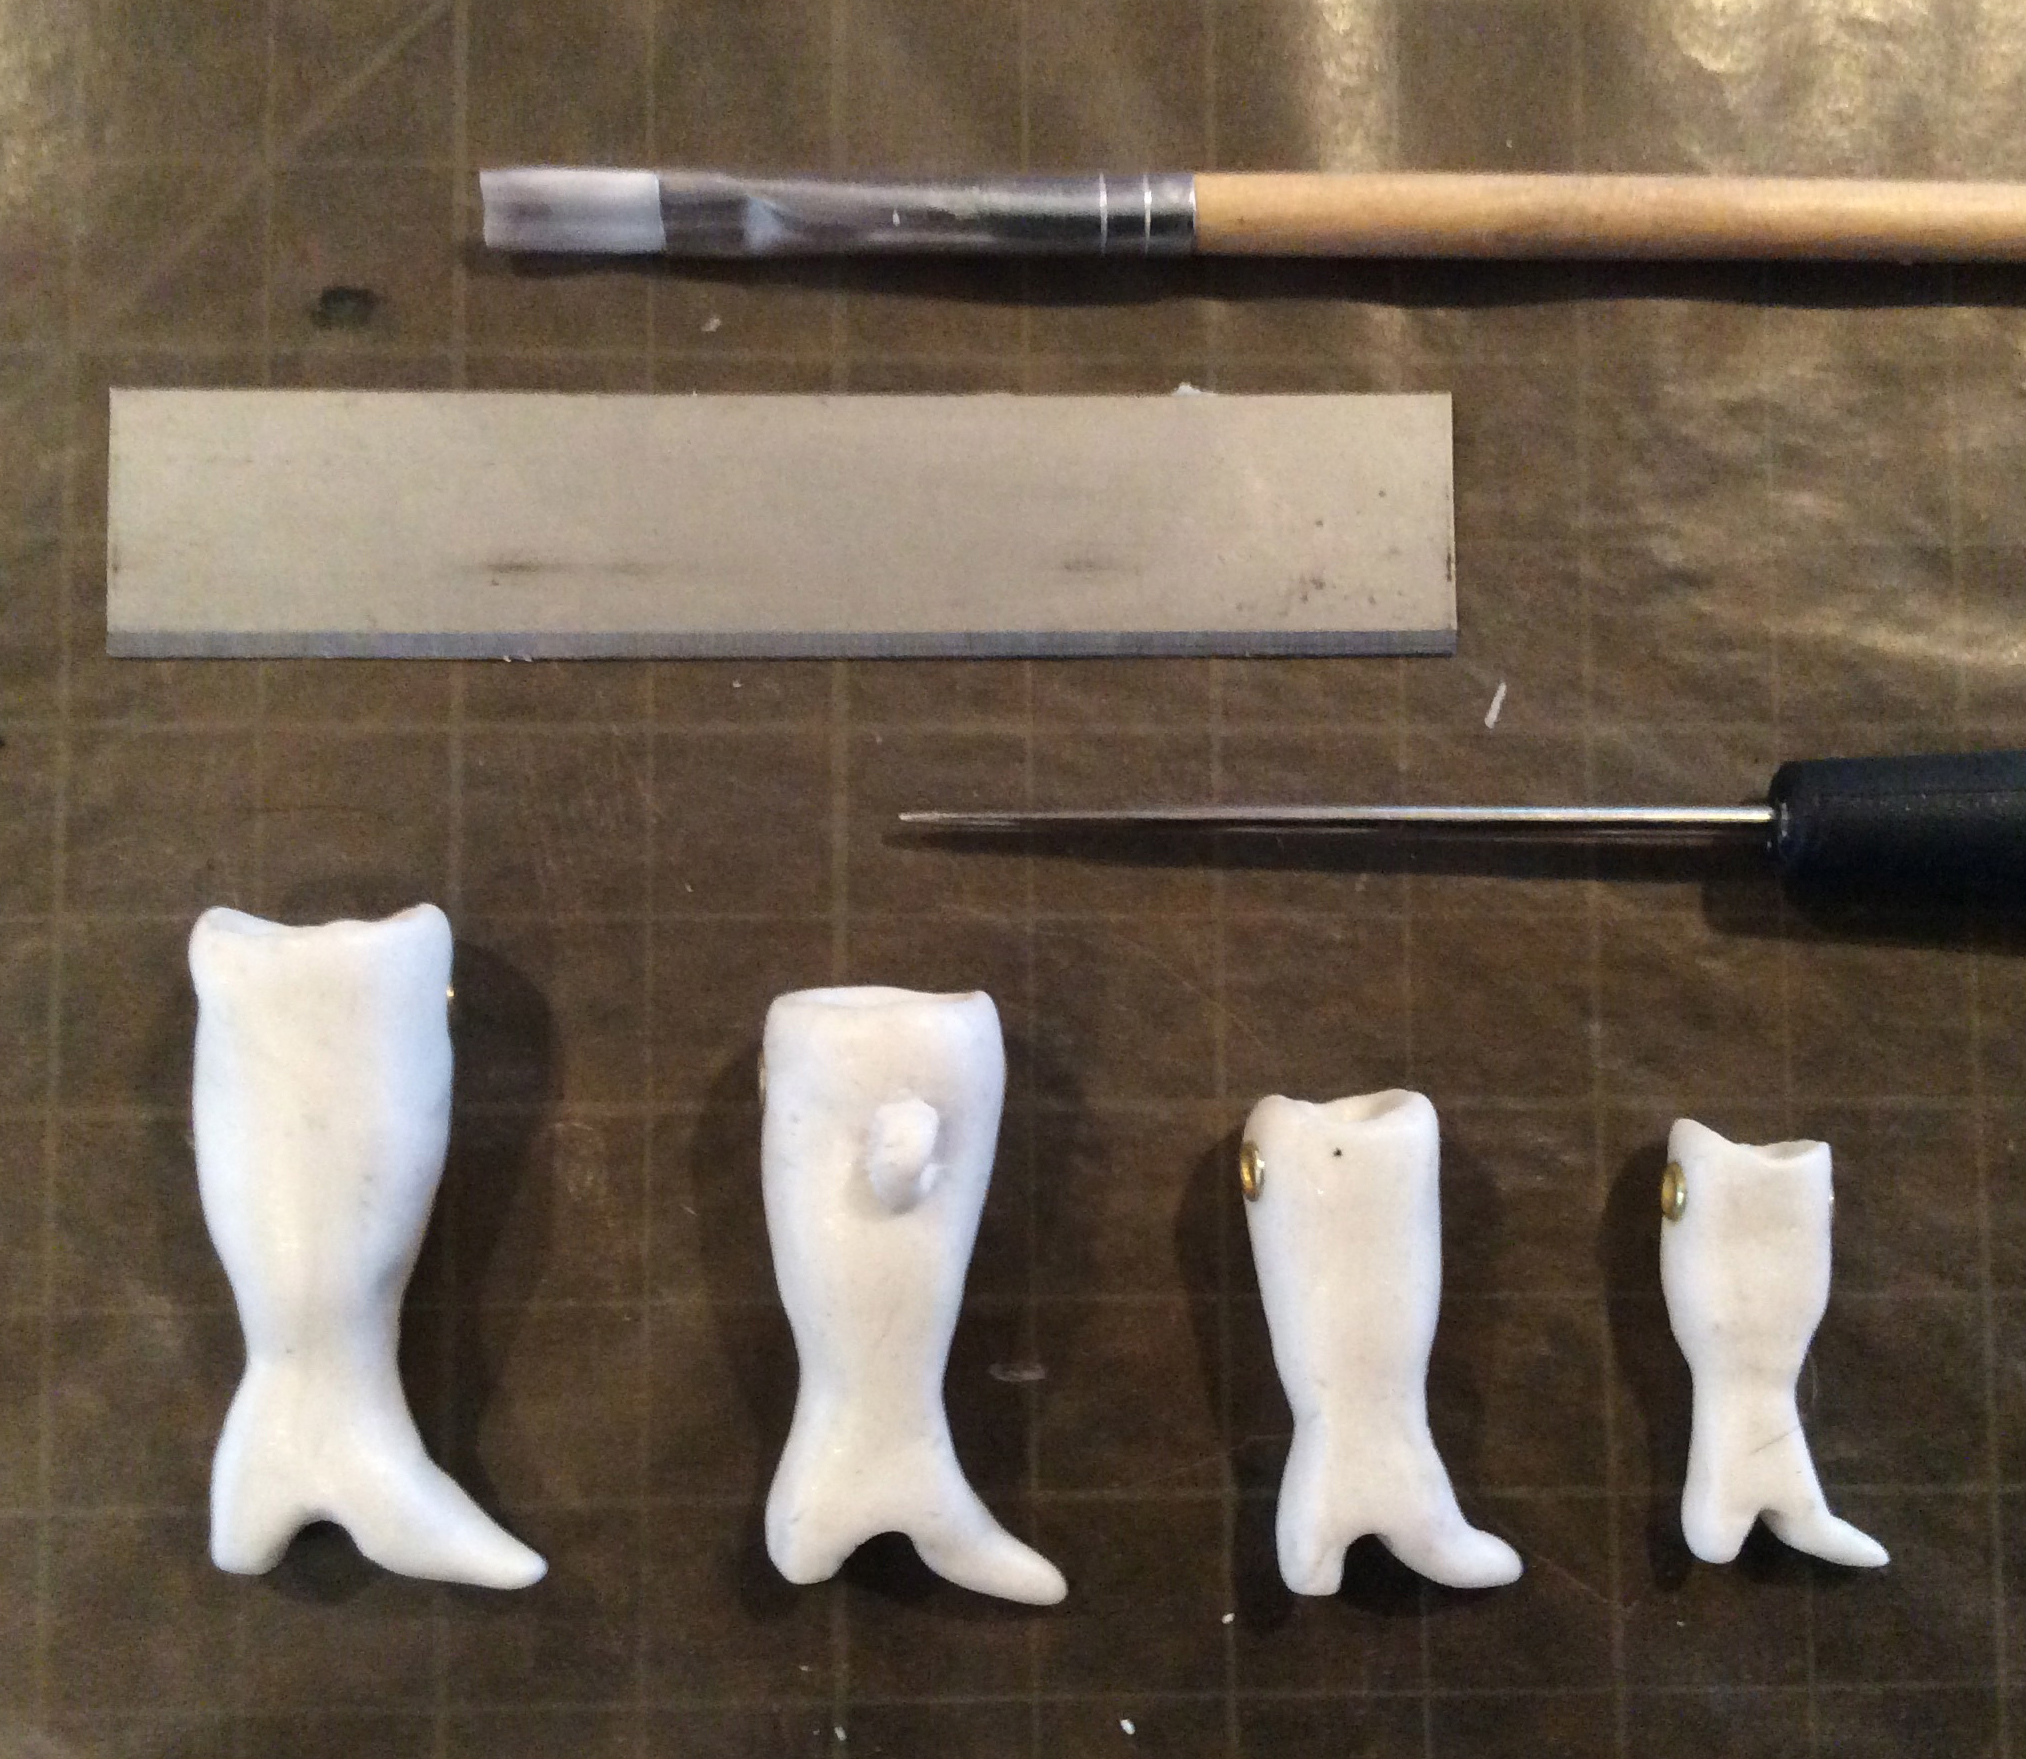
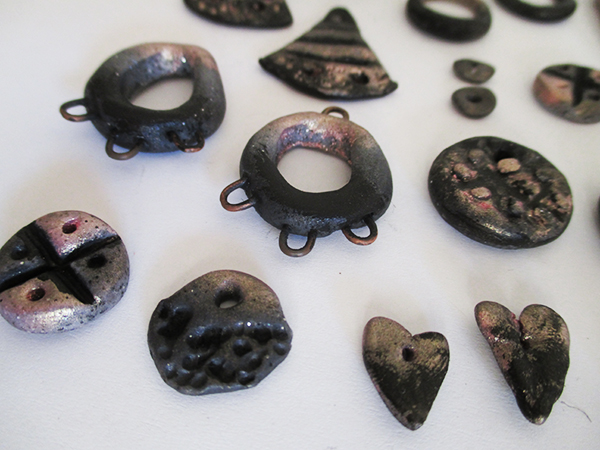
Here are little unbaked clay dolly boots in progress for necklace focals. I’m still loving the ones made from ancient German doll factory digs… the late 19th century pieces, but wanted to try to create my own in order to be more cost effective. And this is working out really nicely too. Making 4 at once gives me some economy of scale… all in an effort to be able to price the finished pieces in a way that makes them accessible to more people.

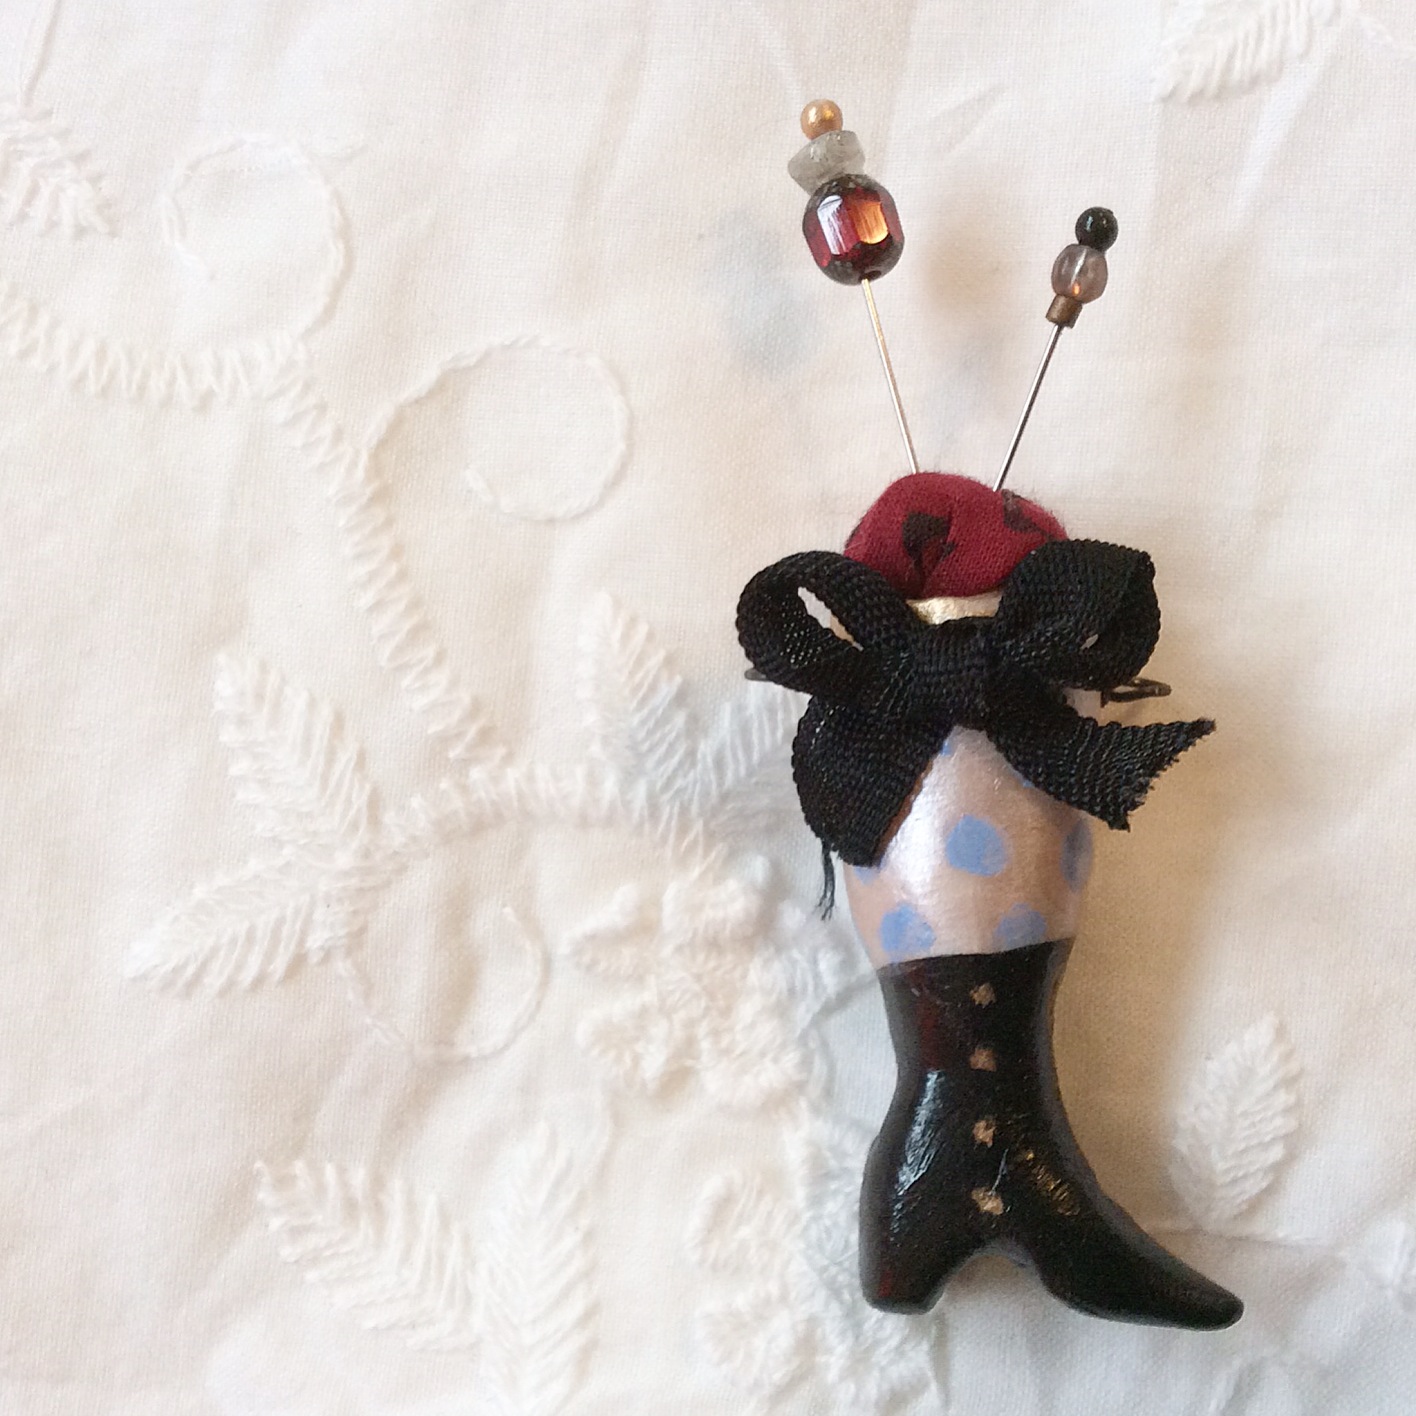
Above, they are finished baking and beginning the painting and embellishing phase. This is really fun too, but tedious as these are tiny. The smallest boot is about .75 inches tall, the largest is only 1.5 inches tall.
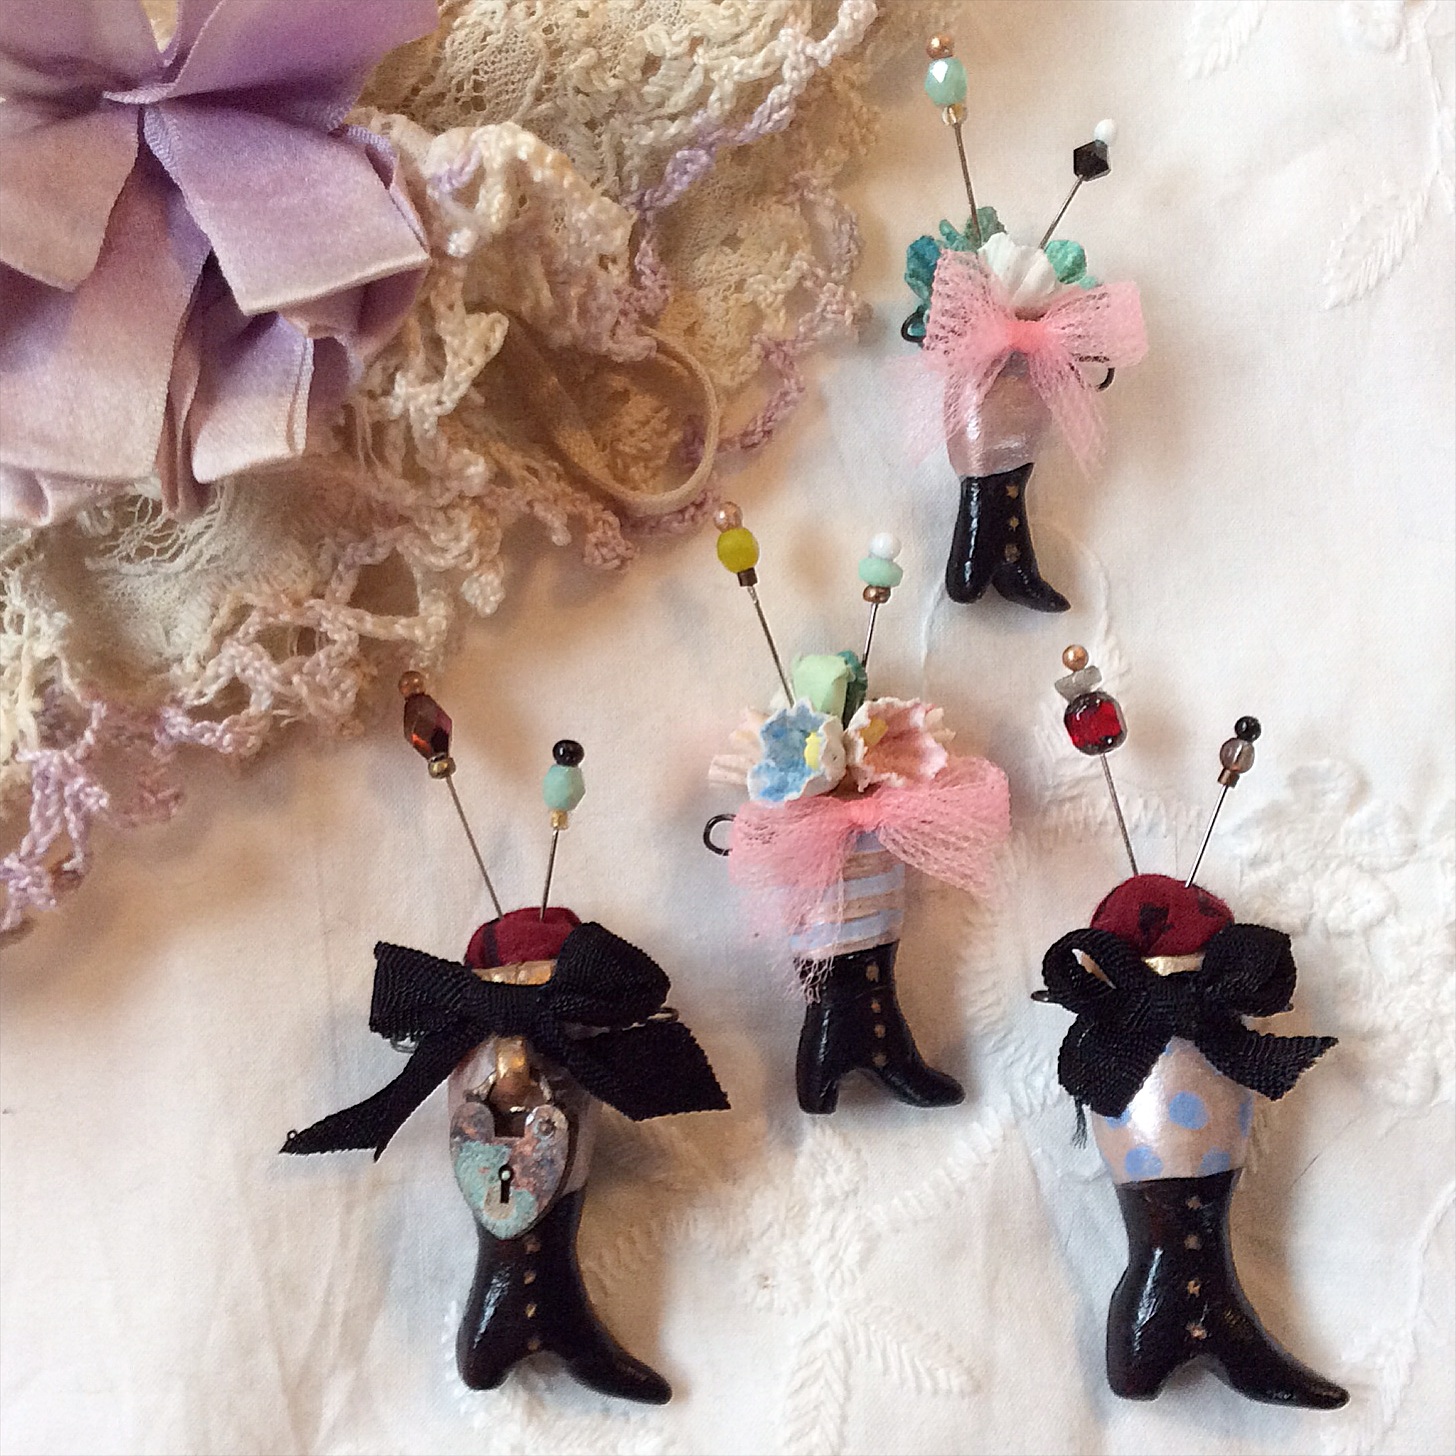
And… finished. Of course in order to sell them, I have to add necklace chain and then photograph again. I am planning to do another batch and then begin listing, but if you see one you want before I get all that done, just email me. The chains will be textured aged brass link, and the length you desire, from shorter, to be worn on flat part of upper chest, to much longer, below breast length. Some close-ups follow and please remember these tiny works of art are my own, so please be inspired but don’t copy.


To read a bunch of posts about clay processes click here.
Subject: Blog, Craft, Supplies | 200 Comments »
03.13.15
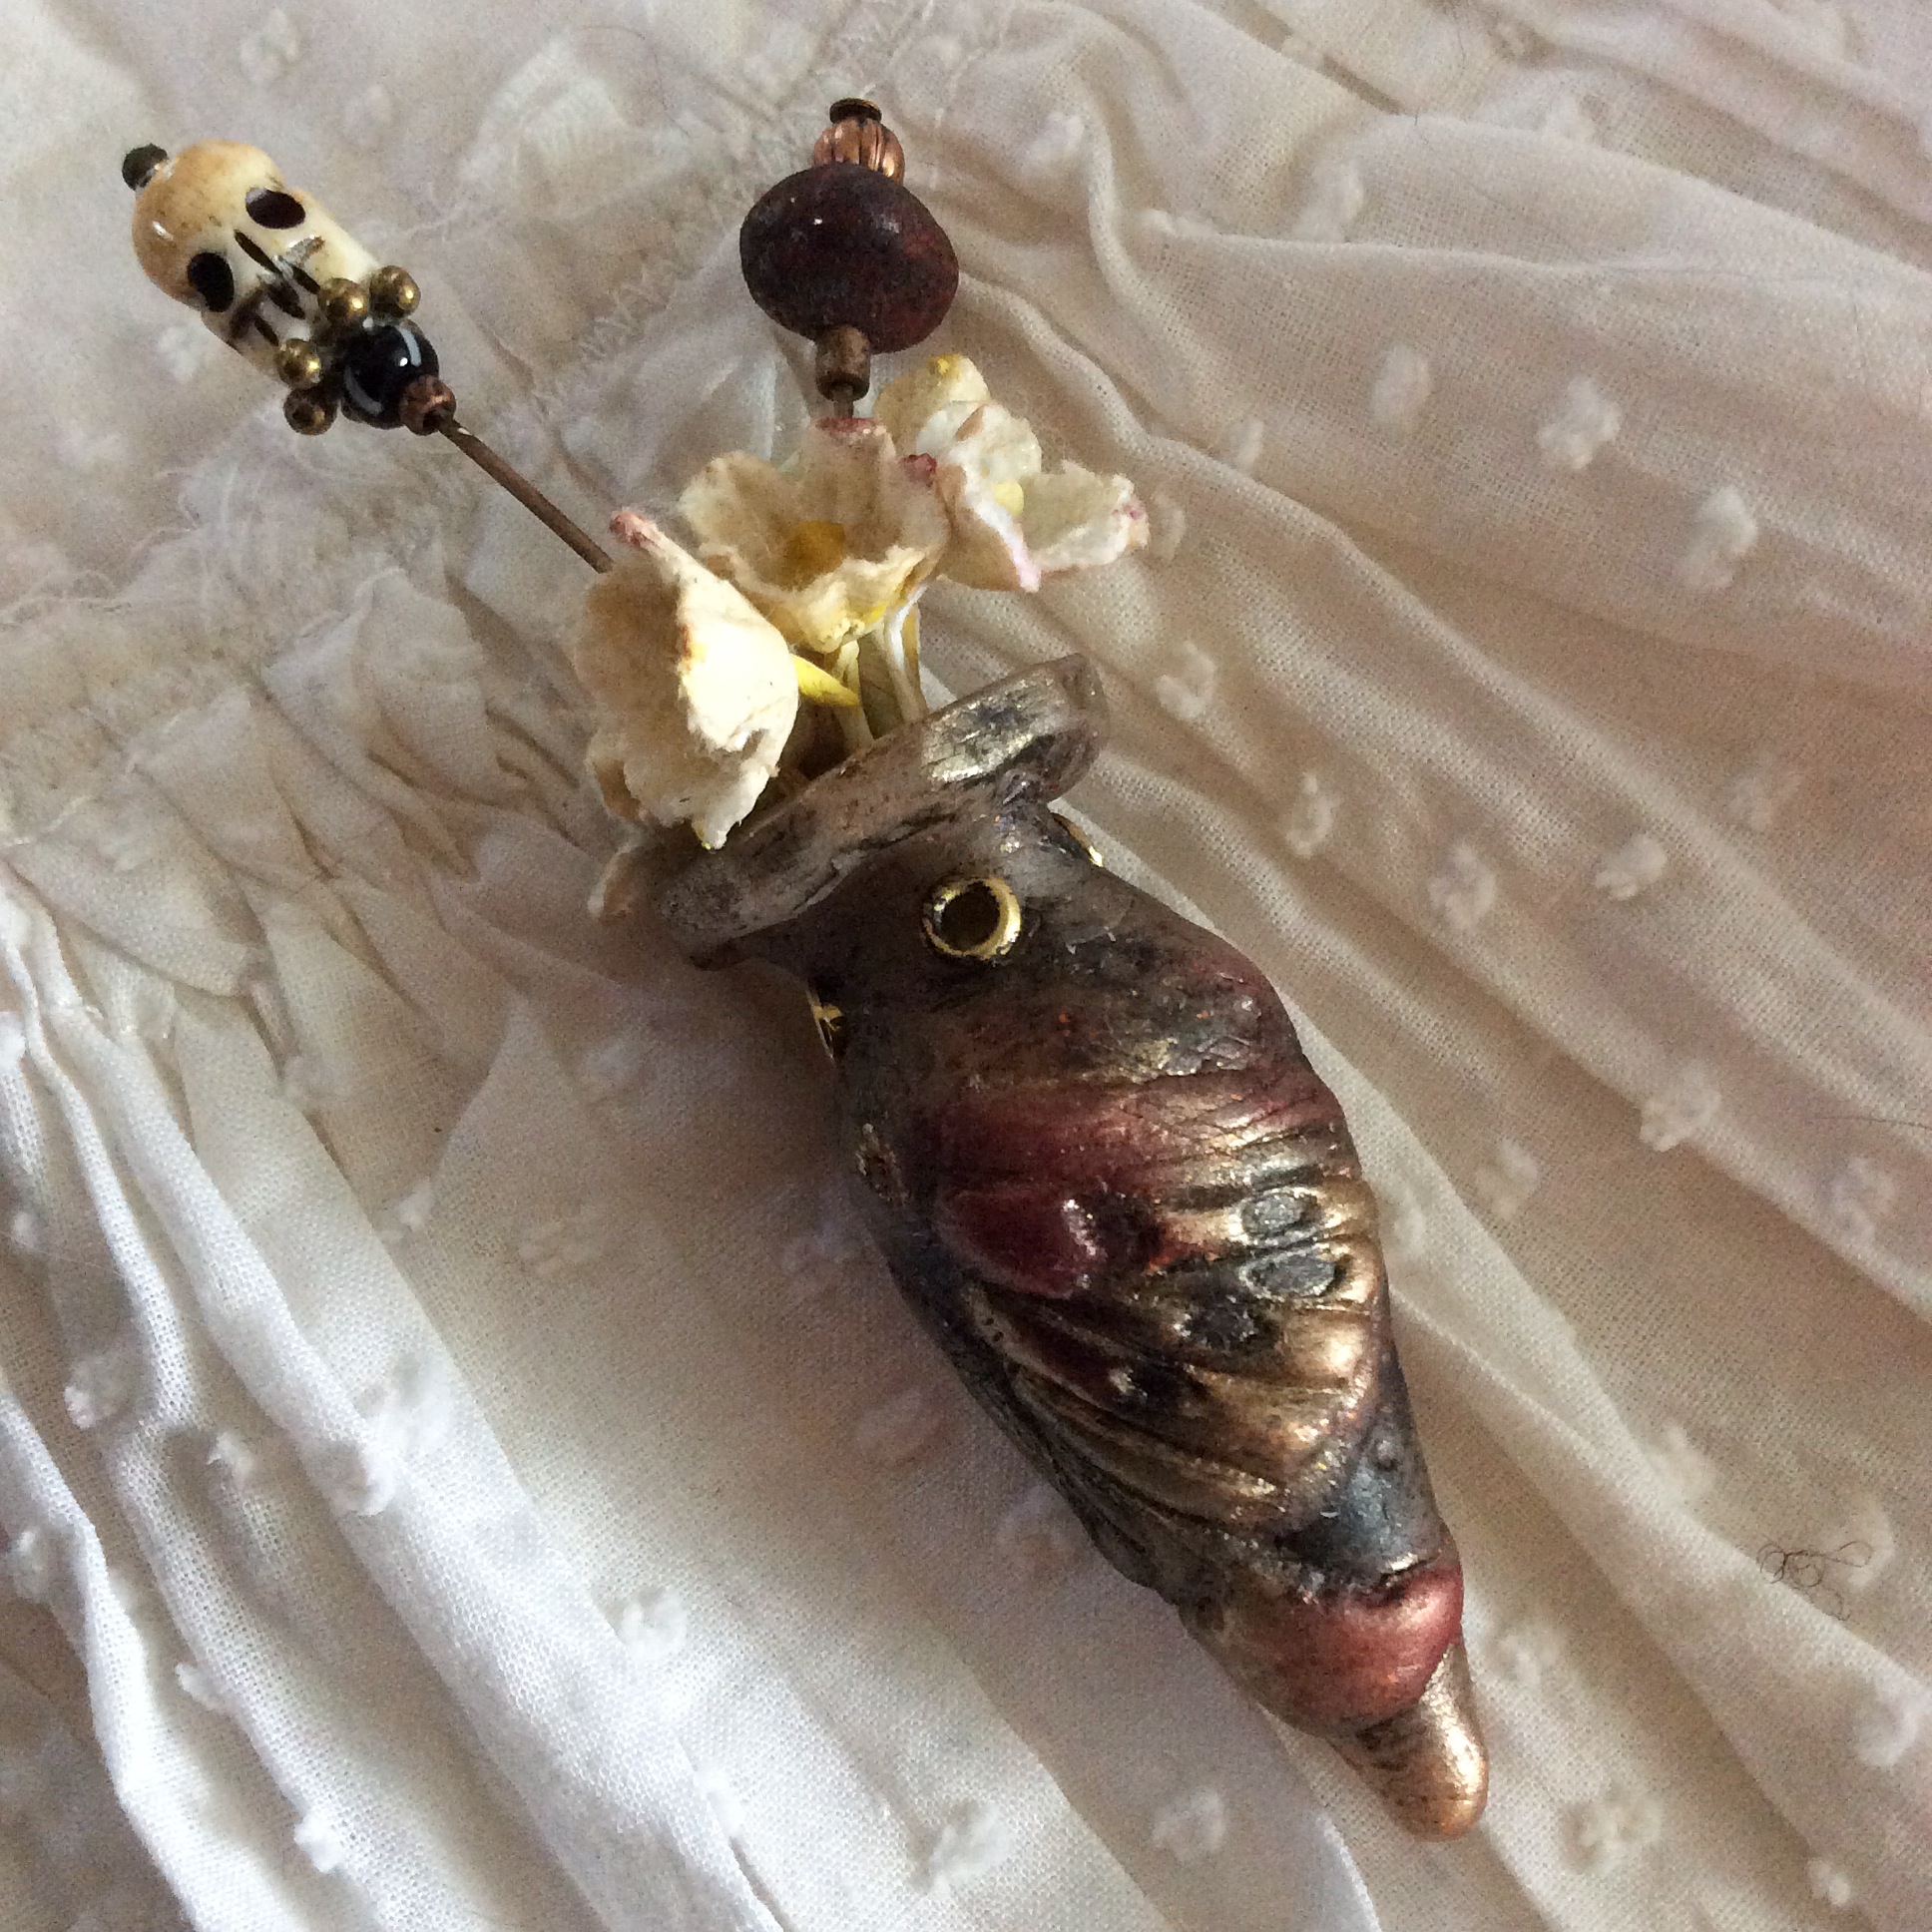
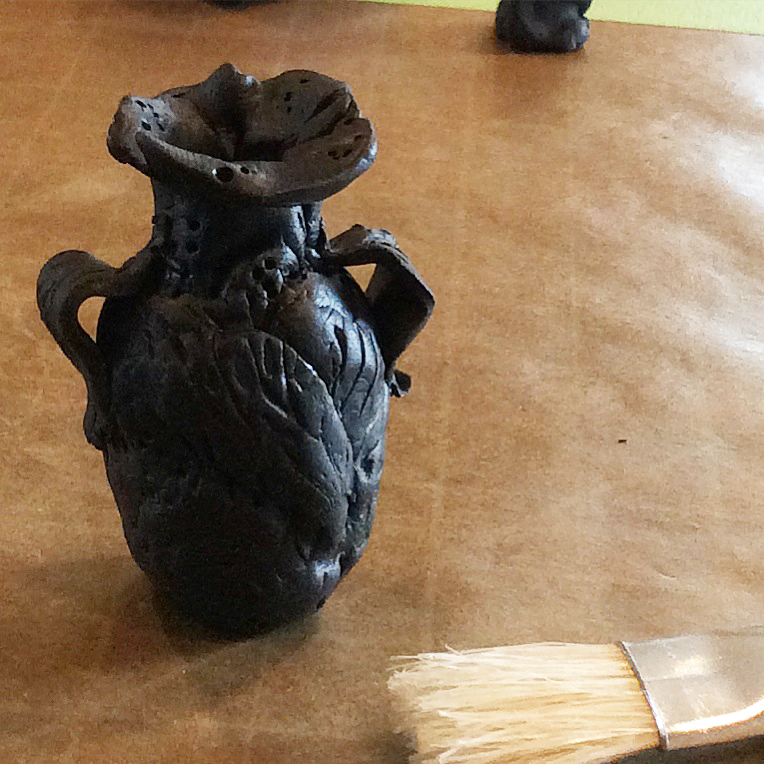
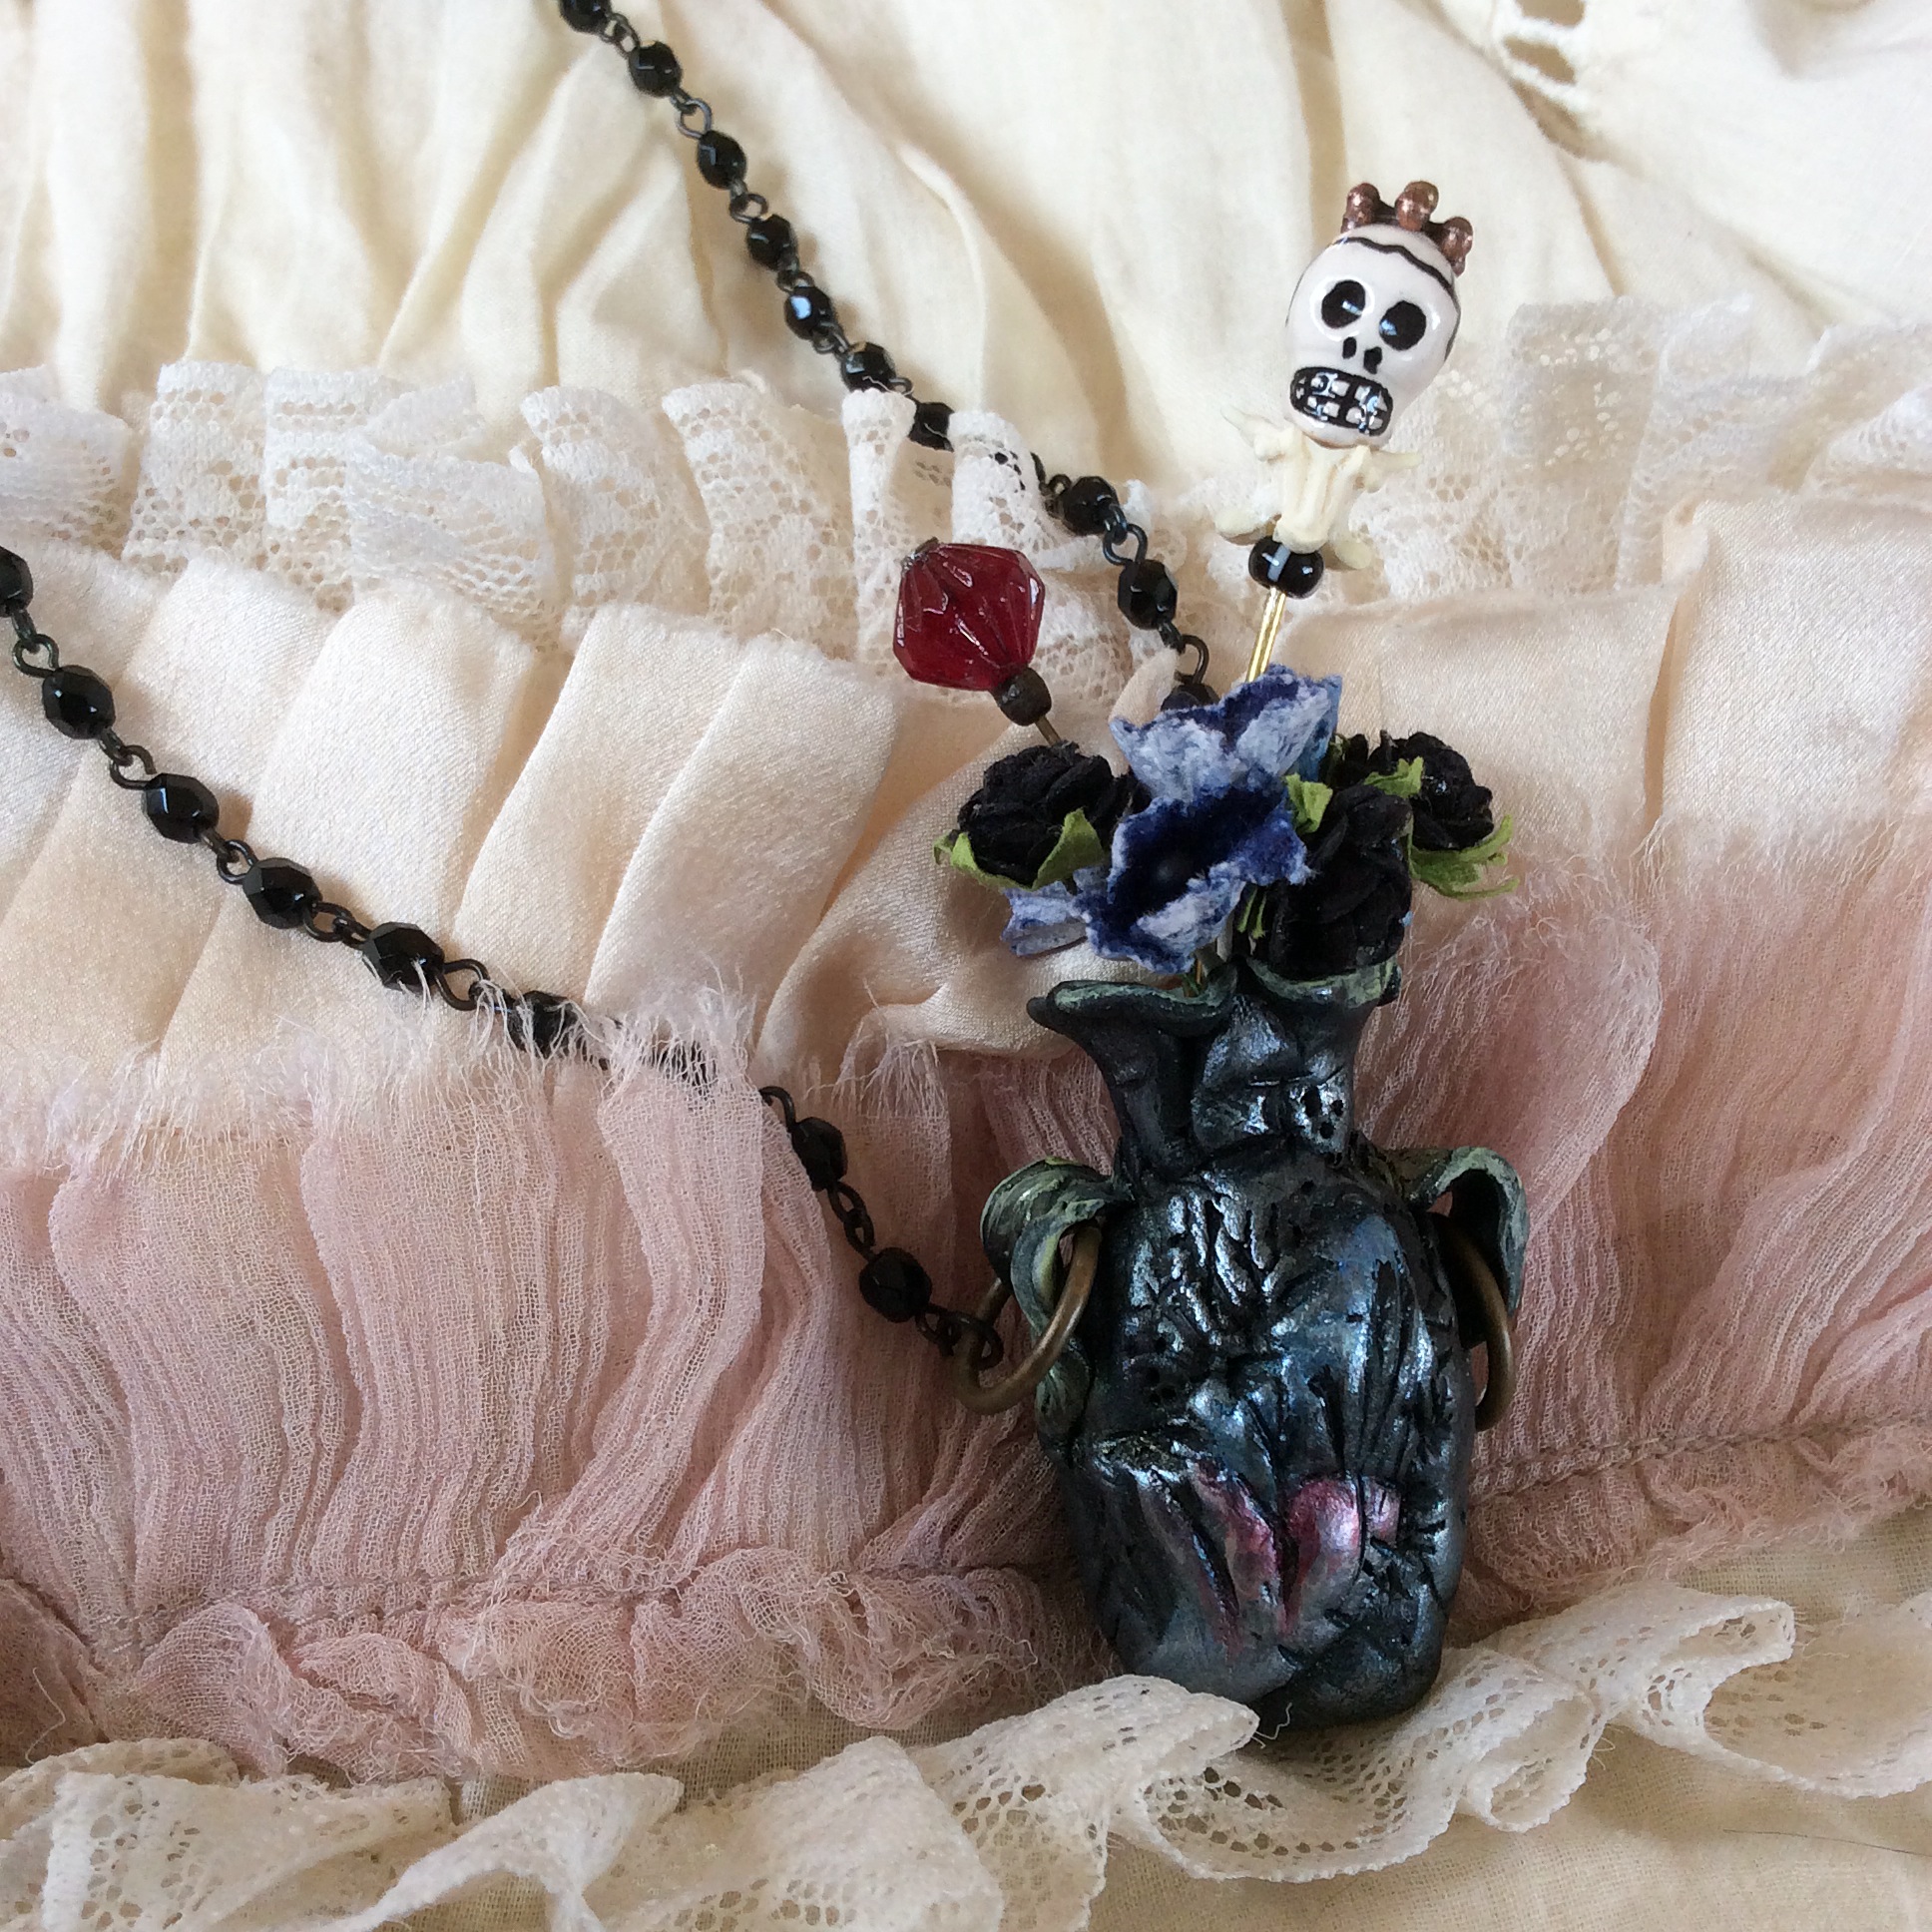
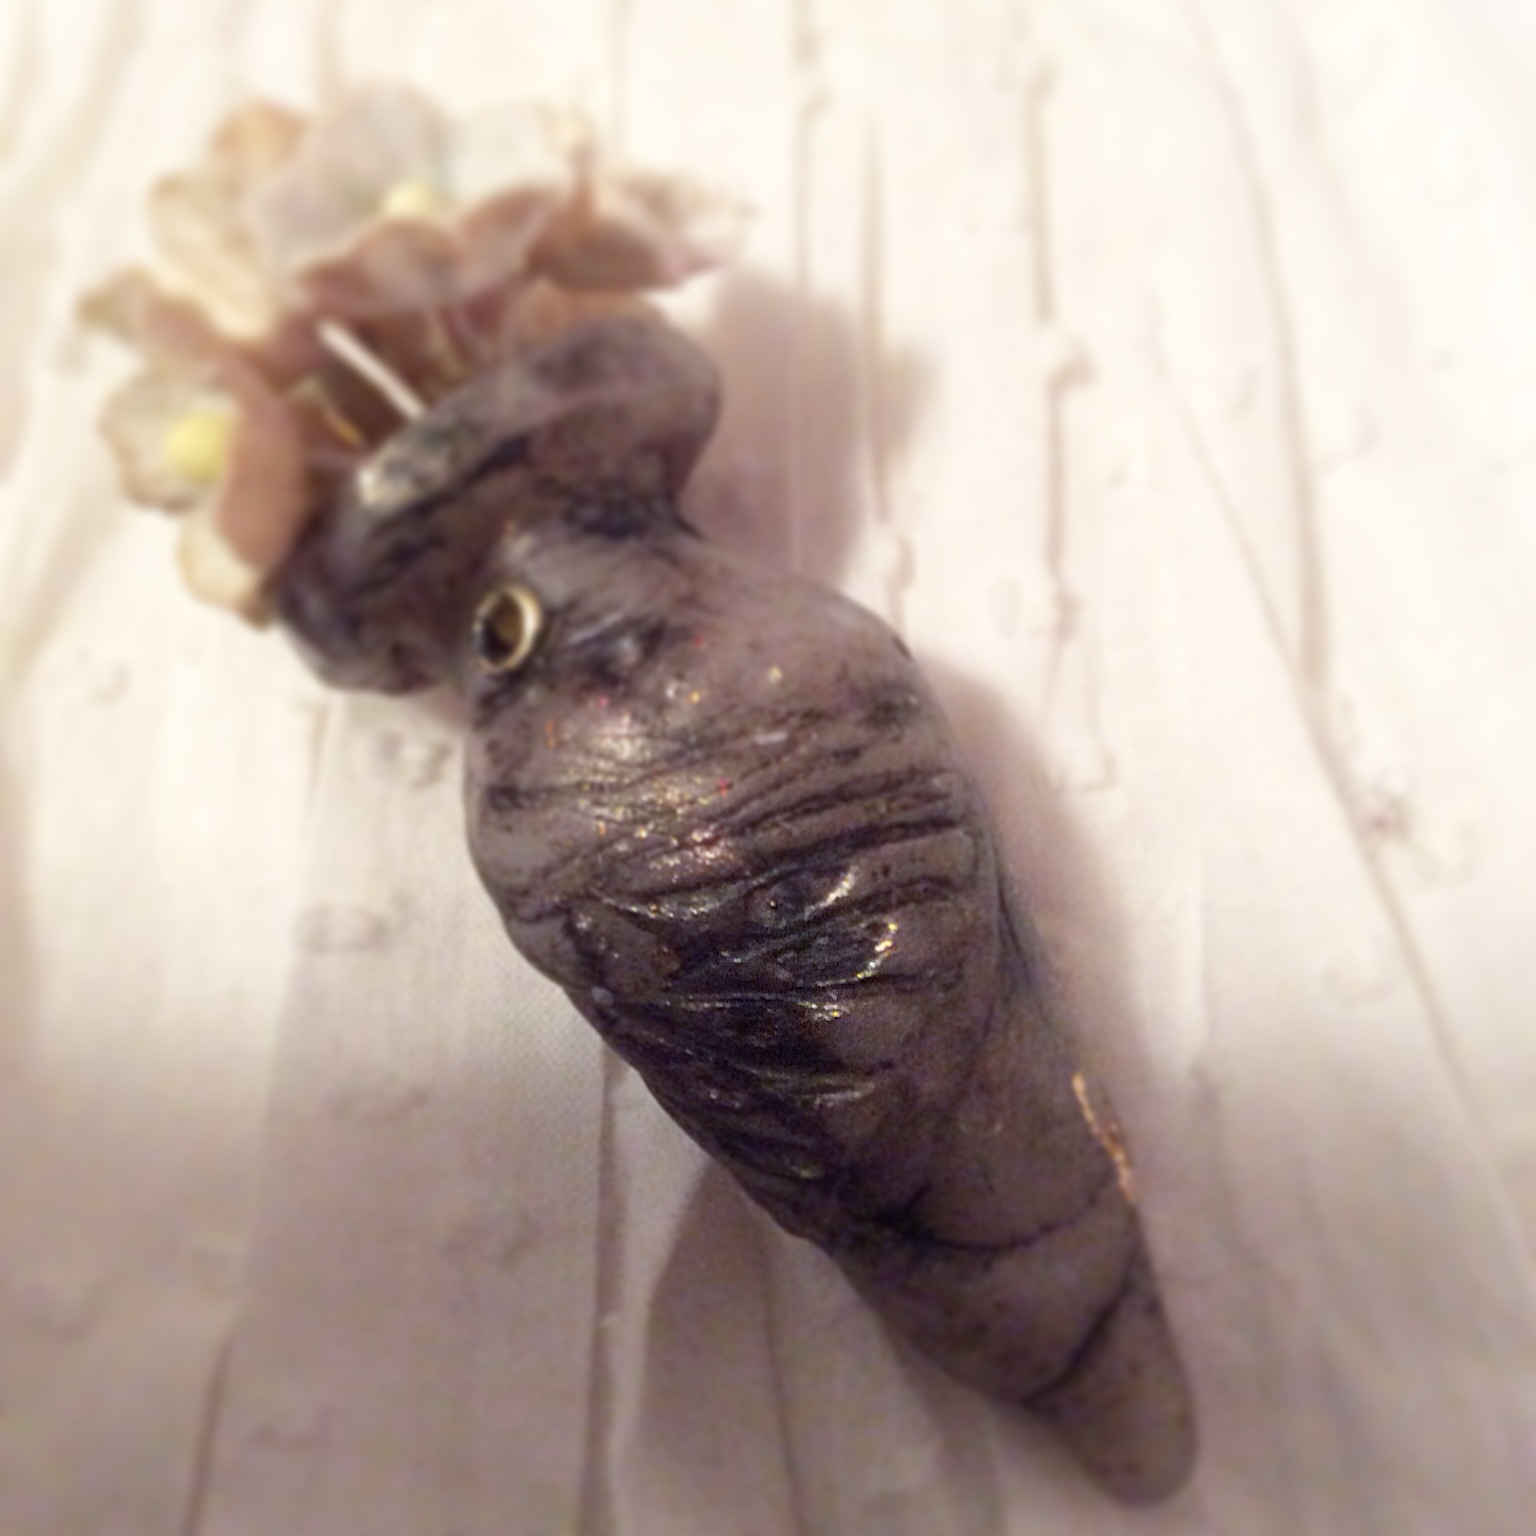
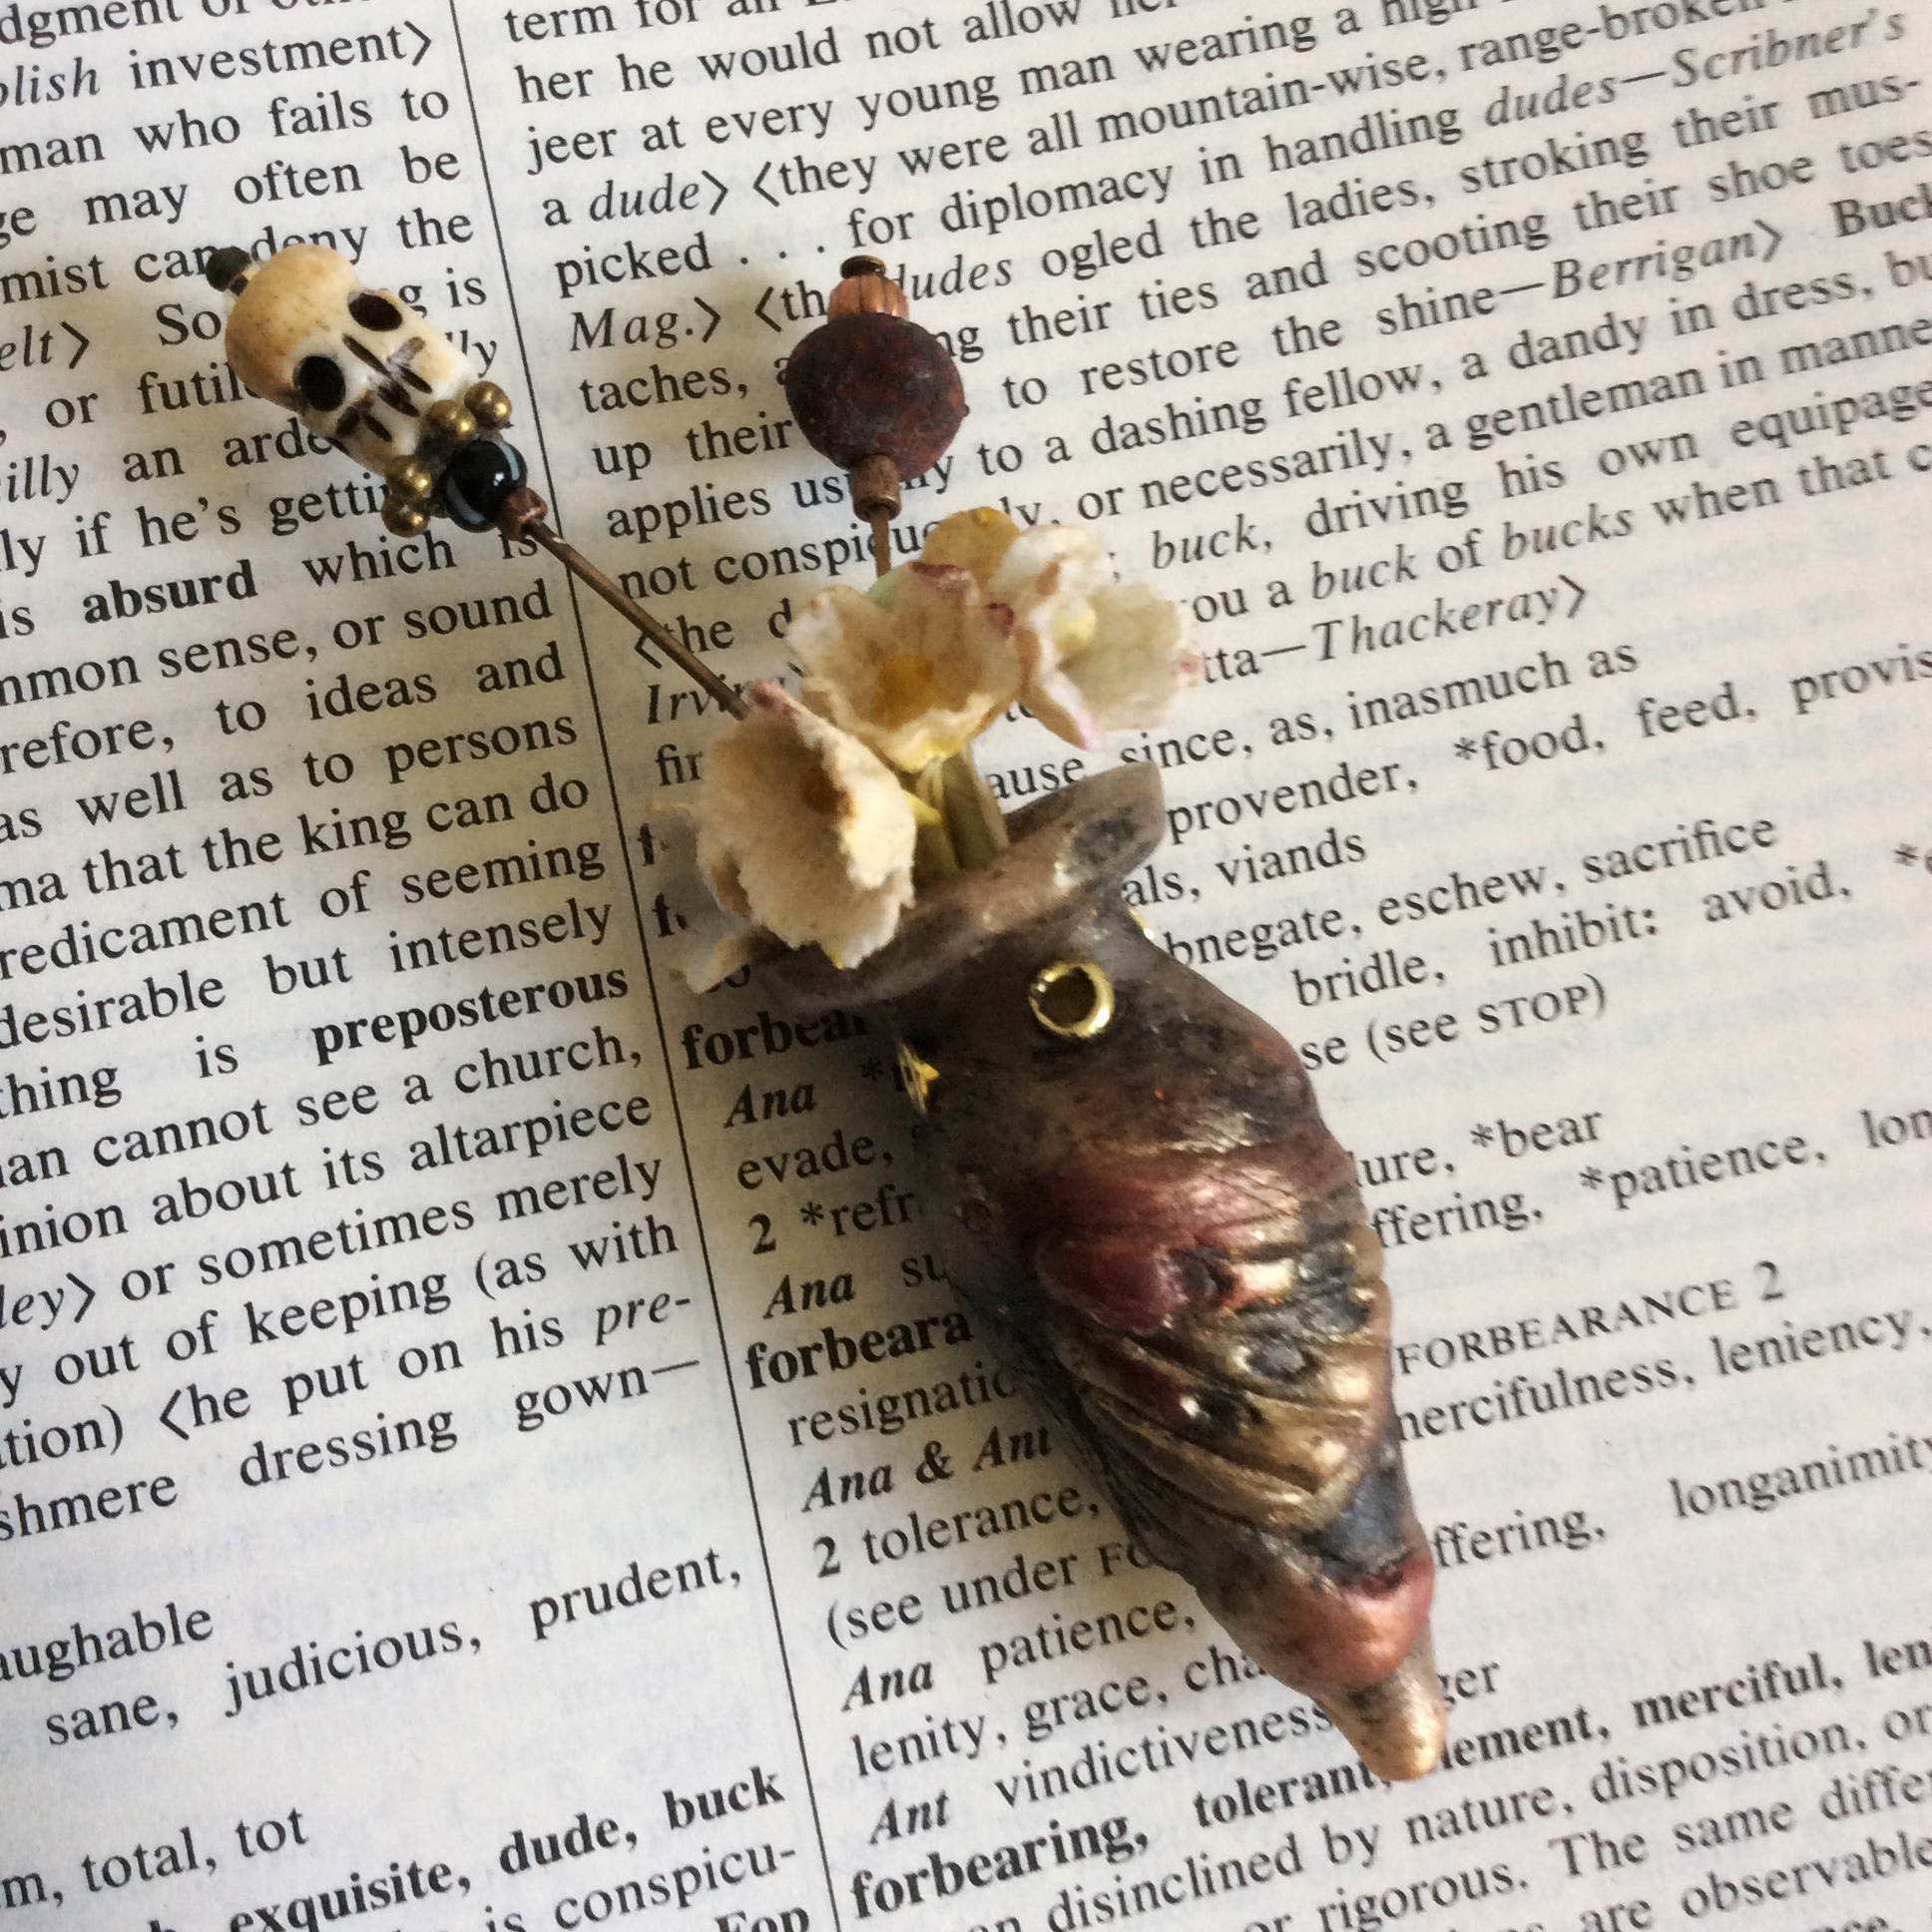
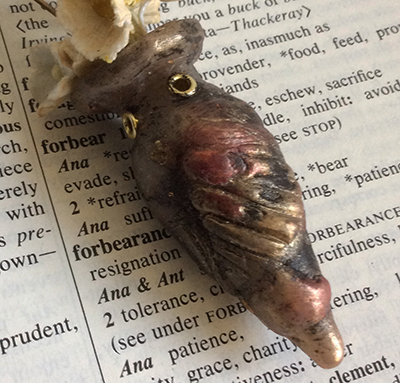
I prefer working small; the above amphora necklace focal is 1.75″ tall, plus the millinery and stick pins. But since I’ve been seriously delving into the polymer clay medium, I’m realizing that even the smallest object holds the promise of so many lessons, from forming to surface texture to paint.
The photo above is where I left the object last night… it had finished baking and I was disappointed with the dirty gray color and lack of translucency (I had mixed in gold leaf to very little effect). Still some things to master, but I wasn’t going to let all the work I’d done be for naught so I slept on it, and put some intentionality toward waking up to work on it some more, knowing that paint was the answer but feeling too sleepy to carry on.
I’ve never been a clay or paint person, in art school or in my 30 years as a practicing artist/designer; I am now falling in love with handling clay and with applying paint in built layers. To make these amphora charms, I’ve taught myself how to create a slab vessel out of clay, because I wanted these to be hollow… more lightweight (for jewelry), and more real. I sort of made it up as I went along, doing what seemed to make sense. Softened and rolled out a sheet of clay, and started forming it, then making and attaching the neck separately from the body.
None of these images capture fully the delicacy of either the textures or painted colors. By using the dirty gray as my middle tone, I was able to add shadows or low lights and high lights, applying pigment slowly. Close up above shows a bit more of the detail.

The texture of the wing was produced separately from the vessel (stamped into the clay), with the top level sliced super thin like the thinnest swiss cheese and then applied to the surface. After this, the piece can’t be handled much until post-baking. All of these techniques can be learned via tutorials and videos on YouTube. I’ll try to find time to add some links to this post soon, but a quick search on Etsy and YouTube will yield everything you need. I’ve been studying and learning so much, even just making a tiny little object like this.
Subject: Blog, Craft, Modern Art, Supplies | 56 Comments »
03.11.15

My creative impulse tends to build to a boiling point during periods when life is too busy, chaotic, stressful… and then as soon as the gift of time is provided… it’s like the floodgates of heaven and hell open, simultaneously.

It started with this object, a very ancient glass bottle that I purchased in a crazy hippie crystal alchemists shop–The Crystal Fox–in Laurel, Maryland of all places. I think there was something about that visit that set things in motion; I’m blaming it on breathing too much incense smoke as Molly and I were in there for like three hours.
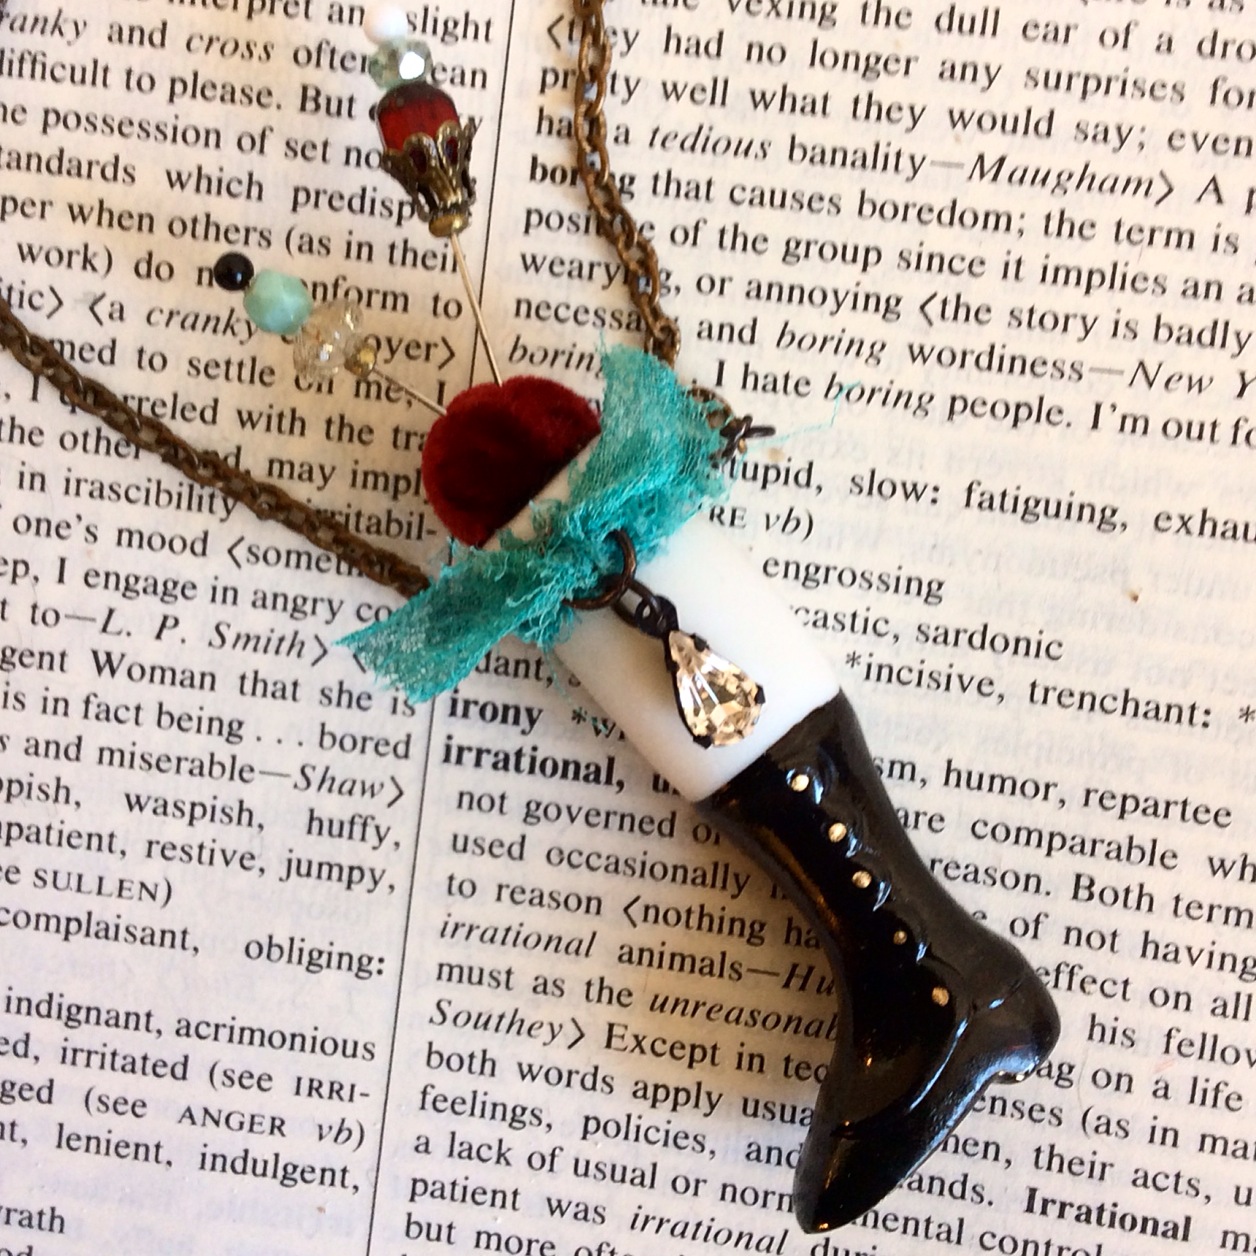
This second object is something I’ve wanted to make for a truly long time, and after finishing it I realized its relationship to the image in the So Charmed website masthead, an image that has always compelled me in powerful ways. The boot is ceramic, and I made the teeny little vintage-style hatpins.
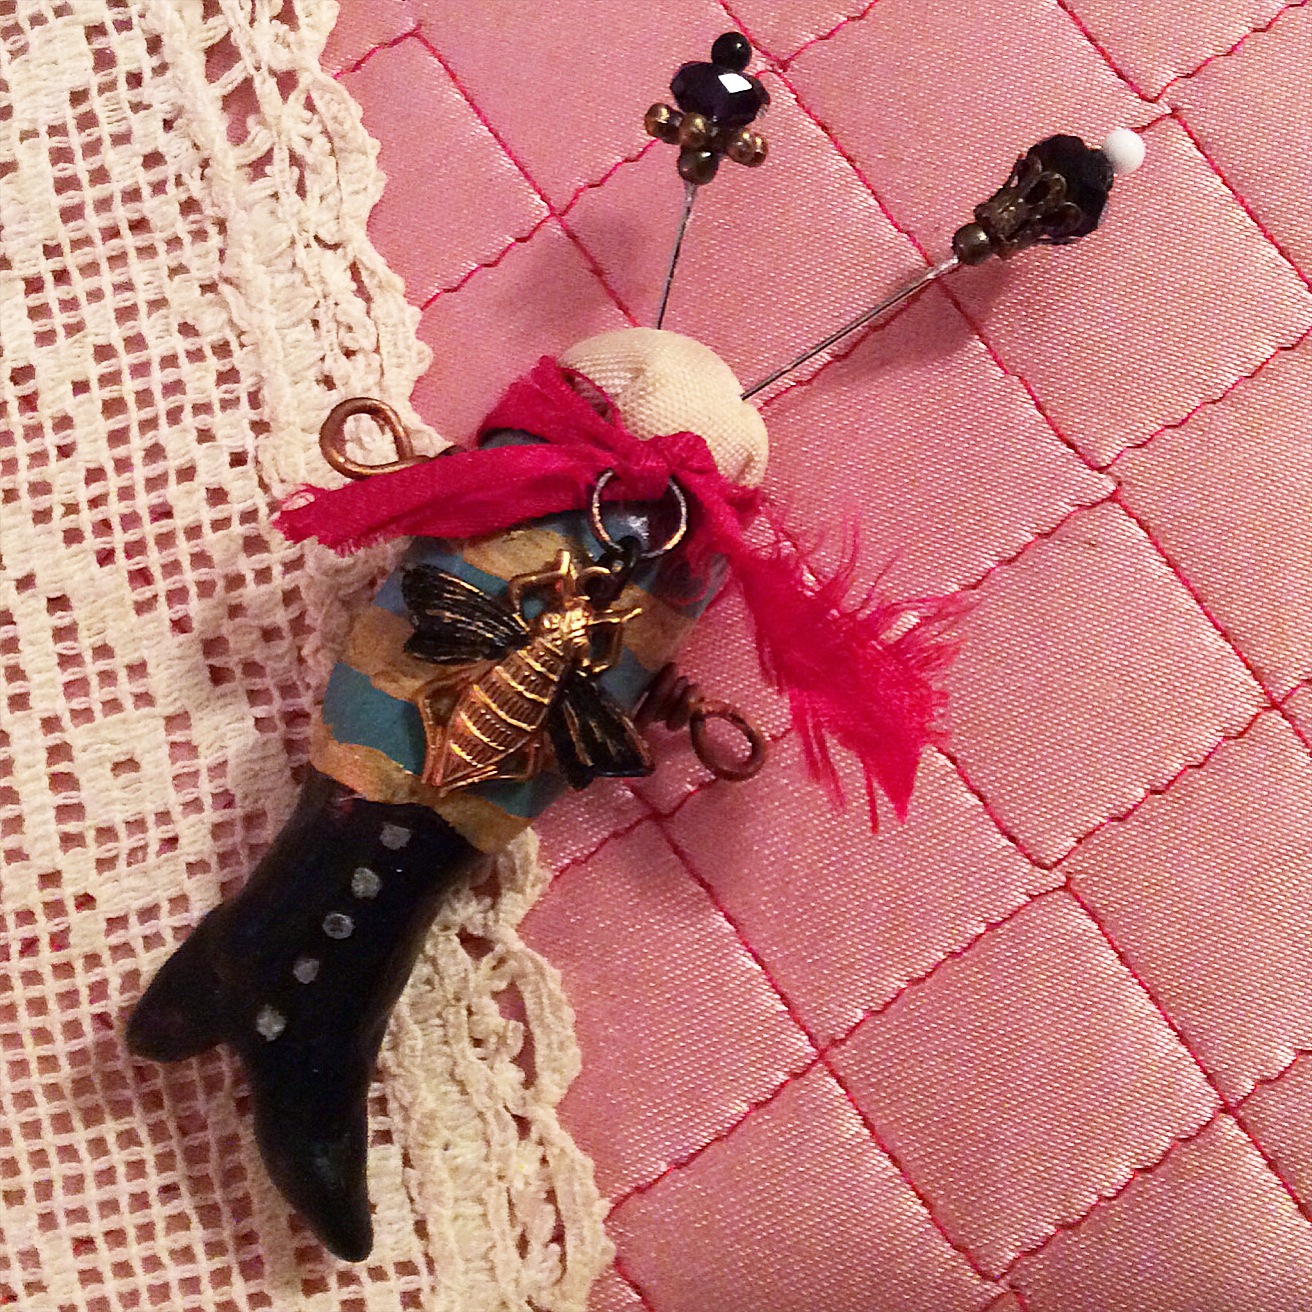
The tiny ceramic or bisque boots are dear and expensive, so the following day I set about to make one out of polymer clay. The above piece thus is entirely handcrafted and I’m not sure I don’t like it better. Anyway, I plan to make more in both styles.

This little guy is an ancient bisque doll, dug up from an abandoned factory in Germany and poor thing was headless, as so many of them are. I dearly love animal-human hybrids (this is my second foray with this concept for jewelry) and felt this one to be incredibly successful, to the point where I may not be able to let go. More are planned.

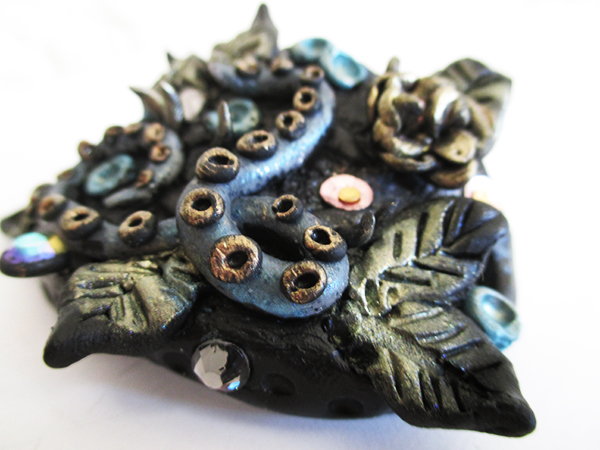
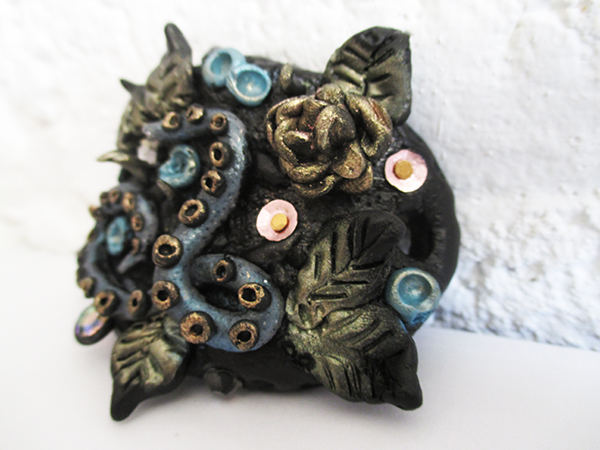
During a manic creative period, there is a point where things either peak in an orgiastic art-fest or flame over the top in a heated blaze that can make one feel truly a bit mad. It is hard to know which thing is happening, only that it IS happening. Hence, Octoboy.
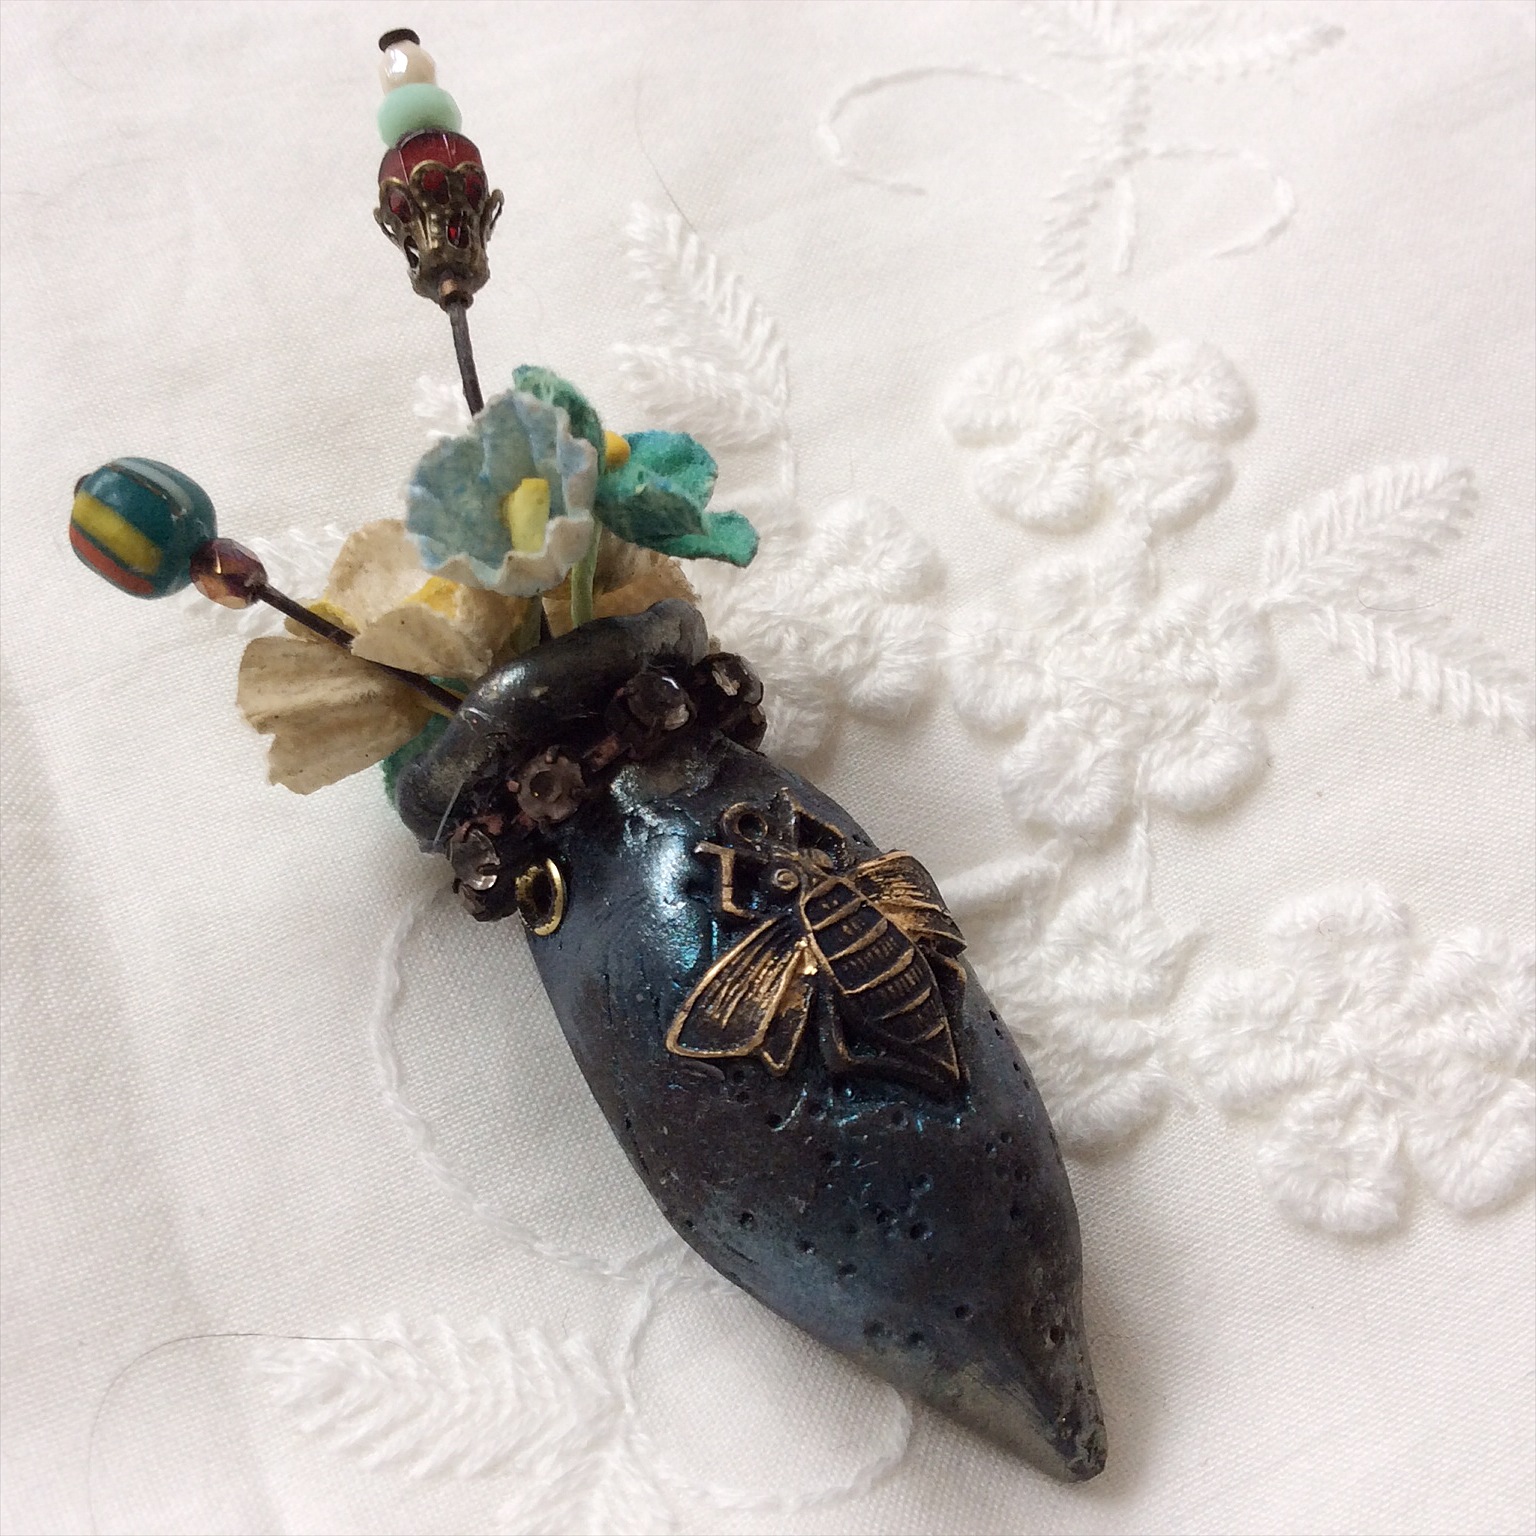
An amphora bottle with velvety millinery and more hatpins. Hard to see but there is a ring of tortured rhinestones around the top. I spent most of the day on this, and I’m very happy with the result. Riveted holes will allow me to wire it for a necklace.
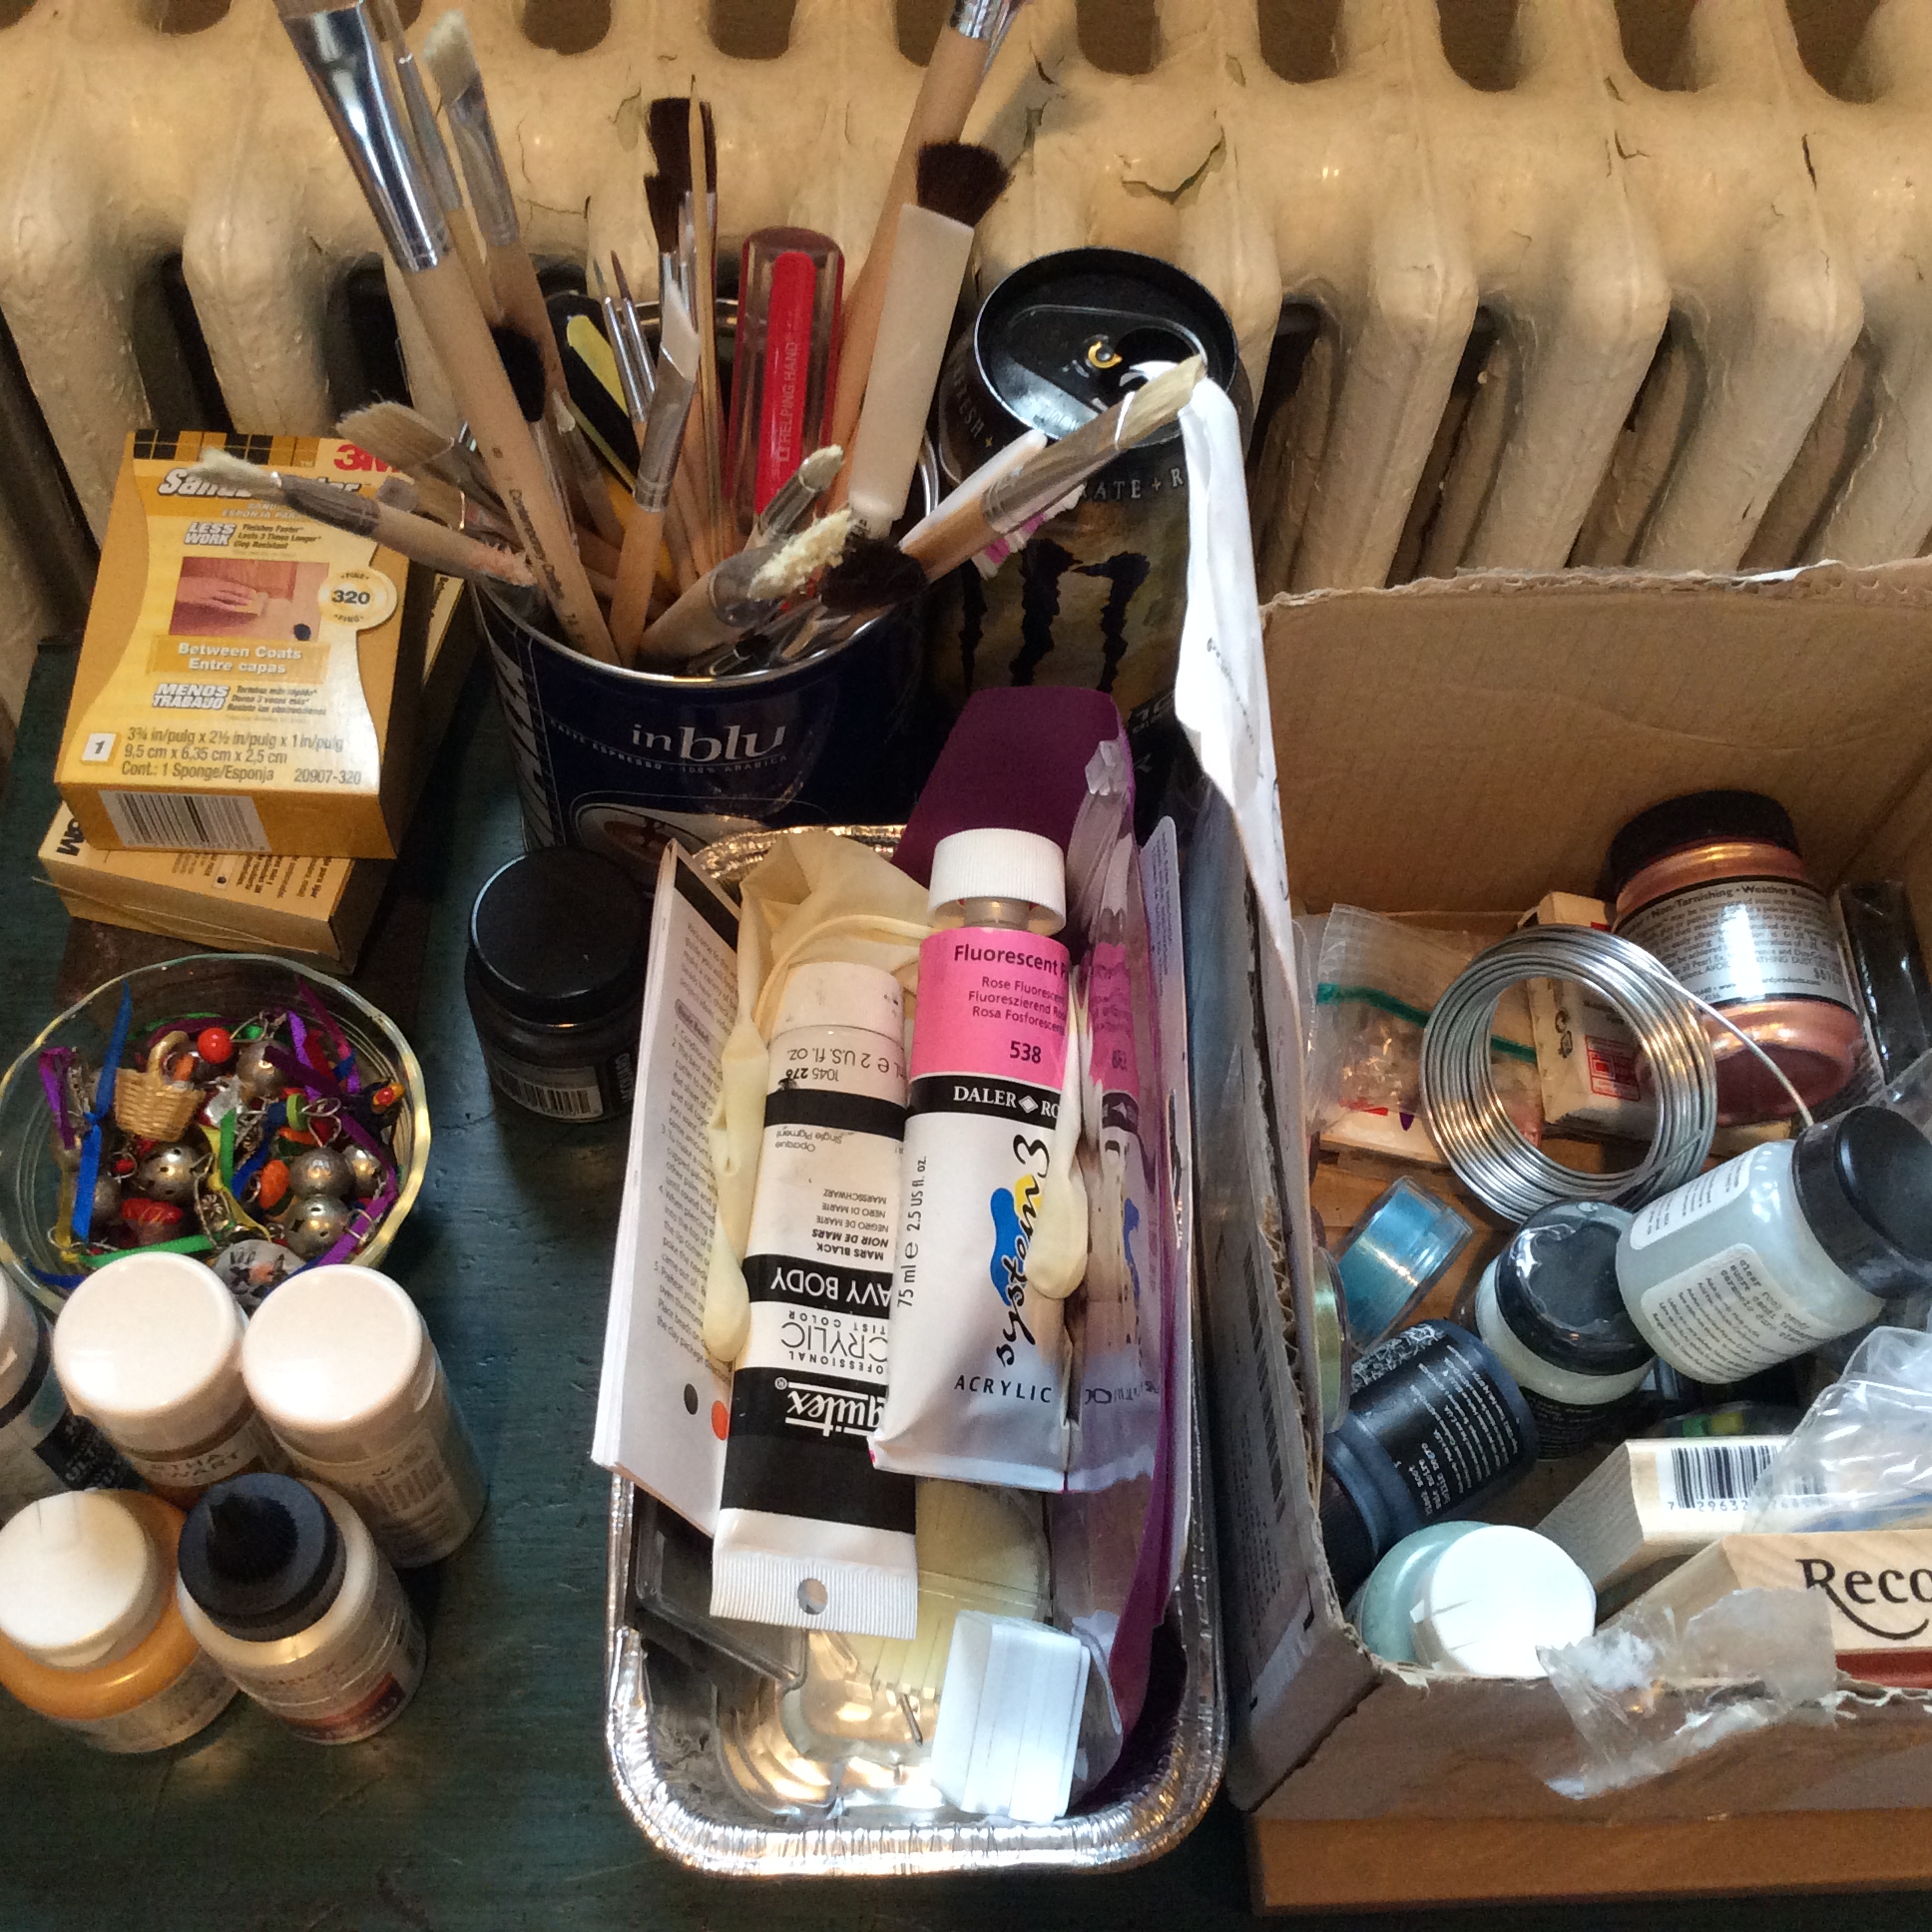
I am going to continue making these with the intent of selling them at So Charmed. But… as always, how to price?? It’s so very hard. These take a day to fabricate and an endless amount of supplies, some of them costly. Above is the table in the dining room where I keep clay supplies so that I can be near the kitchen for baking. Below, more supplies and tools.
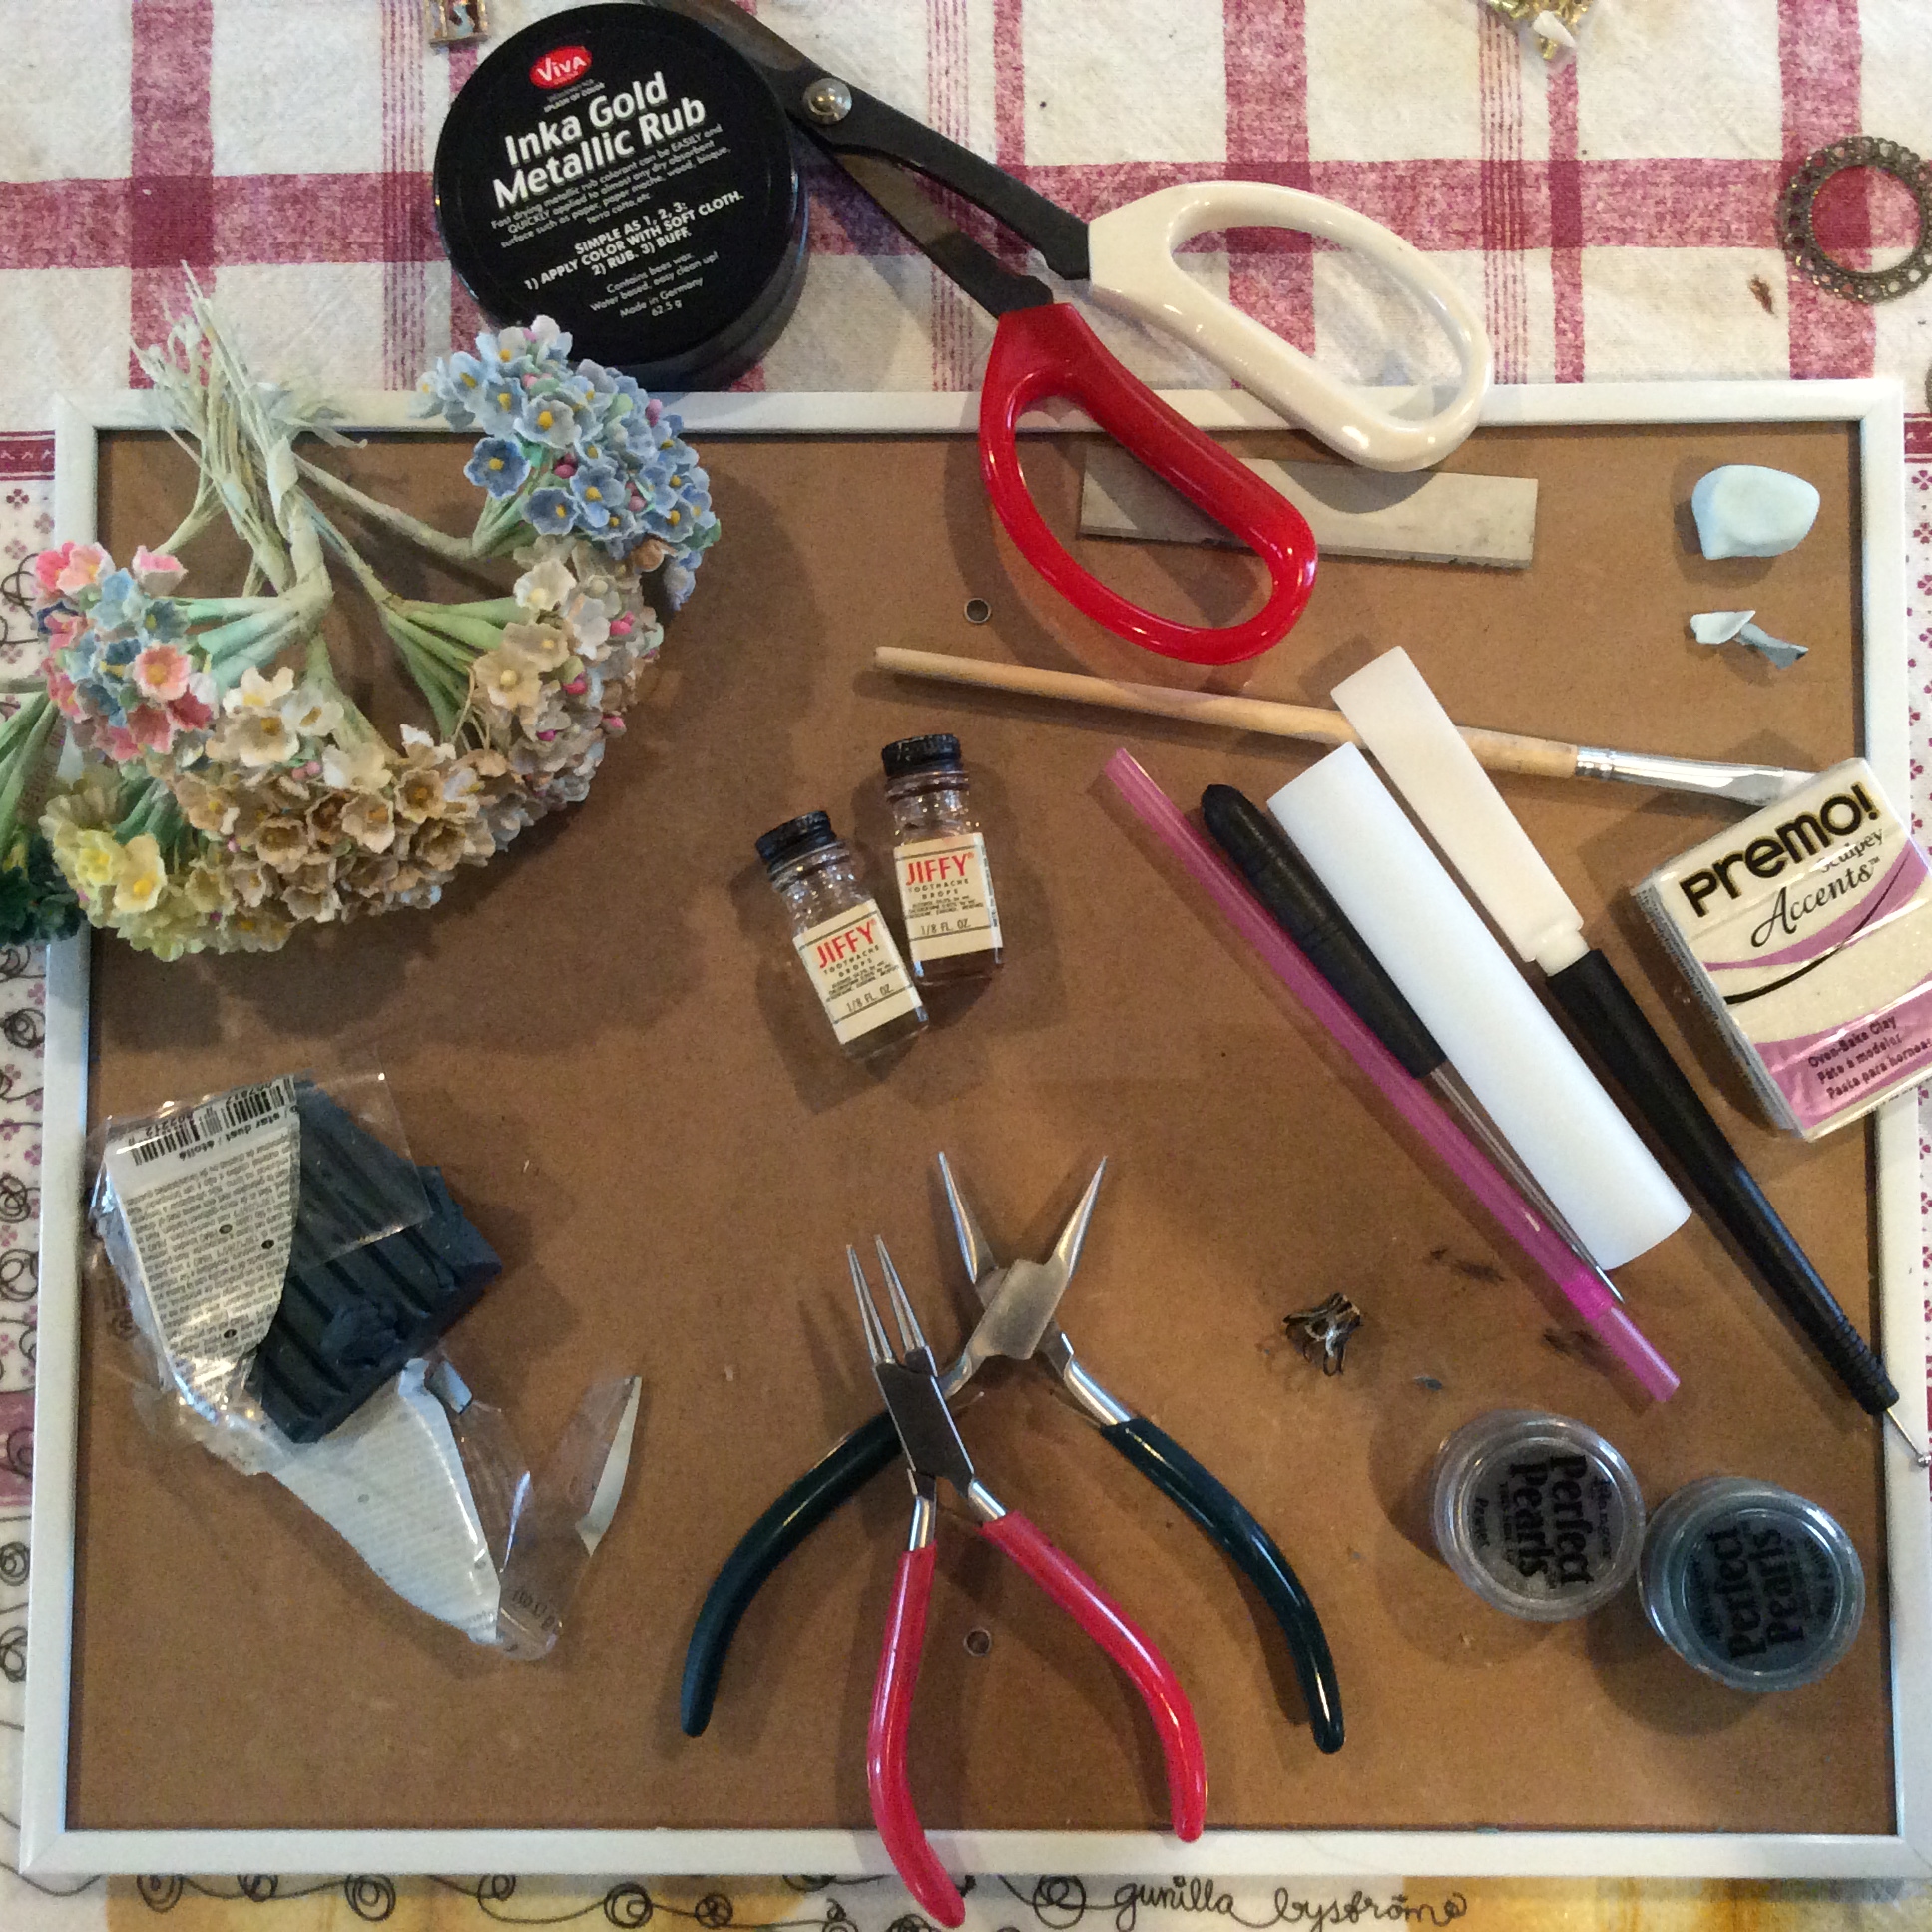
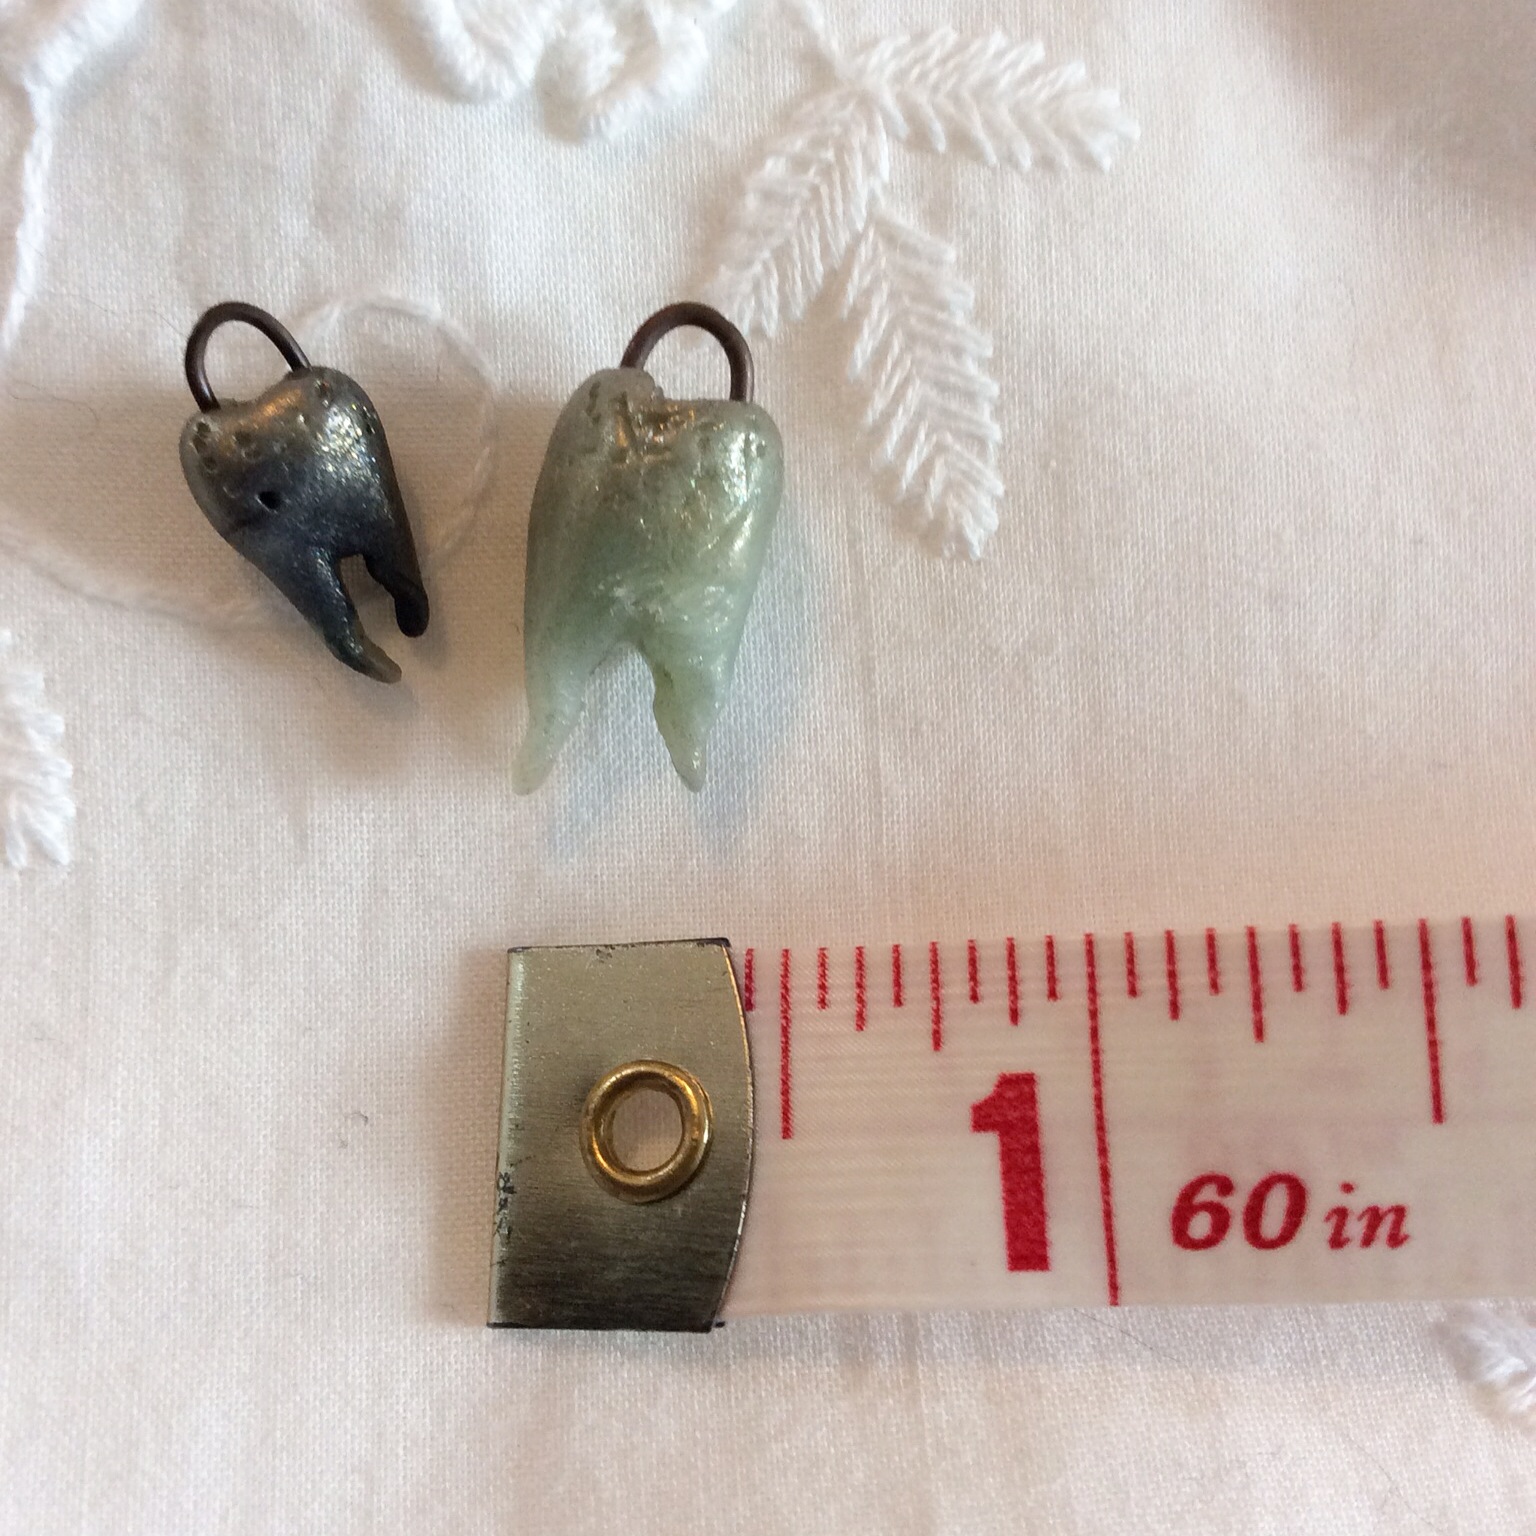
Look closely, do you see two tiny Jiffy toothache medication bottles? Since Molly is refusing to give up her soon to be yanked wisdom teeth for the sake of her mother’s art (Mom, get your OWN out!)… I was forced to make some little toofs out of clay.
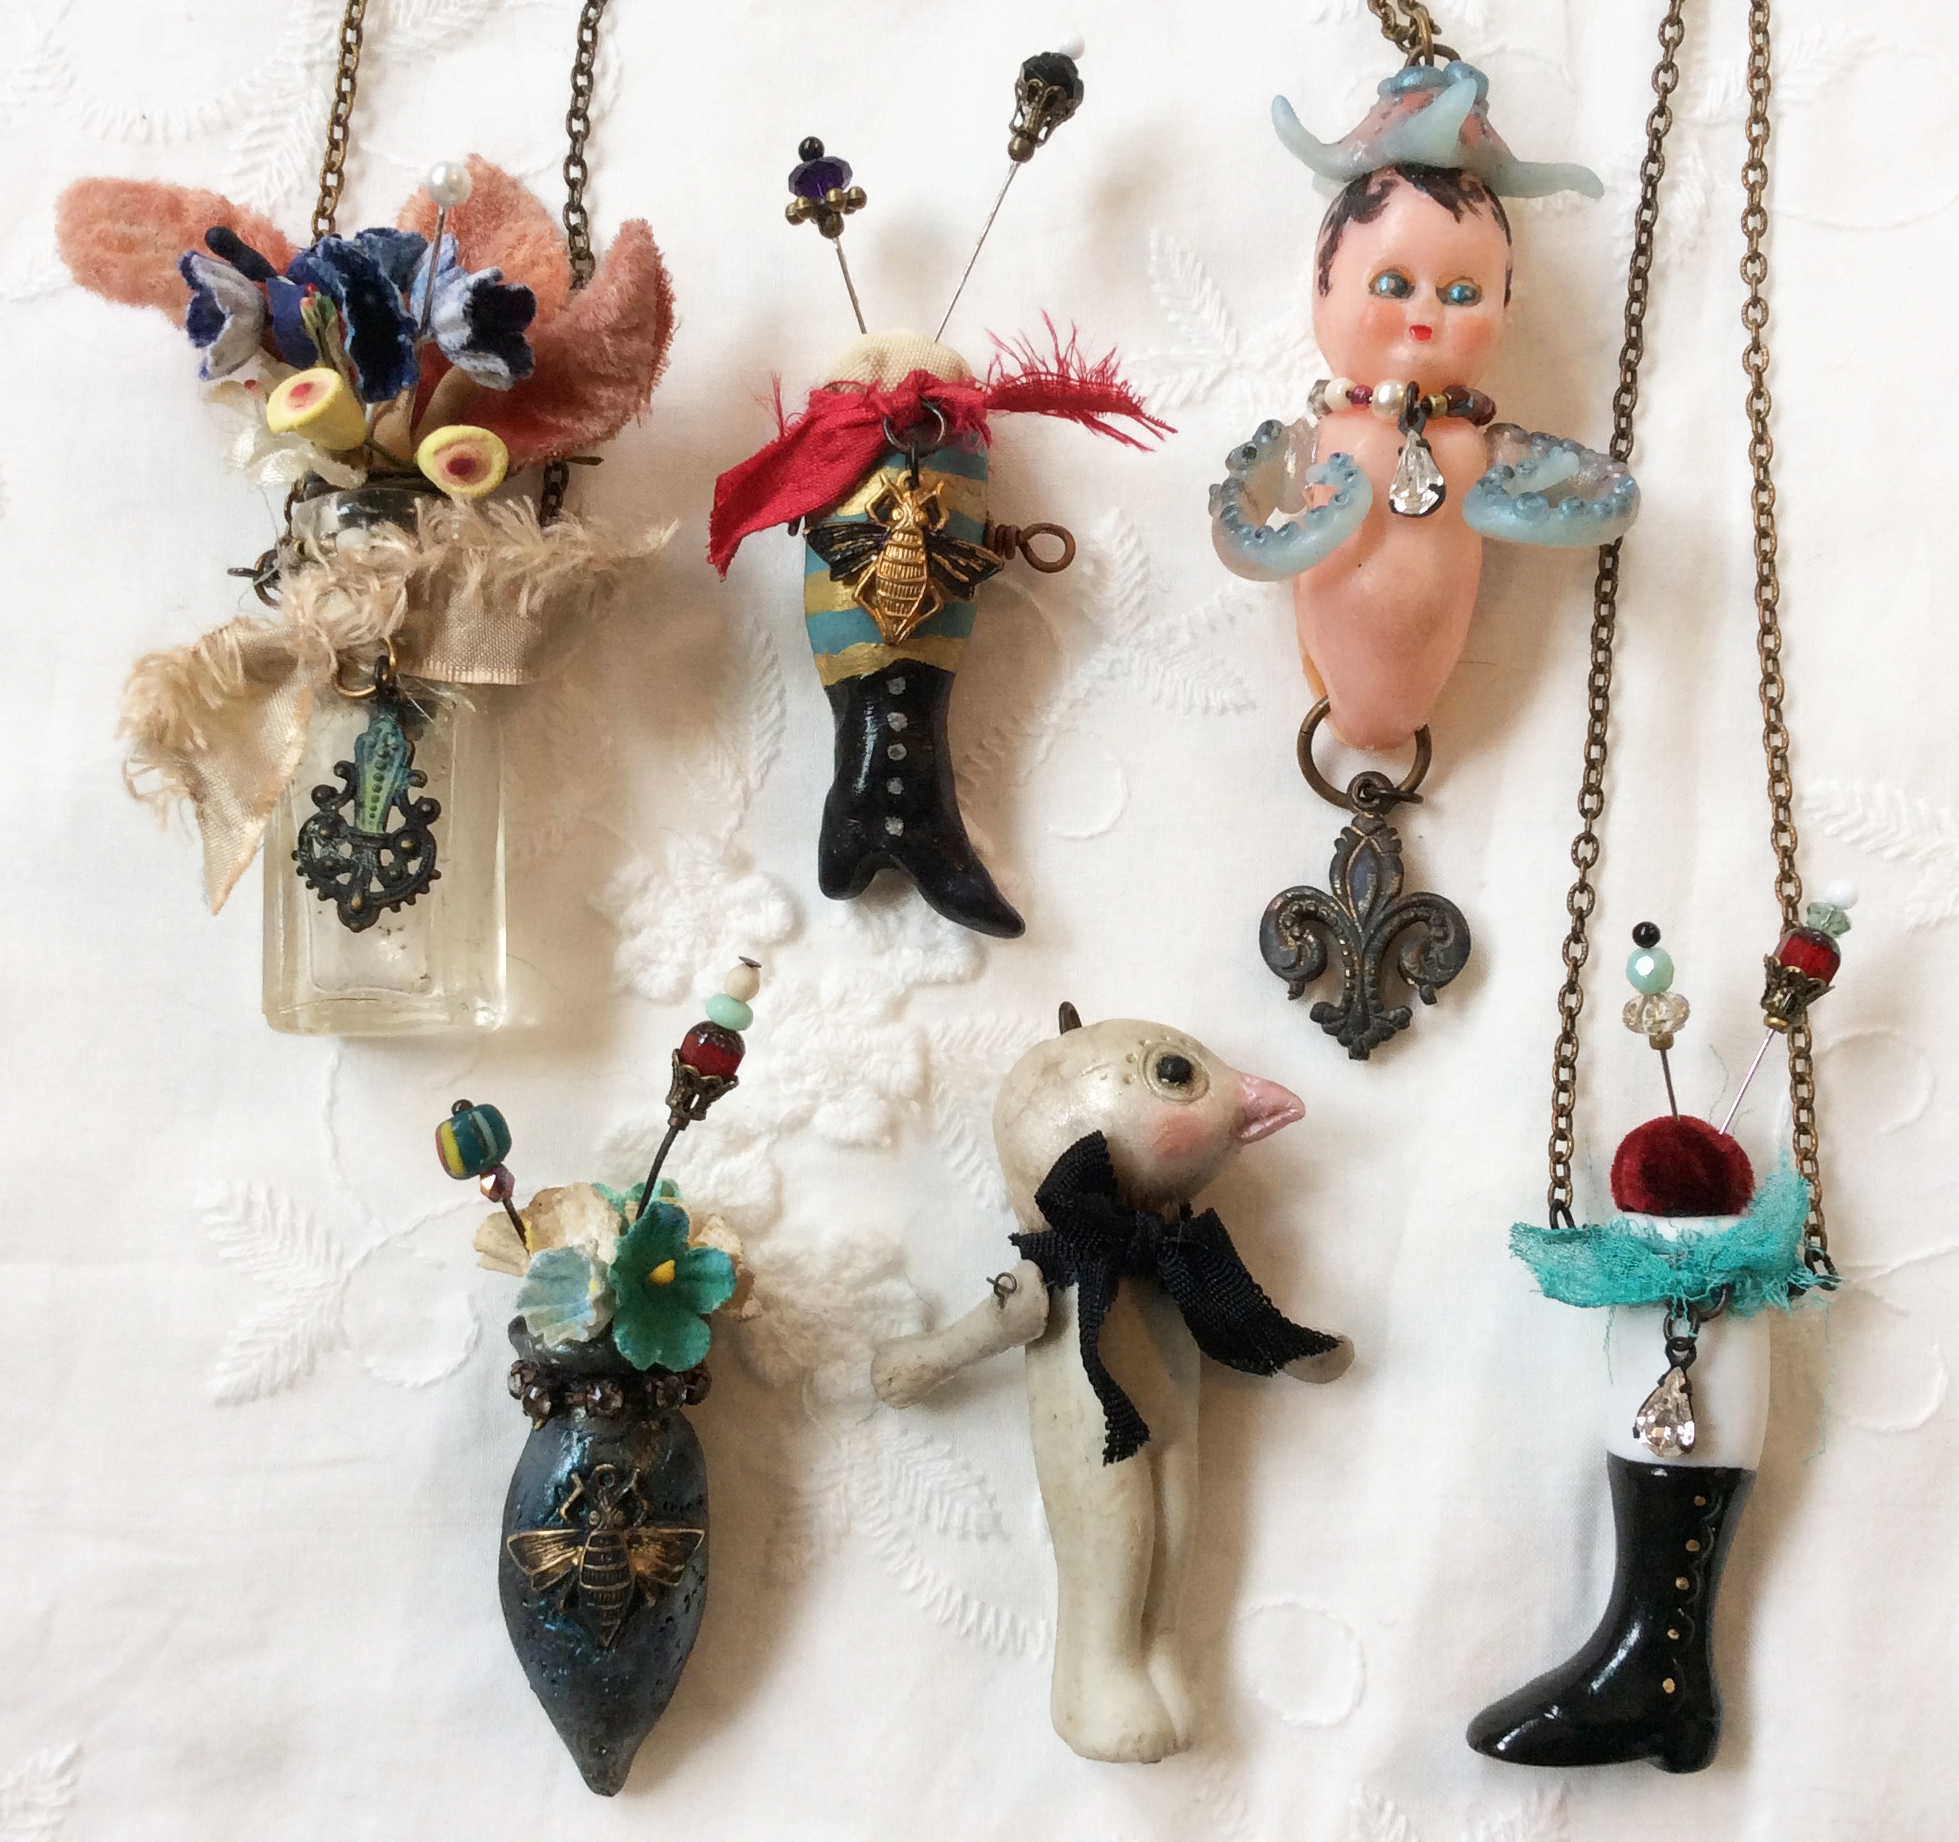
Here is the entire collection to date. I love seeing them together as it suggests a certain consistency of vision that will manifest itself in so many differing and delightful directions. Yay for the muse!
Subject: Blog, Craft, Modern Art | 60 Comments »
11.18.14

I have a love/hate relationship with polymer clay. After shunning it for years based on my perception of the overly cutesy-wootsy suburban housewife crafter (gingerbread men) and psychedelic hippie (cane) aesthetics, I’m here to tell you, polymer has come into its own. This is my second foray into this medium, the beads above were made a few weeks ago. And they got me very excited indeed about the possibilities for this medium.

As I set about to experiment again with polymer clay, I came up initially with the pieces above. I felt they were okay-ish. But they somehow felt a little safe. The leaves were beginning to have a nice, burnt feeling to them and I went on to create the entire suite of components below (Burnt Offerings collection).
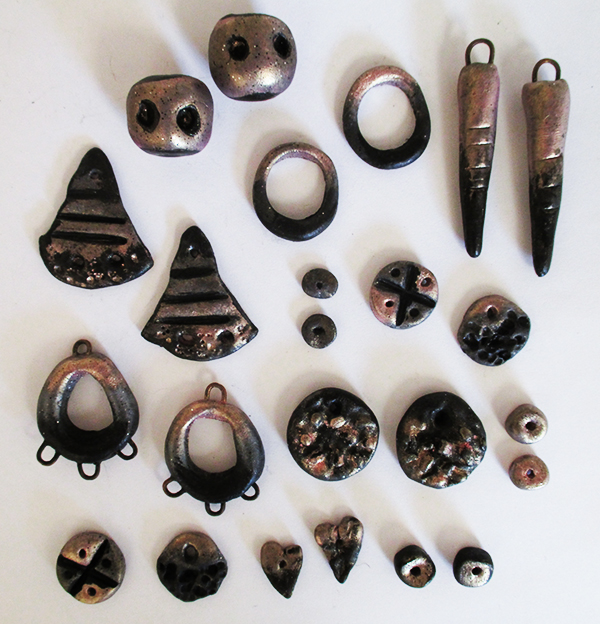
What you can see here is my experiments in both surface texture and coloration. Do I start with dark or light clay? Paint it? Powder it? Gold leaf it? Smash it, scratch it, etch it, impress upon it, embed into it, bake it, carve it? The answer is yes! All of the above and more! Polymer is a really forgiving and soft surface, and therein lies its beauty and frustration. You can get GREAT results. If you handle it after you do, those results will smooth back out quickly. It seemed like starting with a batch of small components was a great way to experiment without wasting supplies.
Of course, you know me. Attention span of a gnat. Easily bored. Gotta go over the top. The above/below piece is a focal for a bracelet, entitled Octopus’s Garden. It has holes on either side to attach chain or ribbon, and a nice curve for the wrist achieved by baking it over a soda can. Features some of the burnt leaves poking out of a dark and spooky garden. With a squid tentacle and of course bling/sparkle/glitz. Because I can’t help myself! Darkness and light, people, darkness and light.
I did not invent any of the techniques you see in use in these pieces… they are out there for the grabbing… all over YouTube. I probably watched about 8 hours of how-to videos over the course of a week while I was working on these pieces and collecting up some supplies. Just go over to the site and search for polymer clay, it will all come up. And you can follow links in the videos for additional blog posts.

Most supplies are available at any craftstore; I went to Michael’s. I also stood in the aisle and read most of a polymer clay how-to book, so as to not have to buy it. Picked up some valuable tips! It was a full immersion into the medium… and I’ve still got a very long way to go with results. I like what I’ve done, but I’m still working it out.
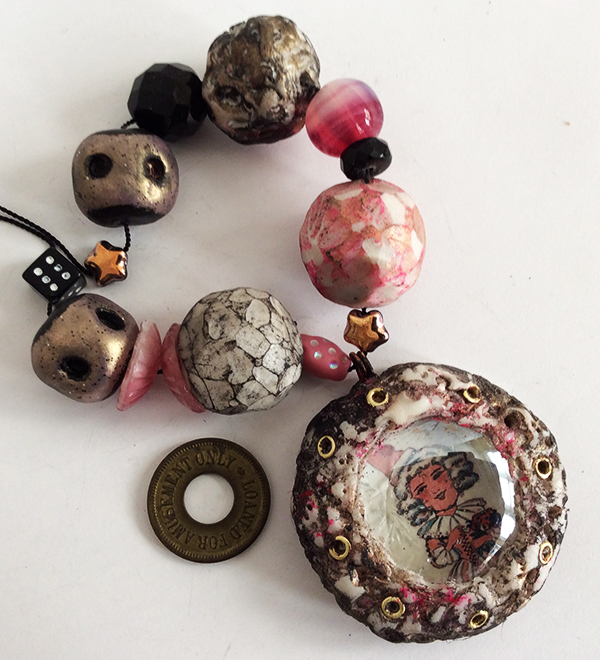
Having started with black clay, it was challenging to get any contrast going with the textures/colors. Although it’s even more challenging to photograph these, and they actually have a LOT of coloration. Above you see experiments with a sparkly white clay, as well as embedding a vintage image under a glass dome. I think it’s important to mix polymer clay beads in with other kinds of beads as you see in the curation above (which will be a necklace) entitled For Amusement Only (imprinted on the vintage brass carnival token also pictured).
So, this is as far as I’ve gotten with this round of polymer. I’m pleased and excited to make more things. There are some truly amazing polymer artists out there who make the clay look like everything from metal to raku-fired pieces. I’m no expert, but if you decide to play, feel free to get in touch with me; I’d love to chat! Unless you decide to make ginger-bread men… then I don’t really want to hear from you. JUST KIDDING!!!!
PS: I have not yet bought the requisite pasta machine for kneading and rolling clay. I’m not sure I’ll need one for the small batches of work I’ll do.
Subject: Blog, Craft, Modern Art, Supplies, They Call It Work | 75 Comments »
09.19.14

You know, way back in the ’90’s. Nirvana, Marc Jacobs, flannel, old boots. Well, it became a thing, but I’m old enough to tell you it was there long before Vogue mag declared it a fashion thing. I think by that time, I’d been shopping for clothes primarily in thrift stores for 2-3 decades, favoring girly dresses with combat boots for awhile. And I wasn’t the only one before this was co-opted by the media machine.
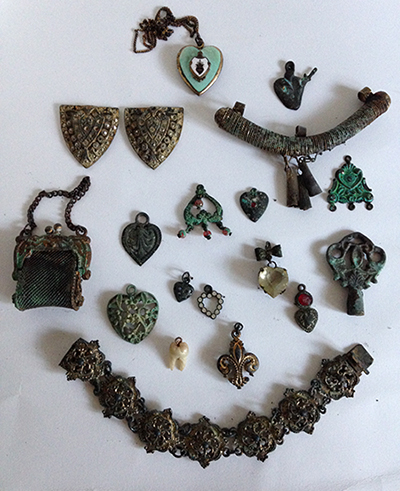
The preference for things worn, used, tattered and torn–objects with a previous life, a history, with distress, destruction, and survival felt natural to me as a form of escape from mall-ified suburban America. So, what does it mean when we MAKE things that are new appear very old (above)? Thrifstores–once filled with glamorous 40’s gowns and beaded cashmere sweaters–are palaces of polyester these days. There are crusty jewelry parts coming out of Russia and Afghanistan these days, rather than Value Village… the cost is a bit prohibitive on most of it.
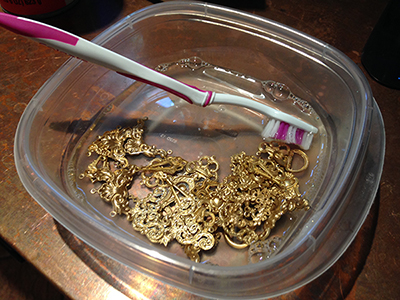
This is shiny new brass. Un-grunged. It’s soaking in dish soap to remove oils so that the chemical agents can do their job. This does not always work, but it’s a good place to start. I can’t imagine using it in its glittering raw state for much of anything. But transforming these pieces is a metal adventure.

Above are bits and pieces in the process of destruction. It’s messy and sometimes stinks like rotten eggs. It’s incredibly unpredictable, which is both a frustration and a huge part of the allure. Without knowing the exact composition of the metal you are trying to distress (copper? brass? nickel? steel?)… it’s impossible to predict which chemical might have an effect, and just what that effect will be. There is a lot of scrubbing and soaking, wiping/sanding and re-soaking to achieve a great patina (the professional term for grunged out metal).
I use chemicals made by a company called Jax. They are hazmat so I order up a few bottles have them all shipped at once. It’s hard not to think of the chemicals as precious, so when I start patina-ing, I run around my studio throwing everything in sight into the soup. Jax makes many different solutions for many different metals… I stock about 4-5 of these and use them interchangeably, sloppily, and without any prescription or recipe.

I’m really loving the verdigris patina lately. After a long while of this not seeming to work, I’ve got it DOWN, getting awesome results. Again, not predictable, with verything from pale blues to deep turquoise, to weird shades of green appearing randomly.

Brass bits are cheaply procured, but I think most of these pieces use very old dies. Using patina brings out the original workmanship, missing entirely from a glaring gold surface. Just look at those tiny swags… SO CUTE! But they just look crappy in gold.
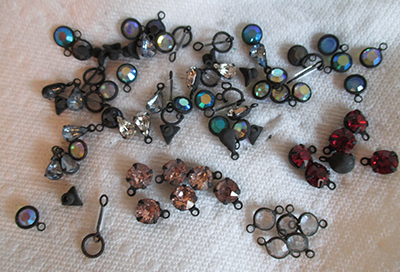
Not to be contradictory about the gold, I sometimes throw gold leaf into these designs, furthering the look of a decayed gilded age. These Belle Epoch earrings also have RAW ruby dangles… raw stones are grunge, tumbled are not! So yes, I’m removing gold, then adding it back in. Seems insane, but is really just so much fun.
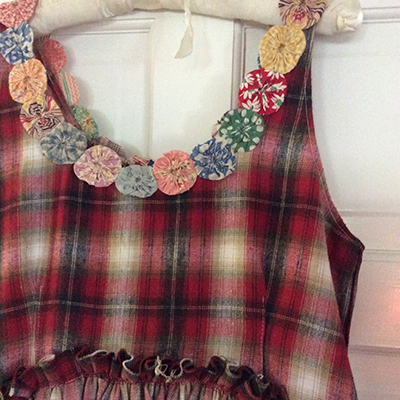
So, back to grunge. Since the 80’s, I’ve never stopped loving tartan; this is a dress I made last summer from the softest flannel and a daisy chain of feedsack fabric yo-yo’s (30’s-40’s).

And I’ll admit, I loved the Jacobs collection in the 90’s; I didn’t resent the elevation of streetwear to high fashion. It’s what always happens and sometimes the results are truly great. Above is another dress I made this summer… the delicate very sheer plaid voile fabric is by Marc Jacobs, a self-referential nod, don’t you think? Plaid looks great with florals and lace.
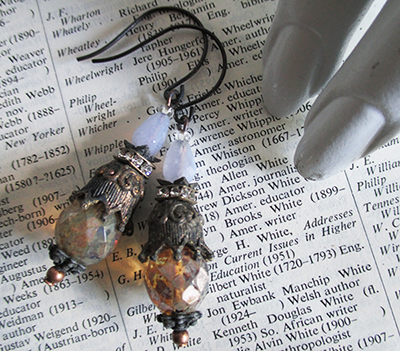
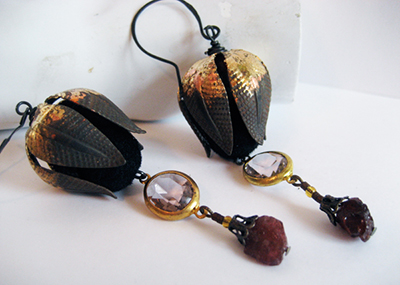
The September earrings would look so good with that dress! Should I keep them? The bead caps on these things are RIDICULOUS. Very medieval or something. And yep, they were super shiny gold, now covered with crusty soot. The beads are palest blue lace agate and Picasso-finished Czech glass beads.
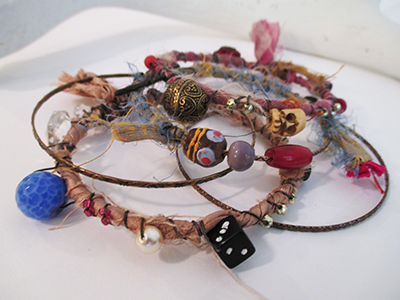
This bangle stack was made for a client this summer, a gift to someone special. I do these mostly by commission, so email me if you’re interested. They feature tarnished bangles from India, reclaimed sari silk, and lots of other beads and elements. Grungy, bohemian cool.

Here’s a recent photo I’m very taken with. Bratty children can be extremely grunge. Their hands sticky, their hair chopped. Their ragged mismatched clothing. The colors above are my palette of teal, rose, gold. You can find images like this over on my Pinterest boards.
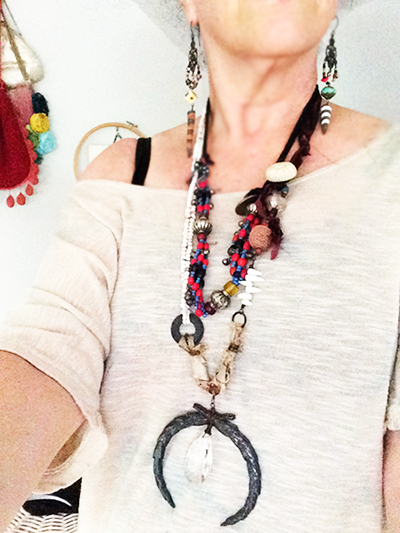
I’ll be rocking my grungy jewelry in massive layers this fall. I’ll wear too many necklaces (including this one that features a destroyed Cadillac hood ornament! The other is an old Afghani treasure that was falling apart and I sort of patched it back together), WITH earrings AND bracelets. Yeah, grunge was a thing. I’m glad it still is.
Subject: Blog, Craft, Supplies, They Call It Work | 159 Comments »
07.12.14
A key quality for making things is a certain fearlessness around one’s tools and supplies. I don’t know where this comes from, for me it has something to do with time (decades of making) and age (being ancient and just not caring). Many women I know confess to owning machines but being scared to use them… I was also that woman, so I understand!
Now that I am over my fear of the machine, I’m left with other anxieties… putting in a zipper! Sleeves! And until yesterday… knits! Not t-shirt knits… sweater knits.
And that’s when I ran into O! Jolly!. Olgayln is a master knitter, with a really fascinating history of working in theater and music. And, she has been making, selling, and CUTTING UP gorgeous machine-knit textiles for quite some time. Her blog, Crafting Fashion, about working with knits was the key to unlocking my fears, and I’m so grateful.
I created the little grunge dress above by cutting up a very open-knit sweater (terrifying) and, thanks to Olgalyn using bias binding tape to seal off the cut end. Below is a shot to show you how this looks.
I thought that the whole sweater (thrifted: $4) would unravel before I had time to walk ten feet from my bed cutting table to my machine. This did not happen.

The body of the dress is Indian cotton, very light and airy, about $6 a yard. Suffice to say, whole worlds of stitchy fun have opened up. As soon as the thrift stores start stocking sweaters again, I’ll be off and running.
If you are a Blythe-ette (and I know some of you are) you will want to dress like your dolly and she of course is wearing Cangaway. When you hit the link, be sure to visit her SOLD section. These fabulous dresses (about $30 ea) sell immediately upon listing, and I’m talking MINUTES. You can get on her “first to know” list and receive an email a few moments prior to her listing and then you’d better strike fast. Pictured is my Sophronia, decked out in Cangaway, plus Mad Hatter top hat by yours truly.
Last but not least, if you are or will be in New York on 7/22, I’d highly recommend a workshop Olgalyn is giving on making a shrug from knit fabric. I hope to make it to one she might schedule in the fall if any local ladies would like to consider caravanning to Brooklyn.
Subject: Blog, Craft, Supplies | 5 Comments »
07.11.14
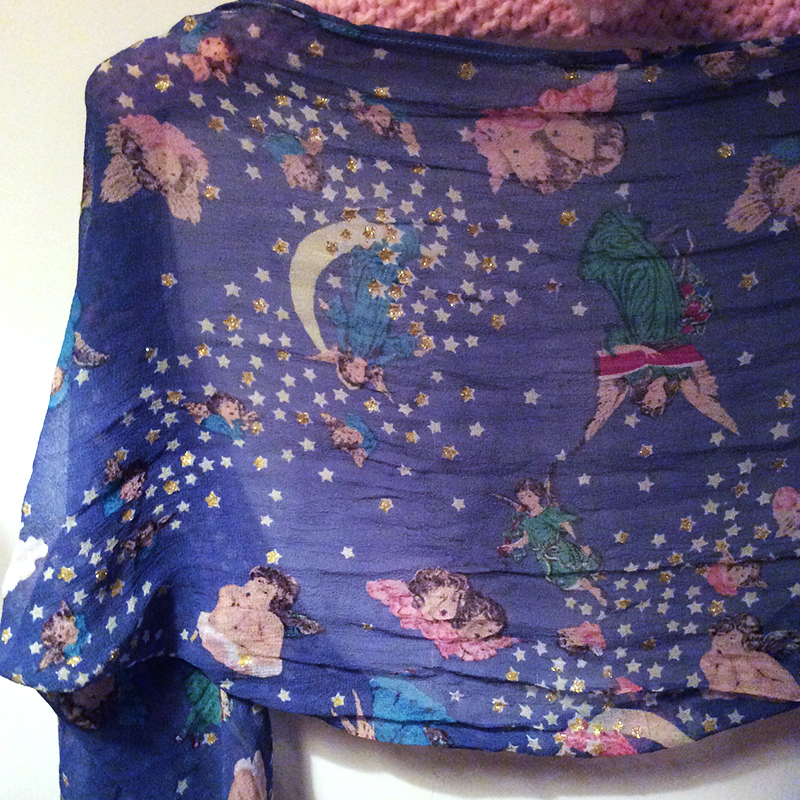
I was delighted to find this gorgeous scarf at my local thrift, buried behind about 100 of her ugly stepsisters. Although I don’t wear scarves, I couldn’t pass up this fabric which put me in mind of a 70’s super-glam brand called Sweet Baby Jane for the Plain Jane clothing company. I used to scour the High Street boutiques on the OSU campus in Columbus, OH looking for these rock-star boho retro fabulous garments. If you remember this brand, check the link above to learn what well-known company it transformed into during the 80s.

And with its angelic cherubs, the fabric also puts me in mind of iconic 80’s Italian clothing brand, Fiorucci. I remember squeezing into a pair of the skinniest Fiorucci jeans ever by lying on the dressing room floor in order to zip the zipper. I think they were gold. Metallic.
If you look closely at this delicate, crinkly, sheer rayon, you can see that some of the little stars in the print are covered with actual gold glitter. Yeah, for $1.99 this was going home with me and I’d figure something out.
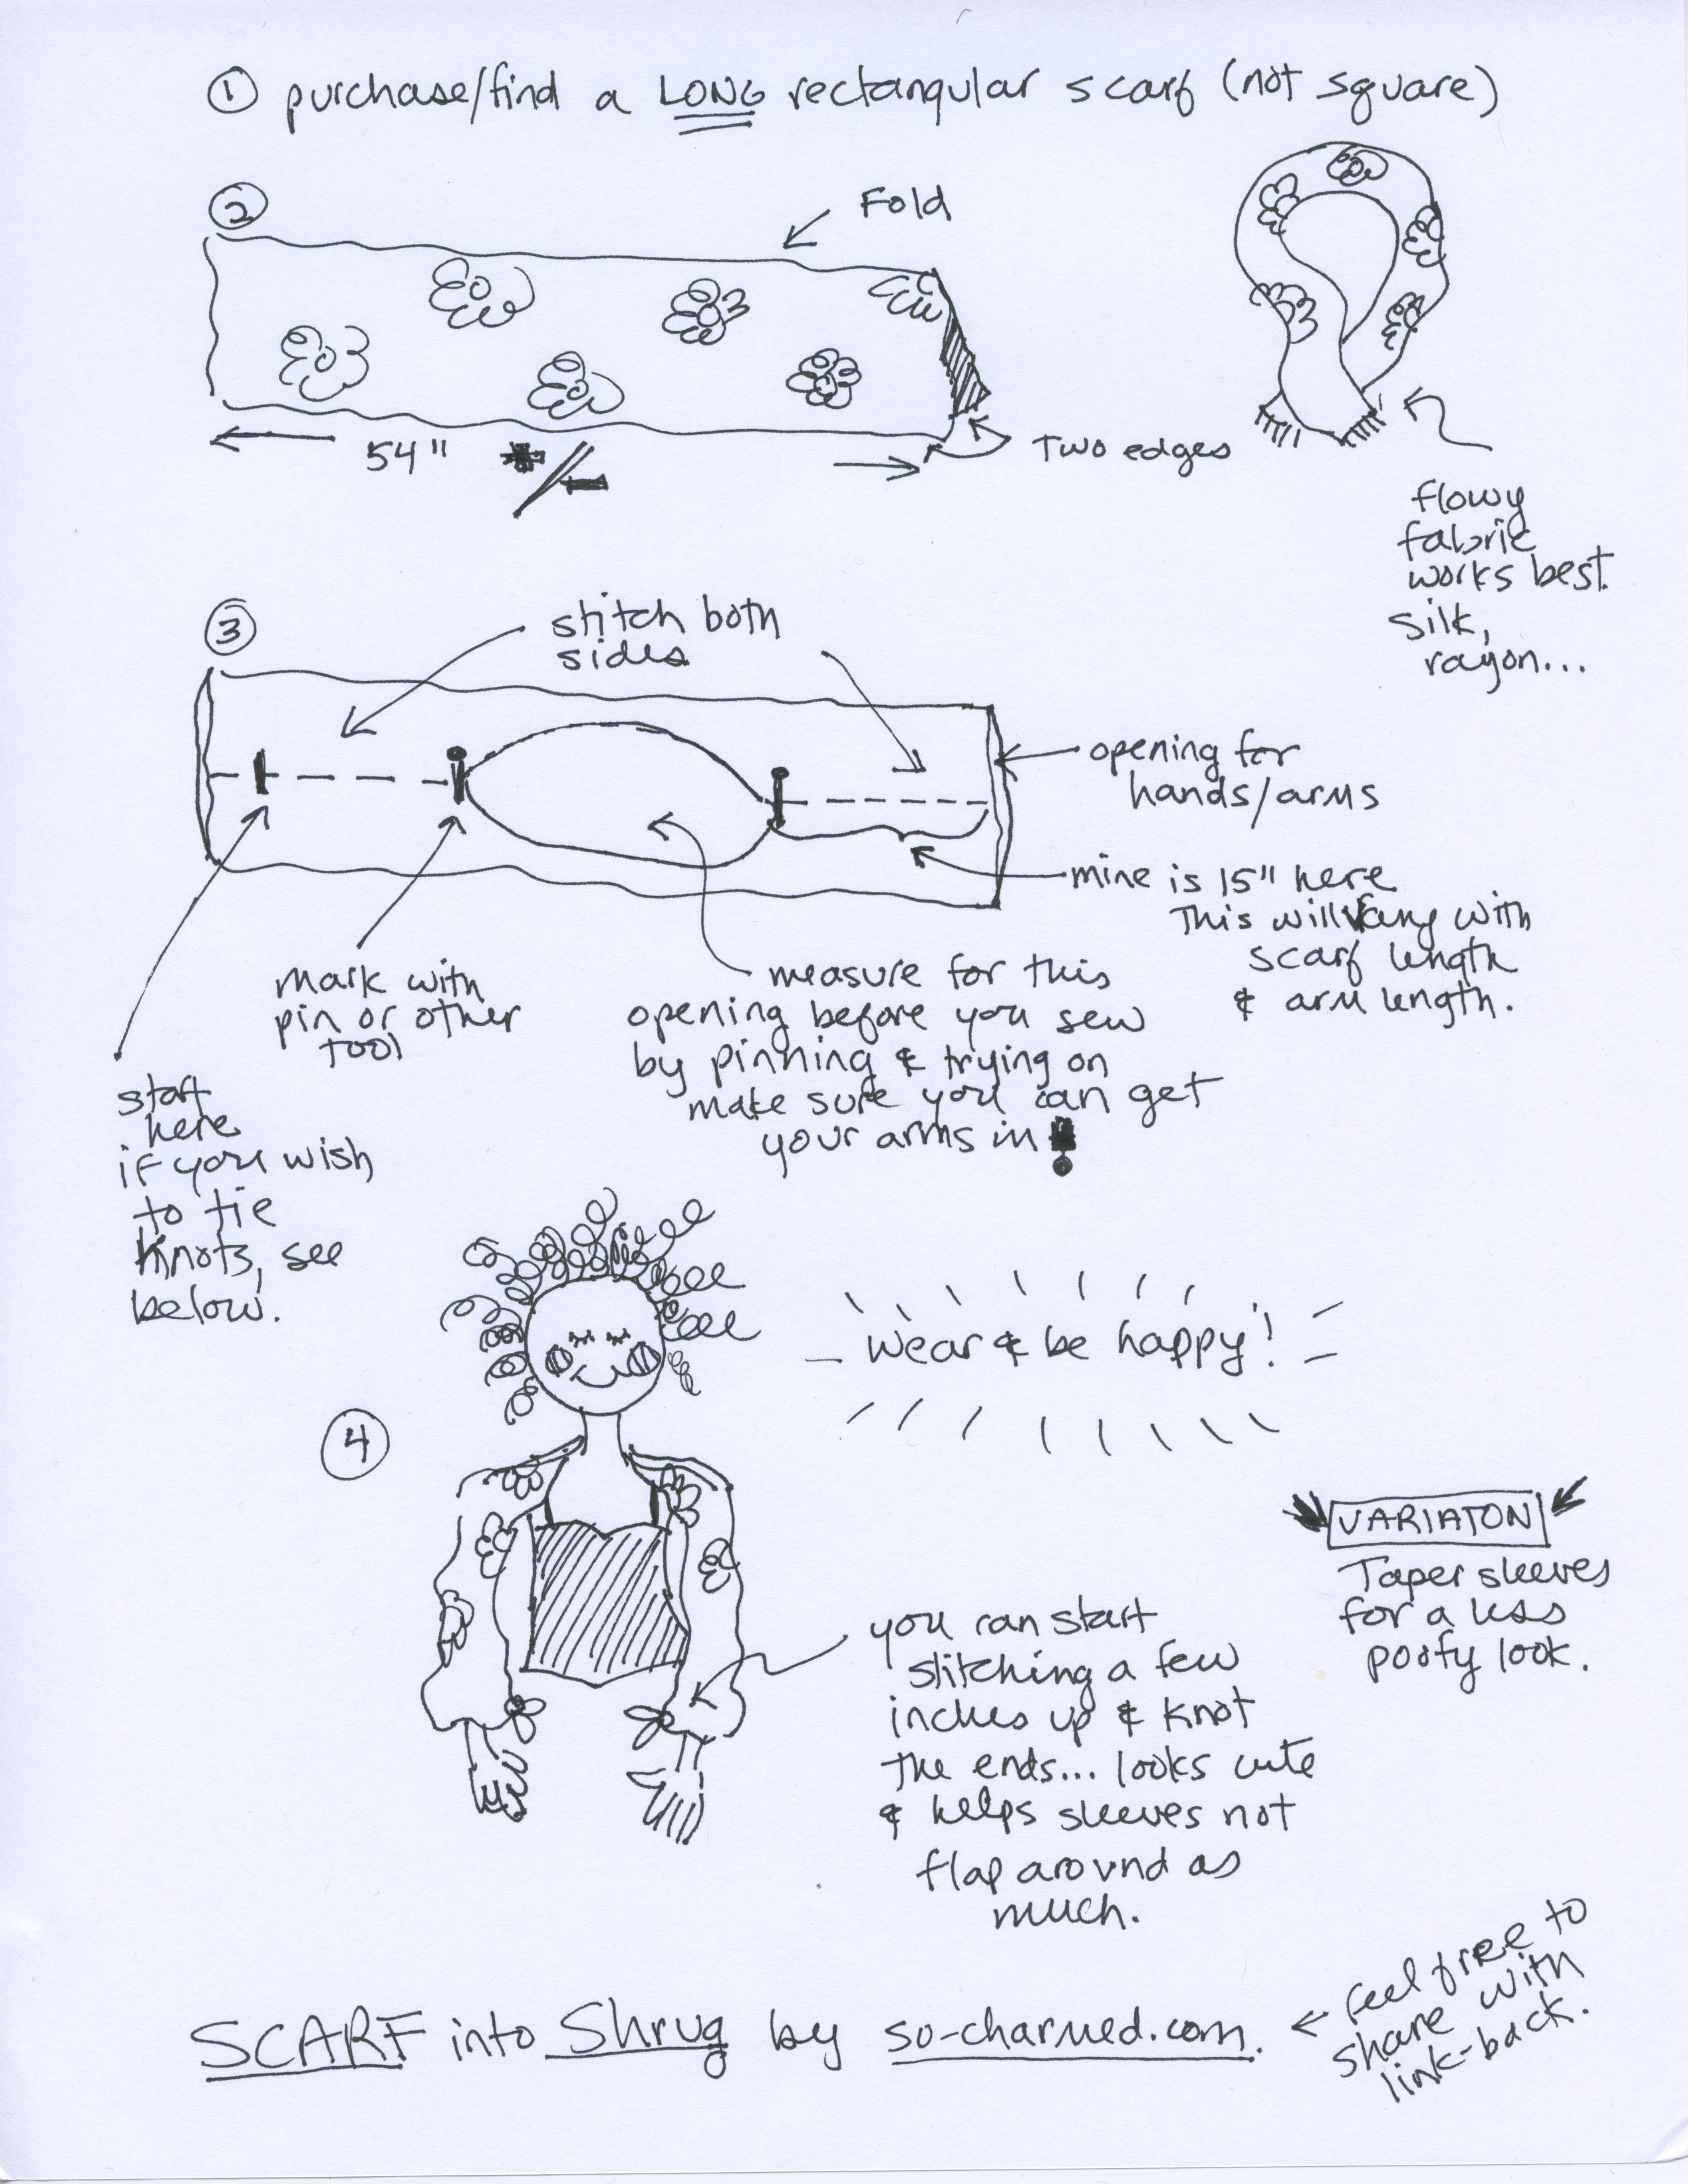
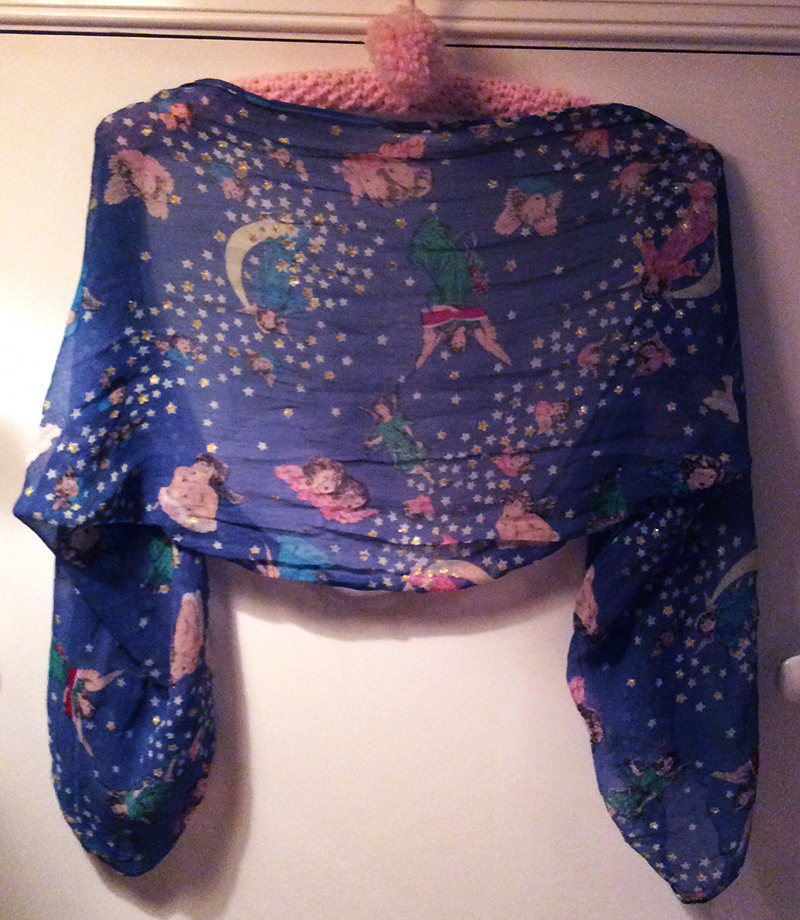
Making this really could not be simpler.The bulk of this “project” is in locating a great scarf to use. It should be an elongated retangle, not a square, and in flowy fabric. Measure to fit, sew two seems and voila!
Feel free to share this idea and the instructions above by linking back to this blog. Larger photos can be seen on my flickr. Thanks! xoxo
Subject: Blog, Craft, Supplies | 5 Comments »
07.06.14
Friends on Facebook know that I’ve been obsessively sewing again; this post gathers together images and ideas, a greatest hits of the allure of this activity for me.
1. Textiles. Probably the number one reason I sew is a deep, enduring love for textiles. My passion for fabric seems to know no bounds and each time I get back to sewing there is a literal world of discovery awaiting.
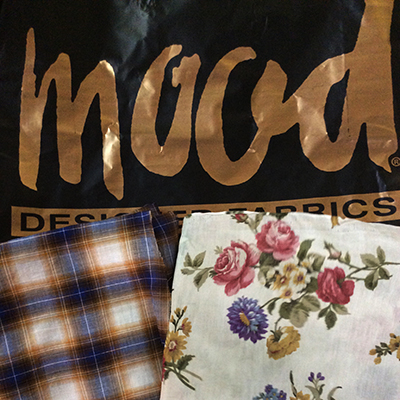
The love of textiles takes me adventuring to Africa, India, Japan, Europe (without leaving home)… crossing decades and centuries (without a time machine), exploring history, industry, technique (sans a classroom). Textiles invite anthropological inquiry and ultimately make me feel connected to societies I can never really know, particularly societies of women. And, thanks to the Worldwide Web, sewing takes to me to Mood, NYC. True, Tim Gunn isn’t around to soothe my nerves, and Swatch the dog is but an on-screen image. Still! Mood!

Above are textiles from Mood that I managed to match from online images only, remarkable, really. I’m having a huge 90’s grunge moment and the plaid is by Mr. Grunge himself, Marc Jacobs, a delightful, sheer voile fabric. The floral is fine silk and a complete bitch to sew. The lace is antique from a yardsale, as is the ribbon.
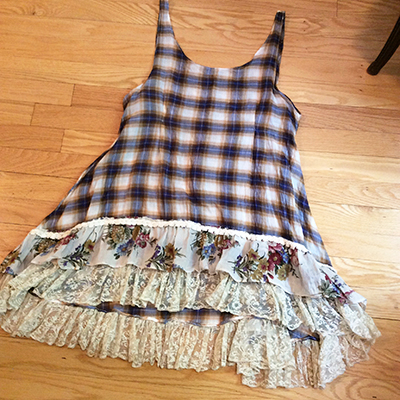
Front of this dress is shorter than the back.
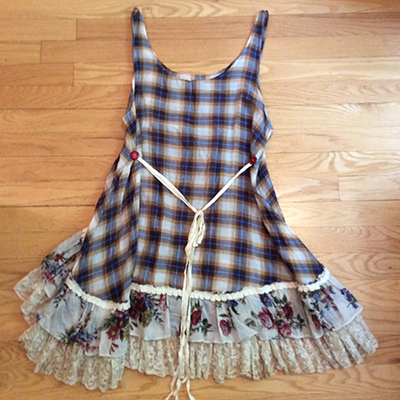
Ties make it fit nicely for sizes 2–8.

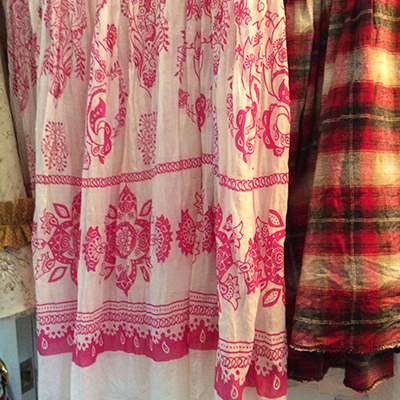
The dress pictured center is made from the sheerest bone white cotton voile from India, block printed with a lovely pattern just begging to be a sari babydoll dress. These textiles can be had for about $6-$12 a yard (and up), via a handful of dealers on both ebay and etsy. I have never been disappointed with this yardage, colors are bright, patterns run from traditional to sweetly off-kilter interpretations of Western themes. And how fun to receive packages from around the world!
2. Analog. To be fair, my sewing machine is a sophisticated computer…
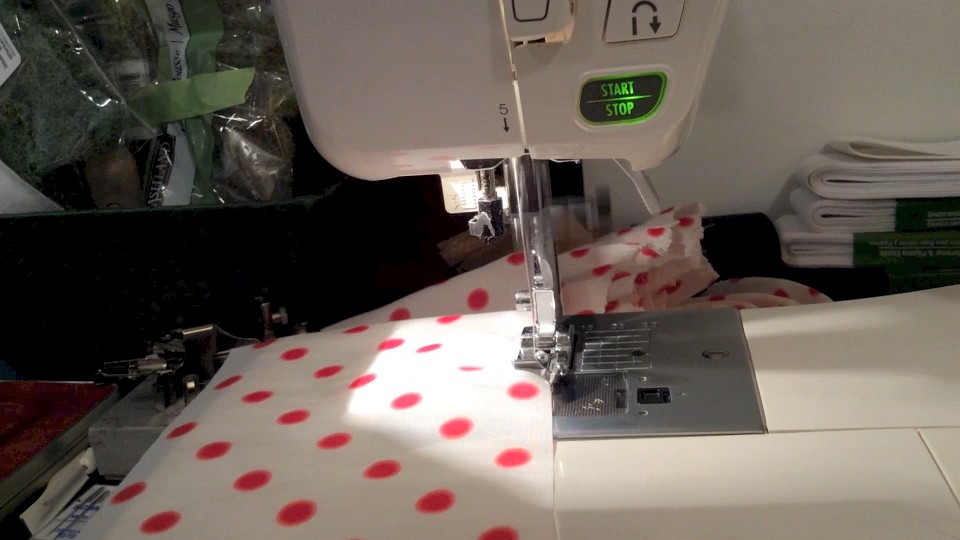
CLICK IMAGE ABOVE TO PLAY VIDEO.
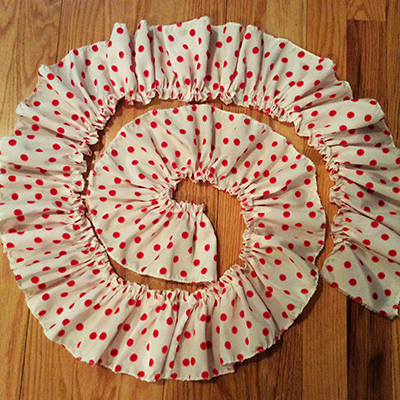
…but that isn’t at all what I love about it… and for the most part I ignore this aspect in favor of the older school functions that have been performed by machines since sometime in the 1700’s. The 10 second video above shows my machine in action, overcasting (which means I don’t need a serger) a length of delicious cherry silk polka dot fabric, also by Marc Jacobs. I love the visuals, I love the sound! And you can’t have enough ruffles, right?
3. Mad Skills. Sewing requires many skills that I do not currently have. I learn at least one or more new things with each project I undertake. As with other challenging activities, the knowledge is cumulative and improvement takes practice, over time. A few tips if you are, like me, an impatient novice:
• Make something simple that you will honestly love and that falls within the current limits of your ability. Then make it again in another fabric. And again, with a slight variation. Each time, push yourself just a little. You will end up with three cute garments that aren’t perfect but are perfectly wearable.
• The right tool for the job… i.e., know your needles, cutting implements (and keep them sharp), measuring tools, markers, etc. Build your tool library slowly on an as-needed basis… learning as you go. Have your machine serviced bi-annually once you really start using it.
• Watch YouTube videos! There is NOTHING you can’t learn on YouTube from sewing bias tape to working with bitchy silks. The sewing videos are often funny. You can pause, rewind, watch them dozens of times late into the night….
• Make mistakes, then fix them as best you can and MOVE ON. Nothing handmade is perfect. If it is, it’s boring.
4. Relationship to day job. Sewing is very different from graphic design; my day job. But there is a lot of overlap and I take advantage of this. There are applicable skills; color sense (and nonsense!), measuring, constructing, and the joy of ideas or concepts combined with the tedium of production.
It feels great to access 30 years of art and design experience in service of wearable creations, all while pushing myself to learn more. The piece above, a swingy tunic (or very short dress) was created from a pattern I made myself, copying a tee shirt from free people. The learning opportunities are endless with sewing.

5. Upcycling, and the romance of need. Sewing your own clothes is not a choice to make simply to save $$$. In today’s world of H&M &tc, fast fashion can be had for dirt cheap. If you purchase NEW yardage, there are bargains to be found… but there are many delicious fabrics you will lust after that are trés expensive. You’ll also need a lot of auxiliary supplies and will be running to fabric stores constantly for matching thread, picking up MORE yardage that you really don’t need… just ’cause it’s there.

And then, there are curtains. The two most influential films of my childhood, “The Sound of Music” and “Gone with the Wind” feature heroines rising to the occasion of style-over-means. Remember the VonTrapp children frolicking through those oh-so-alive hills in their shameful, adorable garments made from the Captain’s living room curtains?! And Scarlet, OH SCARLET! Who can forget her fabulously rich green velvet curtain ensemble???
When not busy searching out bargains on Mood.com, I’m combing my local thriftstore for textiles. Curtains, tablecloths, bedspreads and sheets… the most amazing vintage fabrics, at pennies-per-yard can be found on almost any trip. The bloomers above and below were made from curtain yardage, two panels at a total cost of $4.
The three fabrics came SEWN TOGETHER. All I had to do was cut. Oh, and I patterned these for a perfect fit by copying a pair of pajamas, also scored at the thrift.
The ruffle trim on this flirty dress was also once a curtain. Dotted swiss in a spicy mustard shade, probably circa 1970-something.

6. Collage of disparate elements. In all of my creative pursuits, from jewelry to sewing, I lean toward bringing together things that may not belong in the same project. Below, I trimmed a super soft ombre flannel dress with a length of handcrafted yo-yo trim made of 1930’s feedsack fabric. Feedsack is a collectibles world unto itself, but the yardage has become quite expensive… and is mostly available in smaller pieces (duh, feedsacks). This was a fun way to incorporate the wonderful patterns and textiles without spending a small fortune.

I’m currently obsessing over Japanese textiles and techniques. Below is a babydoll tunic that features very vintage Kimono silk as a ruffle, with the main fabric a “homespun” from JoAnn’s. If you go to JoAnn’s, ALWAYS print out the week’s 40% off coupon… it’s good on yardage! If you forget, email it to your phone from the Web when you get there.
Vintage Komono fabric, much like feedsack, is dear ($$$) and generally available only in smaller pieces b/c it is loomed in the right amount for making Kimono–no waste, making it perfect for trim. The colors and textures are gorgeous. I very boldly tea-stained the dress body after completing it as the stark white wasn’t working with the vintage fabric. Scary, but worked great.

I’m itching for a larger, more involved project after all of these simple dresses, and am about to embark on a piece that will use new and vintage indigo textiles and will incorporate Japanese Sashiko and the boro aesthetic.
Watch the flying fingers in this video as she creates rows of Sashiko hand-stitching. You’ll also see this technique in India, on Kantha quilts. The effect is lovely.
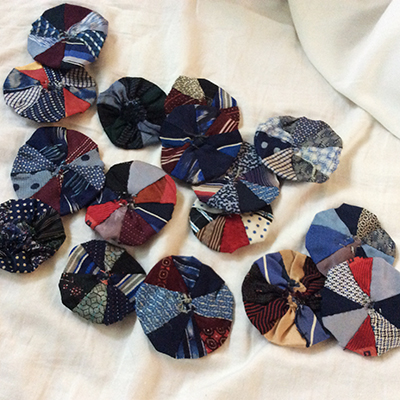
I may incorporate some of these quilt y0-yo’s made in the 1940’s from men’s necktie silk into this upcoming project.
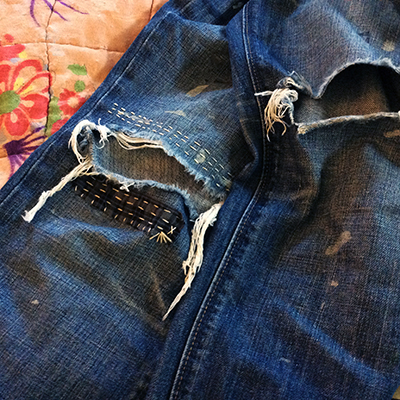
And here are my first practice stitches, done on my old jeans in a doctor’s waiting room. The point is to make all the stitches uniform in size and spacing. But I have seen loads of ancient cloths where the stitches–made perhaps in haste to get a farmer back into the field–don’t look so far from my own wobbly and inaccurate attempts.
Stay tuned! xoxo
PS: Big thanks to Molly for showing me a) how to send a JoAnn’s coupon to my iphone and b) how to get a video off my iPad, into iMovie, and embedded in WordPress… with a thumbnail!
Subject: Blog, Craft, Supplies | No Comments »
02.27.14

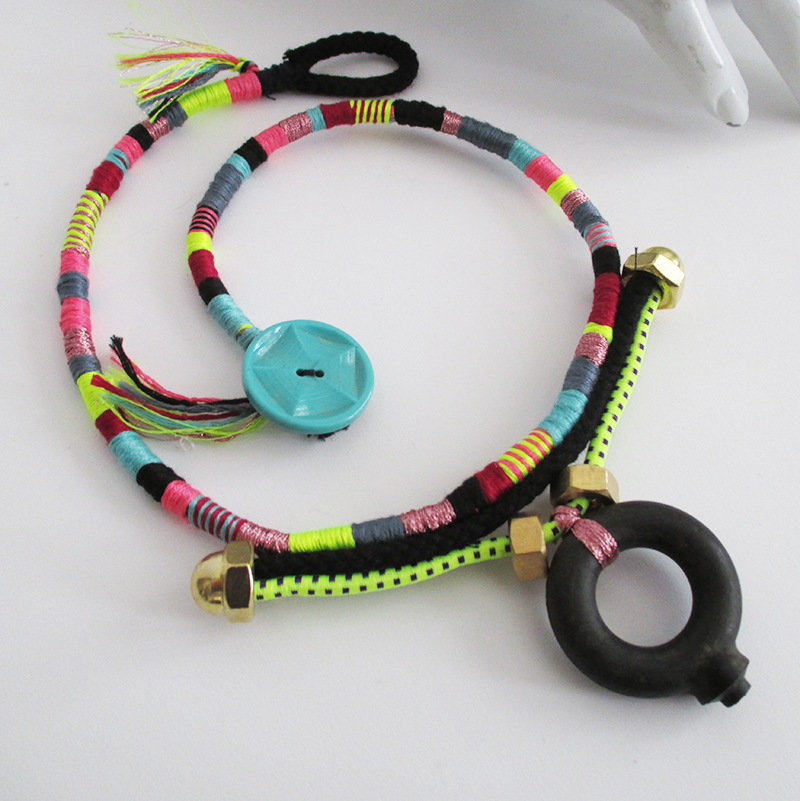
In my work as a designer, both my professional communications design and jewelry design, one of my very favorite aspects has always been the toggle between big picture thinking and small detail management. I’ll assert that having a love and capacity for both aspects of design is a rarity for the creative soul. For me, it took decades to reconcile the fact that I feel most deeply satisfied when both left-brain (creative) and right-brain (reasoned) thinking come into play. I like to make a mess, but I like to clean it up too. I love big ideas but I love tiny little decisions as well. I believe this series of new necklaces exemplifies what I’m talking about. Click on the images to see them much larger or visit with them on my flickr.
My strategic communications work is always in service of a story; whether about meetings for healthcare professionals or the annual findings of a trade association… a narrative unfolds in words and pictures, often with an actionable objective: Enroll, donate, attend. With jewelry, I’m up to the same kind of storytelling, although it tends more toward abstraction. Nothing compares to the excitement of ideas and meaning. I believe this is what we think of when we talk about design. What is the story we are telling, and, importantly why, and to whom?
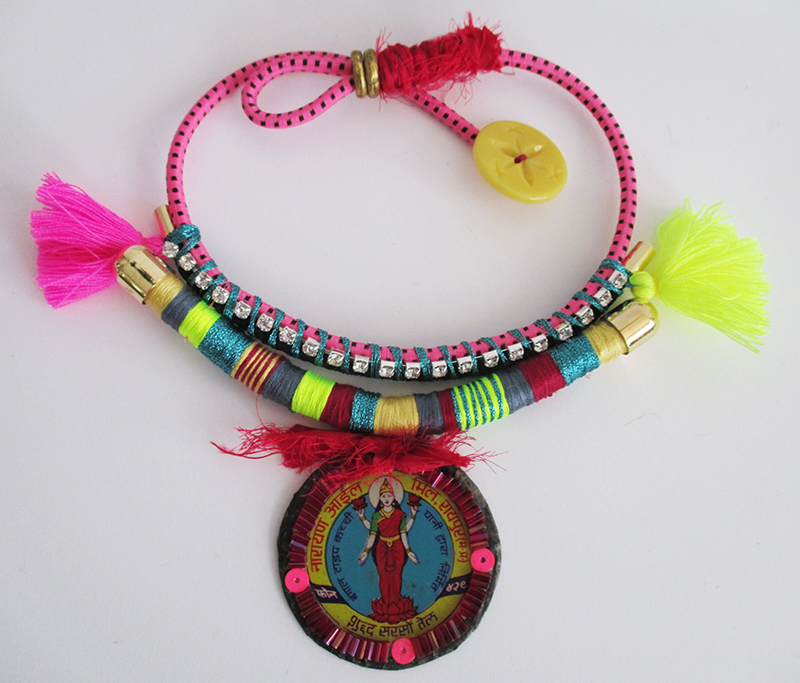
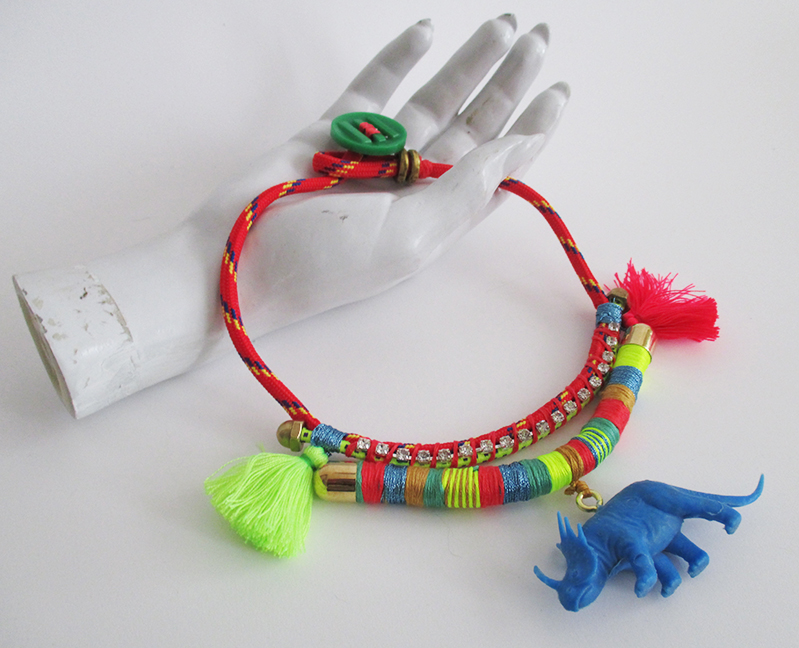
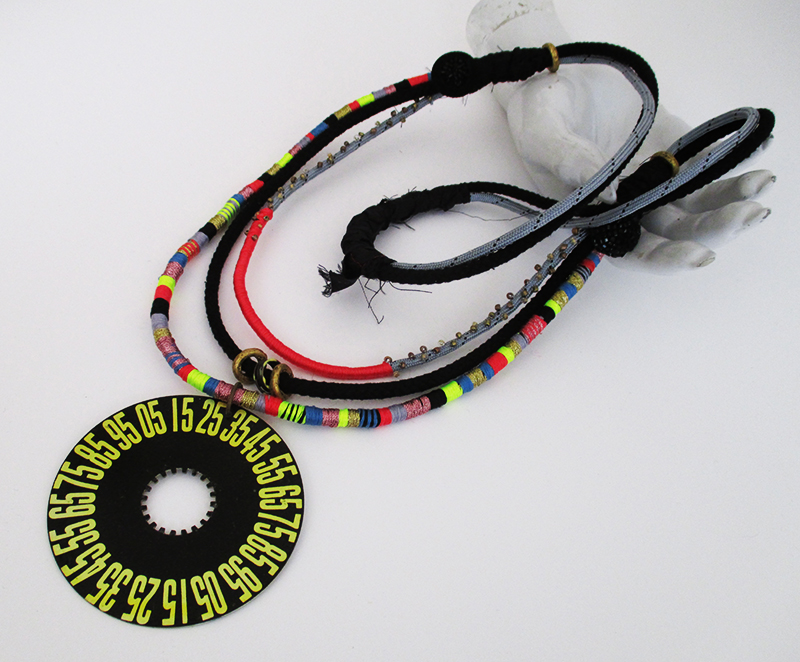
Making connections is part of this concept process, in communications I connect text with images in creative ways and with jewelry, I make, source, and bring together disparate elements… often from countries thousands of miles apart, and decades that now fall across two or even three different centuries. An early plastic button from the 1940’s or a glass Victorian one, beads from Africa, tassels from Asia, mid-century American toys, the tin lid of an oil can from India… how can these things possibly tell one story? With jewelry, the stories are sometimes gathered over years and finally come together unexpectedly. This is the part that seems magical (but isn’t, imho).
Once the elements are selected, located, obtained or made, the right-brain engages as I work out actual construction issues. Whether I’m creating style sheets in InDesign, or linking fine threads to metal… problems must be solved at a more micro level. I find this to be the most challenging place in the process; the place where I may want to turn away from the project and find something new to conceptualize, because that’s just so much more fun and flows more fluidly for me. That said, this construction place is also the land of greatest reward (soldering, for example!). When I stick to it and make something impossible work, I am so damn proud of myself! the storytelling comes easily and readily, like breathing. Am I lucky or cursed?
The final stage, or production, is the most micro of all. This is the time where most of the big picture problems are solved (though sometimes these can change even at this point) and where I buckle down to wrap tiny strands of thread around and around for hours, detangling as I go, or sit quietly and sew on minuscule beads one at a time, perhaps I’m styling text for hours on end, bold, italic, larger, smaller. I generally and truly delight in the zen of this work, though too much of it becomes boring and my mind will start to itch. This is why it’s great to have several projects going at once, a brochure being designed, another being produced… necklace concepts coming together, materials arriving from distant lands, pieces being made and photographed and shared.
Which stage(s) of design and making do you love most? Where do you have to push through difficulty or boredom? How does it affect your work? I’d love to hear from you!
Subject: Blog, Craft, Modern Art, They Call It Work | 1 Comment »
← Older posts


